Monday, May 31, 2010

Bistecca alla fiorentina


One does not always associate steak with Italian cooking, but one of the glories of Tuscan cuisine is, indeed, a simply prepared Porterhouse steak, grilled rare, over a wood fire: bistecca alla fiorentina, or literally 'Steak Florentine'. The dish is so typical that if you ask for a fiorentina in a restaurant, without saying more, this is what you will be served. 

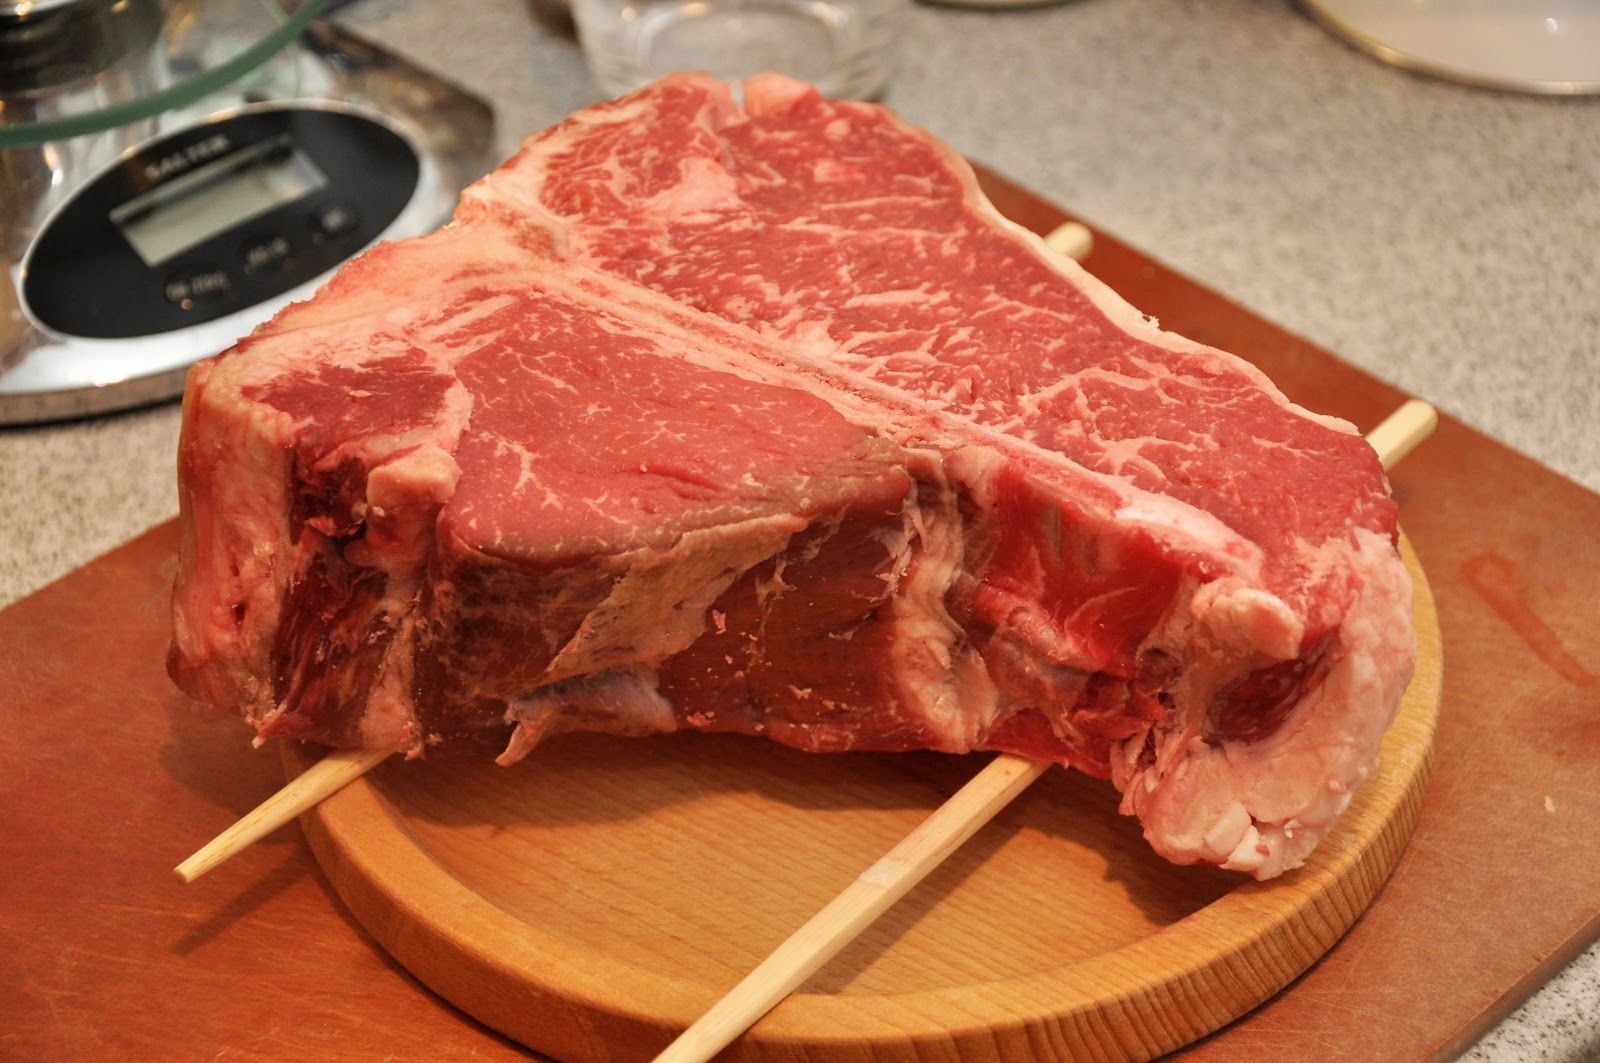
The recipe is exquisitely simple, but as for any other kind of steak, there are some  key points that you need to bear in mind, starting with the quality of the meat. In Italy, a true bistecca alla fiorentina is made with Chianina beef, raised in the Chiana Valley. Chianina beef is apparently now being raised in the US, although I have yet to find it in any market. You can make a beautiful steak with good quality beef of any origin. In the US, look for choice or, better, prime  grade meat. For this holiday meal, I found a beautiful side of prime Porterfhouse displayed at the local butcher, which could be cut to order—which brings me to another key point: a bistecca alla fiorentina must be cut thick, at least 1-1/2-2 inches (3-5 cm) but even better at 3 inches (7.5 cm) thick. This allows a nice crust to form on the outside of the steak while the inside remains rare. A fiorentina is never, ever served well done (nor, in my opinion, is any good steak). 

Preparing your steak for grilling. There are also certain preparatory steps that are critical to ensure the best results. If you get your steak from a good butcher, it should already be aged and rather dry to the touch—as it should be. But if you buy your steak in a supermarket, it is likely to be rather wet, in which case it helps to air dry it in the fridge for a few hours or even overnight. Place the steak on a rack or—if you don't have a rack—you can prop it up with two chopsticks, over a plate to catch any blood that may drip out. This will allow air to circulate around the steak, top and bottom, so it dries evenly. Even so, turn the steak every so often to ensure even drying on the outside and circulation of the blood inside the steak. If you air dry your steak for more than a few hours, cover it loosely with a towel to prevent the meat from drying out too much.
 

Even more important than air drying is tempering the meat: making sure that the meat is room temperature before you cook it. If you plan to eat the meat the same day you buy it, just leave it out until you plan to cook it (unless you live in a tropical or sub-tropical climate). But if you have refrigerated the meat, take it out of the fridge an hour or so before you plan to grill it, so that it come back to room temperature. This operation will ensure more even cooking. 

Grilling. Now get your grill nice and hot. (Some sources will warn against excessive heat, which supposedly can toughen the meat, but I have not found this to be true in practice, at least not with good quality meat.) Wood is the fuel of choice here—oak is traditional—or charcoal. If you must, a gas grill will do, although the final product will lack the characteristic smokey flavor of a true fiorentina. But don't sweat this too much; I make do with a gas grill myself. If you have a smoker box, pre-soaked chips of oak or another a mild wood will add character to your dish. 

Place the steak on the grill. If your meat is cut thick as it should be, lower the heat a bit, to 'medium-high', and grill it for five to ten minutes on each side, depending on the thickness of the steak (See notes below). If you like cross-hatched grill marks, place the steak across the grates diagonally, starting at 'ten o'clock':

 
Then, halfway through the cooking time for this side, turn the steak to 'two o'clock':


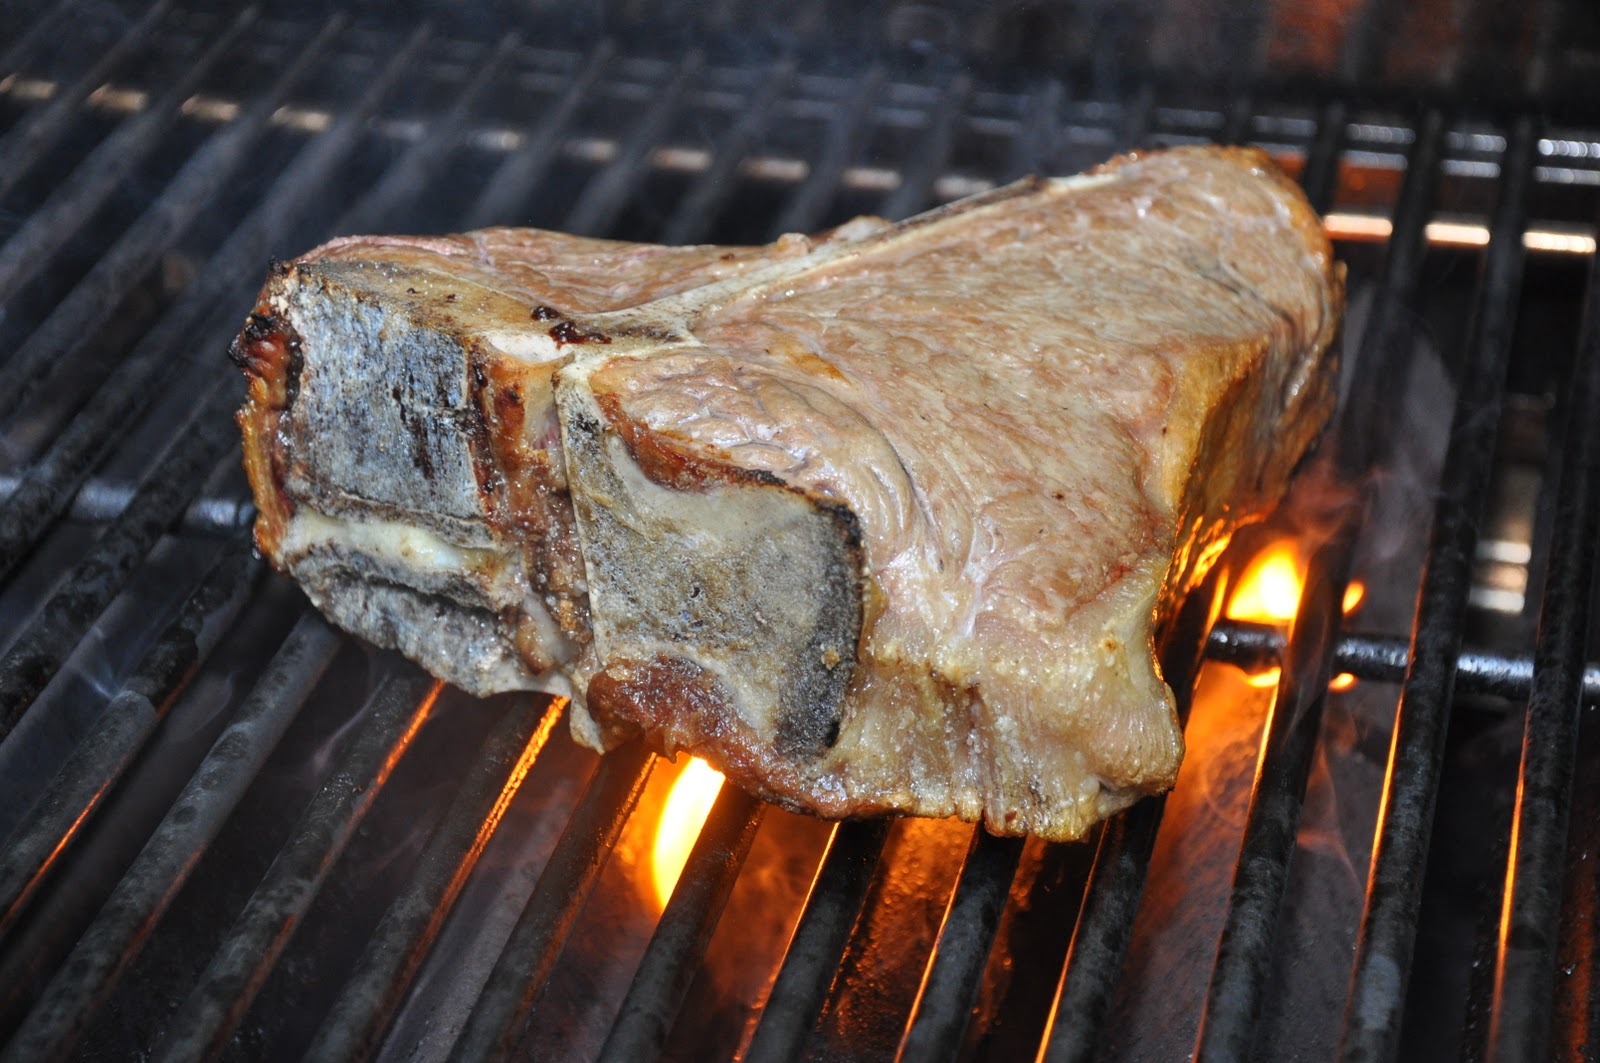
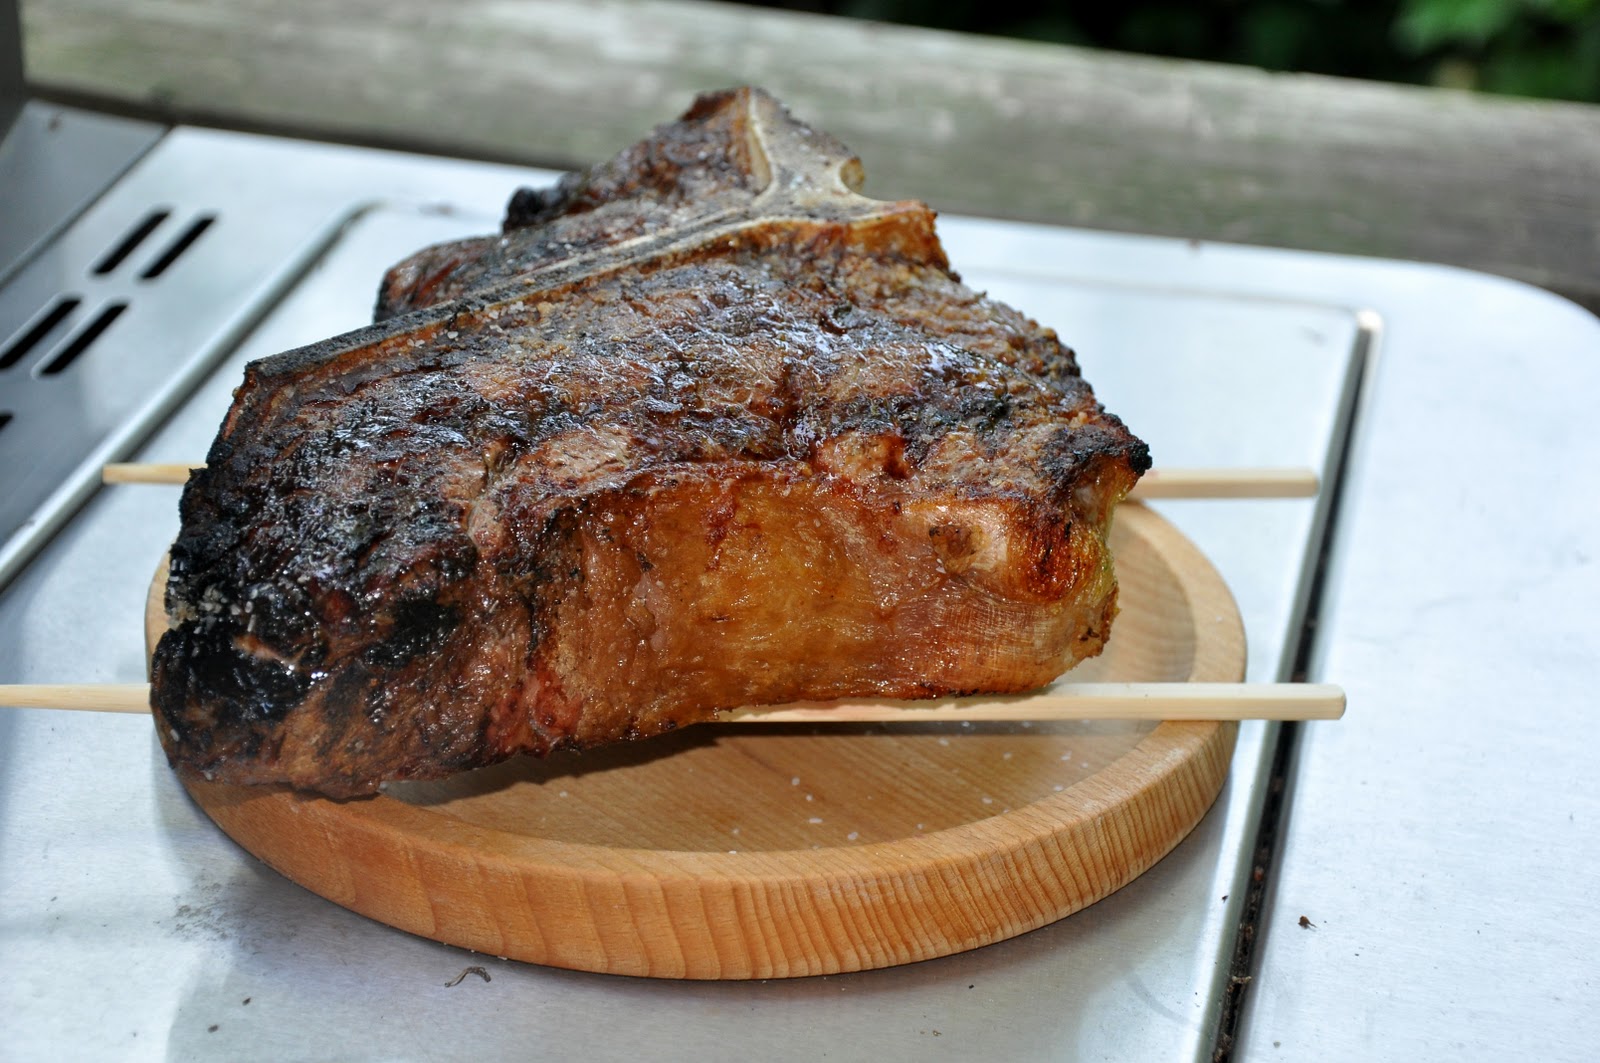
When you turn the steak over to cook on its other side, you will see the lovely cross-hatched grill marks that are the pride of so many 'grillmeisters' (see first photograph above). Now season the steak liberally with salt as the steak cooks on the other side, repeating the two and ten o'clock positions if you like. Turn the steak over and season it again on its just-cooked side. Finally, for a 3-inch monster, you can and should grill the steak on its flank for another five minutes or so, using the bone to prop the steak up. This will drive the blood away from the bone for more even cooking.
 

The total grilling time for a 3-inch monster fiorentina will be about 25 minutes (see Notes below for details on cooking times and testing for doneness.

Resting. After your steak is done, remove it from the grill and let it 'rest' for about ten minutes. This resting is another crucial step (perhaps the most crucial of all) that ensures that the meat will remain juicy when you carve it. Use a rack or chopsticks, just as you did for the air-drying, to ensure circulation all around the steak; this avoids the crust getting soggy underneath.


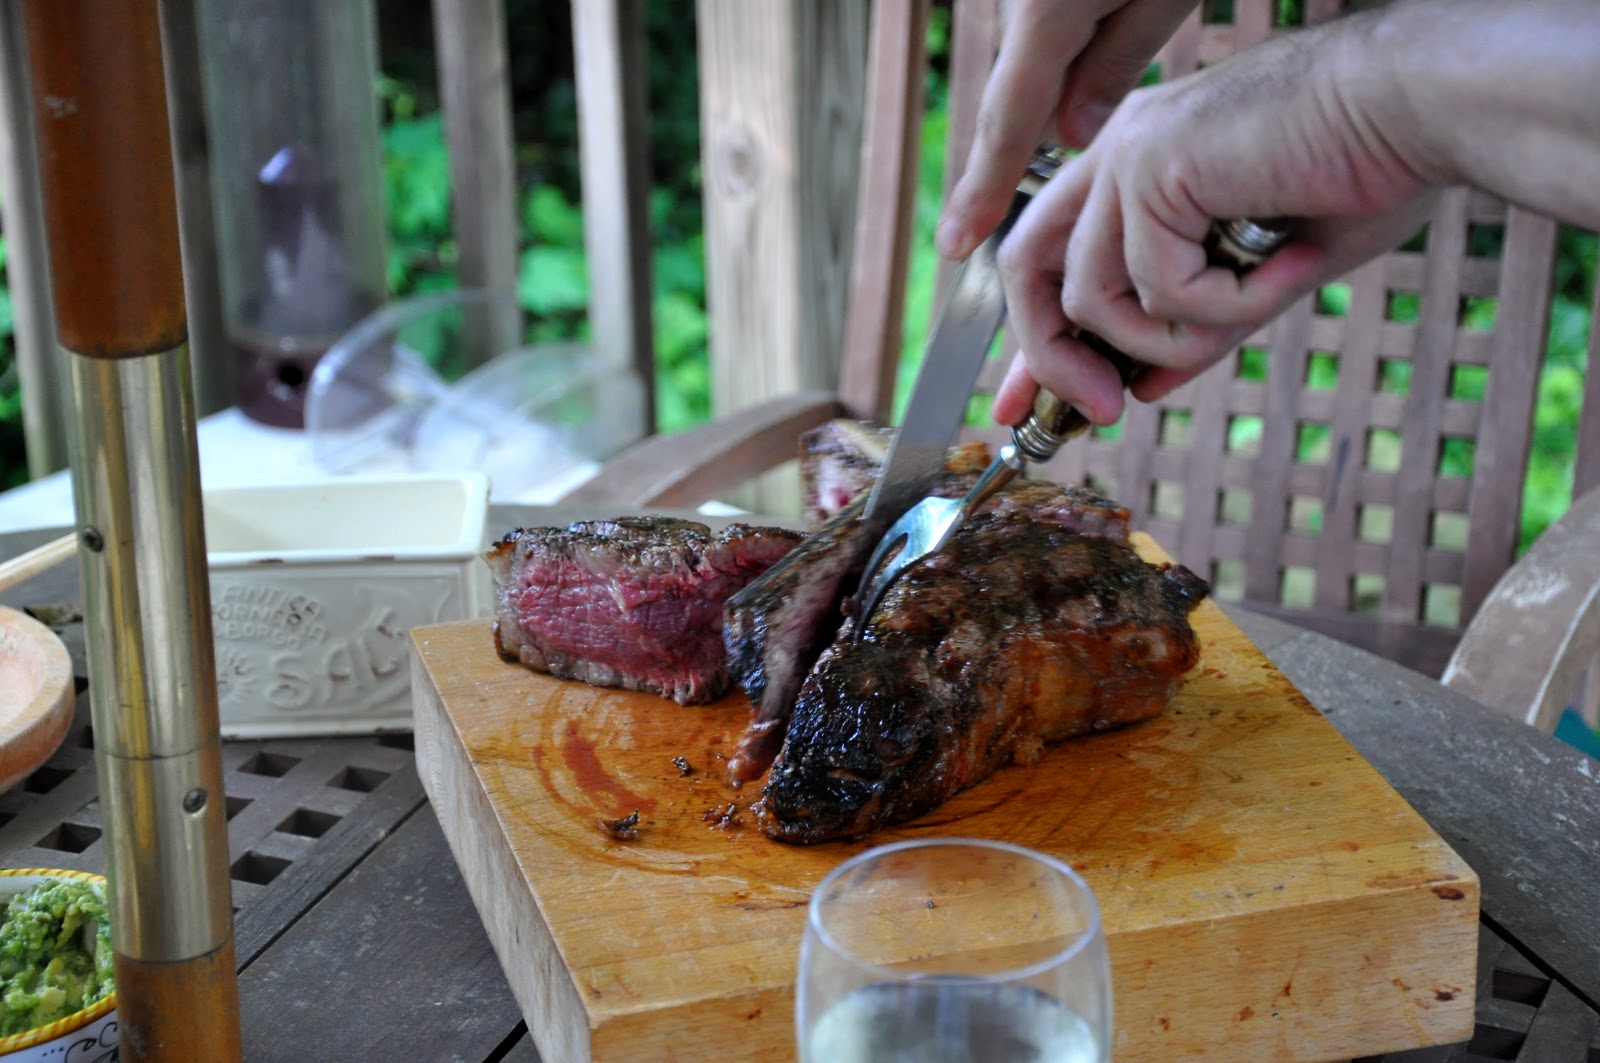
Carving and Serving. A fiorentina is too big to serve individually. It is typically carved up, first by removing the filet and then the contrefilet from the T-bone, then each against the grain:

Removing the filet (aka tenderloin)
 
Removing the contrefilet (aka strip steak)
Each diner helps themselves to as much steak as they want. Many people serve the meat with lemon wedges, but as far as I'm concerned a sprinkling of salt—and maybe pepper—is all this steak needs!
 

NOTES

Cuts of beef: While a top quality, thick cut Porterhouse steak like the one shown in this post is what you need to make a true fiorentina, this kind of eating does not come cheap. (The 'monster' shown here set me back a cool $90.) In our house, a steak like this is a treat for special occasions, so I don't mind the expense. Still, if you are looking to spend less, the same technique can be used for just about any cut you prefer. T-bone would be the next closest thing, followed by a strip steak (which is nothing more than the contrefilet served on the bone.) And my personal favorite cut for steak, a bone-in ribeye, also called a 'cowboy steak', is wonderful made this way. Of course, if you can't afford—or can't find—aged prime beef, 'choice' grade (which is what you are likely to find in a supermarket) will also be delicious. I would not use this technique on lower grades of meat like 'select', which really need some help—like a marinade—to make for good eating.

There is much debate among steak connoisseurs about the precise best way to prepare a fiorentina or, for that matter, any other steak. Here are some brief explanations of the major 'issues':

Seasoning. Some sources, including the august Artusi, solemnly warn against seasoning the steak at all before it is entirely cooked, on the theory that salt will draw out the juices. More modern sources allow seasoning the seared side of the meat, as suggested in this post. Other sources even recommend seasoning the meat before cooking—something that had been thought to be anathema but actually works well if you season the meat an hour or so before grilling, which allows enough time for the salt to penetrate the meat, which draws the juices back in. 

Turning while grilling. Then there is the traditional school of thought that the steak should only be turned over once. But more modern sources call for turning the steak several times, which is said to ensure more even cooking. I have tried both and, quite frankly, can't tell much difference in the taste or texture of the final product. Turning often does allow you to season the steak more thoroughly but you sacrifice those nice, neat grill marks. 

Dressing. Some of the earliest sources, including Artusi, call for dressing the cooked steak with a dab of butter. This touch, so uncharacteristic of Tuscan cooking, is said to have been invented for ex pats—specifically, the English—who played such a prominent role in the life of 19th century Florence (as portrayed in the film Room with a View). More common these days—and more consonant with Italian culinary tradition—is a drizzle of olive oil. 

Rubbing and Marinating. It is also common to rub the steak with some olive oil before grilling, which helps it brown and form a nice crust. Some sources (including Artusi, again) condemn the practice and says that it gives the steak a terrible 'off' flavor, but I have not found this to be the case. A nice rub of olive oil can help when you are using a less-thickly cut steak. When you are using a thick steak, you will have enough time for the steak to brown nicely on its own. You will even find some recipes for a 'fiorentina' that call for marinating the steak with rosemary, garlic and other aromatics. These variations can be delicious—and for lesser grades of beef, almost obligatory—but they are definitely not authentic. 

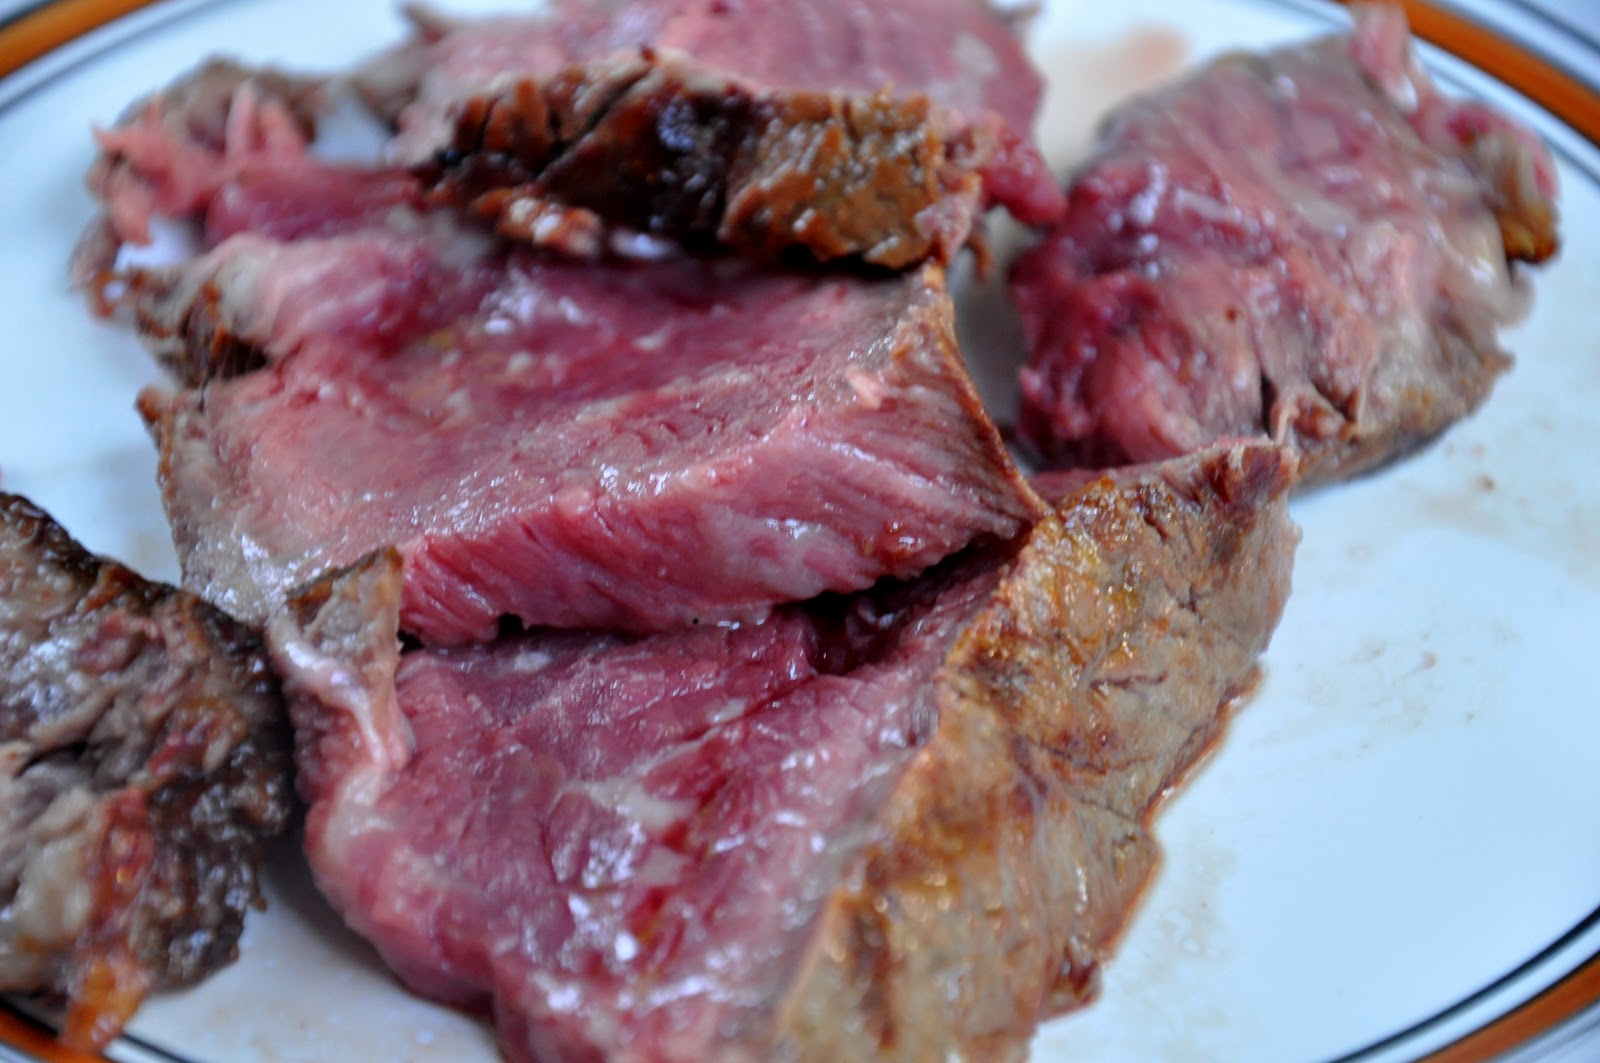
Cooking Times. As mentioned at the outset, a true fiorentina is served rare—very rare. For those who cannot stand the idea of a blood red steak—if you really must—you can serve it medium-rare. However, a well-done fiorentina is heresy. Most traditional recipes call for cooking the steak about 5 minutes per side, for a 1-1/2 to 2 inch (3-5 cm) steak, which makes for a very rare piece of meat. You can increase this to as much as 10 minutes per side for a thick cut steak. (This article contains a convenient chart on steak grilling times by thickness.) A 3 inch (7.5 cm) 'monster' Porterhouse will take a total of 25 minutes, including 5 minutes on its bone side, for a rare steak as pictured in this post. 

A properly cooked fiorentina is served very rare...
Testing for doneness. The most exact way of testing a steak for doneness is to use an instant-read meat thermometer. Steak is rare at 125 degree Farenheit (52 C), medium at 140F (60C) and well done at 170F (77 C). But using a thermometer will puncture the crust and allow juices to flow out of the meat, so most grillmeisters prefer the touch method, using the so-called 'rule of thumb': raw meat feels like the muscle just below your thumb (sometime called the 'mound of Venus', particularly in palmistry) when your hand is open or slightly cupped. If you if touch you index finger with your thumb, this muscle will contract a bit, becoming a bit firmer—the same firmness as a rare piece of beef. when you press it gently with your index finger Touch your middle-finger for medium-rare, and so on.  The following diagram illustrates this 'rule' well: 


And a final note on Tuscany's most famous butcher...I always associate bistecca alla fiorentina with Dario Cecchini, who may be the first—and only—celebrity butcher in the world. And here is short guide to the way Dario prepares this dish. Dario has his own website and blog. He has been featured on any number of 'foodie' TV shows, including Gourmet magazine's Diary of a Foodie and Anthony Bourdain's No Reservations. It's well worth catching one of these episodes if you can: Dario is quite a character—the only butcher I know who regularly quotes Dante!
 
The remains of the day... 

Notice that a properly prepared steak, even when served very rare, exudes only a minimal amount of blood. Those delicious juices are still inside the meat....
 

Saturday, May 29, 2010

Zuppa di pesce alla napoletana


Italy, being a rather slender peninsula, is a country where the sea is rarely too far away. And, of course, the products of the sea play a major role in its cuisine. And so it is not suprising that zuppa di pesce, or fish soup, is a dish that you will find almost everywhere in many guises. In Tuscany they call their version of it cacciucco, and on the Adriatic coast, they call it brodetto, or 'little broth', and you will find variations of it from Venice all the way down to Abruzzo. (Further down the coast in Puglia, the name reverts to zuppa di pesce.) Although called a soup, it is actually more like a stew.

Zuppa di pesce is said that have been invented by fisherfolk, who in the days before refrigeration needed a convenient way to prepare all the unsold bits and pieces of their daily catch. So why not throw them all together in a pot to simmer with some aromatics and water or, if you could afford, white wine? When the tomato became a central part of Italian cooking, especially in the south, many local variations of fish soup turned various shades of red. 

The Neapolitan zuppa di pesce is perhaps the simplest and purest of all the fish soups in Italian cookery: you begin by sautéing a few slightly crushed garlic cloves in abundant olive oil. If you like, you can add a bit of peperoncino to sauté in the olive oil along with the garlic. When the garlic begins to give off its aroma and is just barely beginning to brown, you add tomato—ideally, the pulp of fresh, perfectly ripe San Marzano tomatoes, but otherwise use best quality canned tomatoes that you have run through the largest holes of a food mill. Season with salt and pepper (going light on the salt since the shellfish will be salty) and finely chopped parsley, then allow the tomatoes to simmer for about 10 minutes or so, or until they begin to reduce and reach a saucy consistency. Then add a splash of white wine. 

It is now time to add your seafood, starting with the varieties that take the longest to cook, then progressively adding those that take less time. The origins of the fish soup being what they are, the choice of seafood is pretty loose. But the Neapolitan version will almost always include one or more kinds of mollusks such as squid, baby cuttlefish or octopus, clams or mussels or both, and a variety fish with fins. The fish was, as mentioned, the local catch, so many local varieties of fish, most of them small and some quite bony but flavorful, can be thrown into the pot. Larger fish can be cut into serving or even bite-sized pieces. The most typical fish of all is scorfano, called 'scorpion fish' in English. (Scorfano is also typical of the Tuscan cacciucco and some of the Adriatic brodetti.) Triglie—red mullet—is also a common addition. But any firm-fleshed fish that lends itself to simmering will do: monkfish, snapper, catfish, sole. Last night I added some cut up halibut, and it was very nice. Although less typical of this kind of fish soup, sea scallops and shellfish are make nice additions. The more variety, the better the soup they say. 

You always begin with the mollusks, since they will take some time to cook. With very young calamaretti (baby cuttlefish) let them simmer about 10 minutes before you add any other fish. Octopus or mature squid (which you should cut up into bite-sized pieces) will take much longer, usually about 30 minutes, although you can sometimes find pre-cooked octopus that only needs heating up. Then add you fish and let that cook for another five to ten minutes, depending on the size. Then, finally, add the clams and mussels and simmer them until they open—if, that is, you are confident that they are free of sand. If not, steam them separately and add them at the very last moment, along with their liquid, strained to eliminate any sediment, just long enough for them to heat through. Sprinkle with a bit more finely chopped parsley and serve immediately.

Measurements are not particularly important in this rustic dish. The amount of tomato will greatly influence the end taste. Some recipes call for a lot of tomato—equal in weight to the seafood—but most call for about half as much by weight. The ratio among the various kinds of seafood is pretty free as well, but I find a good rule of them is to use about as much fish as other sorts of seafood. Or you can eliminate the fish altogether, and just use the mollusks and some shellfish like shrimp or crab, in which case you will have zuppa di pesce senza spine, or 'boneless' fish soup.

Zuppa di pesce is usually served with toasted bread, rubbed with garlic and sometimes drizzled with a bit of olive oil. The bread is also wonderful fried in olive oil—but that can be a bit heavy for modern tastes. I often just use bread to sop up the wonderful juices, an act that Italians call fare la scarpetta, meaning 'to make the little shoe' (see Glossary for details). 


NOTES: There are some minor variations among the recipes, mostly concerning when to add what. Some recipes call for adding the squid and/or octopus directly to the garlic soffritto, before the tomatoes. Some call for adding the wine either before the tomato or at the same time. And the parsley can be added at almost any time, along with the garlic at the very beginning, or at very end. And, depending how pervasive you want the garlic to be, you can use it slightly crushed (my favorite) or chopped or sliced. A few recipes call for onion instead of, or in addition to, the garlic—but onion is more typical of the northern types of fish soup.

It probably goes without saying, but any leftovers make a lovely sauce for spaghetti or linguine, not unlike the well-known dish spaghetti or linguine allo scoglio.

As mentioned, there are many varieties of fish soup to be found all over the country. You could write a book (or a blog) just about all the different versions. I plan to blog at least on the most famous of these, like cacciucco alla livornese and the broèto from Venice, in the future. 

And fish soups are not just limited to Italy. There are versions from all over the Mediterranean and beyond. The most famous one of all, without a doubt, is the wonderful Provençal bouillabaisse. The Greeks have their kakavia and the Spanish their sopa de pescado y marisco, and various fish soups can be found all over Latin America. And, of course, let's not forget the cioppino from San Francisco.

Friday, May 28, 2010

Céléri rémoulade


I normally like my salads with a simple oil and vinegar dressing in the typical Italian manner, but once and a while I get the urge for one of those rich and creamy salads like cole slaw or Russian salad … or this French classic: céléri rémoulade, shredded celery root dressed with a mustardy mayonnaise.

With the help of a food processor, the dish is quite simple to make—even simpler, actually, than cole slaw. First, you peel the celery root with a knife (the skin is too tough and irregular for a peeler), cut  it into chunks, and then shred a celery root in a processor. Immediately fold in a good cup of mayonnaise, enough to dress the celery root well—along with a generous dollop of Dijon mustard, a splash of vinegar (or some freshly squeezed lemon juice), salt and pepper. If you like, you can some chopped parsley for extra flavor and color. Refrigerate for a good hour or more before serving. 

To this basic rémoulade dressing, you can add some extra flavorings if you like, such as capers or chopped cornichons or some other herbs like tarragon, chives and/or chervil. The Larousse Gastronomique suggests finishing the sauce with a bit of 'anchovy essence'—whatever that is (anchovy paste?). Some recipes call for adding the yolk of a hard boiled egg to a raw egg yolk to make the mayonnaise, assuming you are making it by hand. As an unorthodox variation, you can lower the caloric content a bit by folding in some sour cream in lieu of some of the mayo, in which case best to go light on the vinegar or lemon juice.

Sauce rémoulade is quite versatile. It is lovely served with all sorts of cooked vegetables, as an accompaniment to poached or roasted fish or even with a nicely grilled steak.

Sunday, May 23, 2010

Lasagne agli asparagi


A good dish of lasagna is one of the most satisfying meals I can imagine. But, to be honest, a dish of classic lasagne alla bolognese can be a bit on the heavy side, especially as the weather gets warmer. That's the beauty of vegetarian lasagne; if not exactly dietetic, they are lighter than meat-based lasagne and yet totally satisfying. You can make lasagne with almost any vegetable, but perhaps my favorite is made with asparagus, the most elegant and, to my taste, most toothsome of Spring vegetables. 

The basic technique is just the same as for lasagne alla bolognese (see this post for the recipe): begin by preparing a batch of fresh pasta, then a good portion of béchamel sauce. But instead of the ragù, you prepare a bunch of asparagus two ways: Take a bunch of asparagus, trim and peel them, then boil, or better, steam them in lightly salted water until tender—not crisp tender or mushy, but fully tender. Cut off the tips and set them aside, and purée the remaining stems in a blender or food processor with a bit of béchamel sauce. Season the purée with salt to taste—it should be quite savory. 


Now assemble your lasagna just as you would classic lasagne: place a layer of pasta in a buttered baking dish, then a thin layer of béchamel, followed by a layer of asparagus purée, then place a few asparagus tips here and there, then sprinkle generously with grated parmesan cheese. 


Keep on layering in this way until you have used up your ingredients—or until you have laid down four or five layers of pasta. (This kind of lasagna should not be too thick.) Cover with a layer of béchamel, sprinkle with more grated parmesan and dot with butter. 


Bake in a hot oven (400F/200C) for about 20 minutes or so, until the top is lightly browned. Allow the dish to settle and cool for 10-15 minutes or more—see below—before serving. 


NOTES: The basic technique for this vegetable lasagna is really quite easy once you get the hang of making the béchamel and fresh pasta. And it can almost be an every-day dish if you use store-bought fresh pasta, although, as I've commented before, finding true fresh egg pasta suitable for this kind of lasagna can be a challenge. If you use no-boil lasagna sheets, make sure to make a rather loose béchamel and slather it abundantly over the pasta, as unboiled pasta absorbs a lot of sauce. I've hit upon another substitution that, however unorthodox, I like better: egg roll wrappers. Yes, egg roll wrappers.  While they lack the rich egg flavor of homemade pasta, they have the same fine, silky texture as very fine homemade egg pasta. And you add them directly to the baking dish, no pre-boiling necessary, saving considerable time and effort. 

If you want a richer dish, you can sauté the asparagus tips in butter before adding them to the dish. And you can also make the dish even more savory if you like by allowing the asparagus purée to insaporire in a soffritto of butter and shallots before folding in a bit of béchamel. In the alternative, instead of asparagus purée, you can sauté both tips and stems in butter, along with a bit of shallot, and layer them over the béchamel. And some versions of this dish really go to town, adding bits of soft cheese like a fontina or bel paese, and/or shredded prosciutto along with the asparagus tips. 

You can make all sorts of vegetable lasagne using the same basic method. For vegetables (like mushrooms) that don't purée too well, you can simply slice them thinly and sauté them in butter or oil, along with a bit of shallot or onion  or garlic (depending on the vegetable and the effect you are after). If fact, almost any  sauteed contorno can do service to stuff lasagne in this way: funghi trifolati, piselli alla romana... You can even make lasagna with a combination of different vegetables, with each layer of pasta dressed with a different vegetable. There is really no end to the variations you can dream up. And with all that lovely bechamel and butter, they are all delicious! 

It is very important to let the dish rest for some time before serving. Not only is the pasta scalding hot when it has just come out of the oven, but as the dish cools it also firms up a bit. If you serve lasagne direct from the oven, it will fall apart when you serve it. And the longer you wait, the firmer the dish will be. A 10-15 minute wait is the minimum, but you can let it rest for up to 30 minutes. And don't worry, it will still be nice and warm.

Nota bene: More tips on lasagna-making are included in the post on lasagne alla bolognese.
 

Saturday, May 22, 2010

Costolette alla milanese


One of the pillars of Milanese cuisine, costoletta alla milanese (locally also called cotolette alla milanese) are nothing more than a breaded veal chop browned in butter. It's so typical, in fact, of the cooking of Milan that if you just ask for 'una milanese' in a restaurant in Italy, this is what you'll be served. Simple but really, really good! 

You take a veal chop, bone in, and flatten it slightly with a meat pounder or the back of a skillet—not too much, because you want the chop to cook evenly, which it won't do if the meat is much thinner than the bone. Remove any silverskin you may find around the edges of the chop. (This prevents them from curling up as they cook.) Then pass each chop in some beaten egg, seasoned with salt and pepper, and then in bread crumbs, pressing the bread crumbs into the chops to make sure they adhere well. 

Heat a generous amount of butter—a whole stick—in a skillet, over moderately high heat, allowing the butter to foam up. When the foaming subsides, add the chops. Don't crowd them, but at the same time, if you leave too much empty space in the skillet, the butter may burn. Regulate the heat so that the chops brown nicely with the butter darkening too much or burning. (Adding a bit of vegetable oil helps prevent the butter from burning.) When the chops are nicely browned on both sides, serve immediately, sprinkled with some sea salt and, if you like, lemon wedges on the side. 

NOTES: Like any dish of few ingredients and a straightforward cooking method, the key to success is the quality of your raw materials. The veal, of course, is key. The best veal for this dish is milk-fed veal, which has a lovely light pink flesh and an exquisitely delicate flavor. This young veal produces a thin chop that cooks rather quickly. But they are hard to find. 

Most veal sold in the US is older, closer to baby beef (vitellone in Italian) whose meat is darker and more strongly flavored. And since the animal is older, the rib bones will be quite large, making for a thick chop, usually surrounded  by a layer of fat, looking very much like a ribeye steak. These big chops are fine for grilling, less fine for this treatment. Still, you can approximate the taste of a true milanese by prepping it like this: first, trim the chop well of it outer layer of fat, then flatten it, then soak it in milk seasoned with a bit of salt a good 30 minutes to an hour. You'll need to brown a thick chop at a lower temperature to make sure it cooks through; the chop should be juicy but well done. And if the chops are really thick, brown them on the stovetop and then transfer them to a moderate oven (350F/180C) for 15 minutes or so. Test the meat by feeling it with your finger: the meat should be firm to the touch. If you're not up for so this much complication, you can opt for making cotoletta rather than a costoletta (see below).

The breadcrumbs are also important. The main thing to avoid is using so-called 'Italian' breadcrumbs sold with various 'seasonings' in them. Use plain breadcrumbs or 'Panko' if you like. Even better, make your own fresh breadcrumbs from some day-old bread in the food processor. It's a great way not to waste good leftover bread that's too hard to eat. 

There are a few minor variations on this dish, the most common being the addition of grated parmesan cheese to the egg wash or the breadcrumbs. Some folks like to add a bit of grated nutmeg to the egg, which is nice if used discretely. Some recipes omit both the salt and pepper from the egg, and call only for adding salt when serving. Artusi includes an unusual version (at least these days) with a prosciutto, parsley and cheese stuffing. And one variation that I heartily recommend: Some friends from Milan once recommended a nice Summery way to serve a milanese: with tomato salad, made without lemon or vinegar, on top of the just-cooked chop. Although it doesn't sound particularly special, the taste combination is really quite unexpected.

The milanese is often served with fried potatoes as a contorno, but personally I prefer a simple green salad, some peas stewed in butter or some greens in padella.

Veal is expensive, of course. The same technique can be used on all kinds of less expensive meats, including pork chops. And of course, you can use the same technique to cook scallops of veal, pork, turkey or chicken without the bone, in which case you have breaded cutlets, or cotolette without the 's' in  standard Italian, although apparently in Milan they call the bone-in version cotolette as well. A bit confusing, I know...

You may have noticed a similarity between cotolette alla milanese and Wiener Schnitzel. That should not be surprising since, Milan (most of northern Italy, in fact) was under Austrian rule for most of the 18th and 19th century, after the Treaty of Utrecht (1713), which ended the War of the Spanish Succession, assigned Spain's Italian possession to Austria. In any event, there was (and is) much Austrian influence in Milan and, at least in things culinary, vice versa. The Italian gastronome Giuliano Bugialli maintains that the Wiener Schnitzel is the Viennese version of the milanese, not the other way around.

Thursday, May 20, 2010

Pinzimonio


When things are really hectic at work, as they are now, even a hardcore food fanatic like myself doesn't always feel like cooking. Or perhaps you've had a heavy lunch or midday dinner and feel like a light dinner. Or you're looking for something to serve an easy and convivial antipasto to start a warm weather meal or a light something to serve with drinks? Well, for times like these, may I recommend the classic Tuscan pinzimonio

Pinzimonio is, quite simply, olive oil, seasoned with salt and pepper in which various crudités of your choice can be dipped. It's healthy, it's easy and it's almost infinitely variable. If you have decent knife skills, you can make enough to serve four in five minutes or under. 

The choice of vegetables is yours, but a typical pinzimonio will include carrots, peeled and cut into matchsticks, celery and/or fennel, also cut up into dippable pieces, and radishes. From there, you can add any other vegetables that you enjoy eating raw: tomatoes, cut into wedges, green onions, ramps, very tender asparagus… Other common vegetables include bell peppers and cauliflower, although personally, I don't care for these vegetables eaten raw. And although really tender raw baby artichokes are a favorite served in pinzimonio, I've yet to find any State-side that aren't unpleasantly bitter when eaten raw. 

To the dipping oil, you can add additional ingredients if you like to spice things up—freshly squeezed lemon juice or wine vinegar, a bit of mustard or some minced garlic, for example—but I prefer the simplicity of olive oil, salt and pepper. Of course, use the best possible quality ingredients that you can find: impeccably fresh, young Spring vegetables that the Italians call primizie dipped in fruity, cold-pressed extra-virgin Tuscan olive oil, sea salt from Trapani and freshly ground Tellicherry black pepper would give you the ne plus ultra version. 

The name 'pinzimonio' is a combination of the word pinze, or tweezers, and matrimonio, or marriage, referring to how you pinch the vegetables between two fingers (the tweezers part) and marry it to the seasoned oil. Poetic, no? The term is sometimes used, in error, as a catch-all for any dish of crudités served with a dipping sauce. 

And speaking of knife skills, a great place to learn them online is by watching the excellent instructional videos at the Rouxbe Online Cooking School.

Monday, May 17, 2010

Pollo alla diavola


Pollo alla diavola, or Devil's Chicken, is a simple and delicious way to grill chicken. 

Begin by butterflying a young chicken: cut away the chicken's back bone with kitchen shears and spread the chicken flat, skin side up. Cover the chicken with a sheet of waxed paper and, with the bottom of a frying pan, give the chicken a few good whacks to flatten it even more, but without breaking it up. 

Place the chicken on a platter and season it generously on both sides with olive oil, salt and red pepper flakes. To this, I often add the juice of half a lemon. Let the chicken marinate for about an hour or so. 

Heat up your grill and grill the chicken on both sides, over a moderate flame, until nice and golden brown all over, about 15-20 minutes per side. A little charring on the edges is perfectly fine—and even desirable. I find that a grilling basket makes the job very easy and helps keep the chicken flat, but you can simply place the chicken directly on the grill if you prefer, placing a brick or other heavy weight on top to keep the chicken flat.

NOTES: The better the chicken, of course, the better the flavor will be, so an organic, free-range chicken will really make a difference. But the beauty of the marinade is that it will lend flavor even to those bland 'industrial' chickens—just up the seasoning to make up for the flavor deficit. 

The marinade can include other elements if you like: fresh rosemary leaves, freshly ground black pepper, either in addition to or instead of the red pepper, even Tabasco sauce. The proportions are entirely to taste. I like to add enough pepper to make the dish spicy—that is the defining characteristic of the dish—but not so spicy that it overwhelms the taste of the chicken itself. The longer you marinate, of course, the more intense the flavors will become. I find an hour is quite enough, but you can prepare it several hours ahead and put it in the fridge. You can even skip the marination stage; just dress the chicken and place it on the grill immediately.

If you don't have a grill or prefer to cook indoors, the chicken can be made al mattone, either in a terracotta cooking vessel specially made for the purpose, or on a griddle or in a heavy skillet or sauté pan, weighed down on top with another skillet or—as the name suggests—with a brick. Why all this trouble to keep the chicken flat, you ask? It ensures that the chicken cooks quickly and evenly, and gets nice and crusty all over.

The name "Devil's Chicken", as you may have guessed, is a tongue-in-cheek reference to the 'hot as Hades' nature of the dish and, I surmise, the well-charred exterior of the bird.

Saturday, May 15, 2010

Risi e bisi


Sweet, fresh peas in their pods can be hard to find, but when I spotted some in a local market I grabbed them up to make a delicious Springtime dish from the Veneto: risi e bisi, or rice and peas in Venetian dialect. Although it resembles a risotto, the technique is quite different. 

Shell your peas but don't throw the pods away. Rinse them and put them in a stockpot with a sliced onion and two sliced carrots, a pinch of salt and just enough water to cover. Simmer for a good half hour or more until you have a flavorsome broth.

Now make a soffritto with very finely chopped onion, pancetta and parsley (a food processor makes short work of the task) gently sautéed in butter and a bit of olive oil. (Some recipes call for a bit of garlic) When the onion is soft and translucent, add your shelled peas and a ladleful of the pea broth. Cover and gently simmer the peas over low heat until they are almost tender. 

Now add the rest of the broth and the rice—preferably Vialone nano but Arborio will do in a pinch—and continue simmering until the rice is tender, stirring from time to time. Add more broth or water if the rice dries out—but this is not a risotto where you should be adding liquid little by little. Remove from the heat and stir in a nice portion of freshly grated parmesan cheese and another nut of butter, continuing the stir until the cheese is entirely incorporated and the rice has taken on a nice, creamy consistency. Serve immediately. The dish should be rather liquid and flow easily, all'onda or 'like a wave' as they say in Italian, the typical of the rice dishes of the Veneto. Some versions are even wetter, almost a soup.

The key measurement is the ratio of pea to rice. Most recipes calls for a ratio of roughly 3:1 by weight, counting the weight of the unshelled peas vs. uncooked rice. I usually follow the rule of about 75g (2.5 oz.) of rice per person, which makes for 200g (7.5 oz.) of peas, rounding off. 

NOTES: I am usually a fan of frozen peas, but for this dish only fresh peas will do, not only because you won't have the pea pods for making the broth—which gives the dish its characteristically deep pea flavor—but also because frozen peas cook much too fast, so they will be entirely done long before the rice is.

There are some variations on the theme, as is usually the case with these mythic dishes, but the recipes you will find are remarkably consistent. The cookbook of the Italian Academy of Cuisine gives a second recipe for risi e piselli—not called risi e bisi—which has you adding the broth ladleful by ladleful, like you would for a risotto. The book explains that risi e bisi is typical of the Lumignano, a mountainous area in the province of Vincenza, while the latter variation was much in use in Venice during the Doge's festivities, although Padova claims to have invented the dish. 

Other variations include adding the peas only after the rice has cooked for about 10 minutes or so, for which you will need very tender, young peas, since they will only cook about 10 minutes total. You can also use some of the peas or the pods and purée them, as in this lovely rendition by my foodie friend and professional chef Carmelita of the Bologna-based Cook Italy cooking school, a technique which lends a lovely green color to the dish and gives it an even more intense pea flavor. Some recipes call for adding the chopped parsley at the end, as part of the final mantecatura, rather than as part of the soffritto. Some recipes call for prosciutto rather than pancetta. And, if you like, you can use meat broth in which you simmer your pea pods rather than water, which will produce a richer dish but less purely pea flavored. 

And if you really must use frozen peas, I would opt for puréeing some of the peas for extra flavor, and using meat or vegetable broth. Use a ratio of peas to rice of about 1.5:1. 

The dish is easily made vegetarian simply by omitting the pancetta, and can be 'veganized' by using oil instead of butter and omitting the cheese—although at that point you are getting rather far afield from the original.
As noted, the rice to use with this dish is Vialone nano, a variety that is native to the Veneto, more specifically to the area known as the bassa veronese, the plains that extend south from Verona. I've raved about this rice before, and it's excellent for all kinds of risotto, but it is practically essential for this dish. 

A vialone nano rice paddy in the bassa veronese

Tuesday, May 11, 2010

Piselli alla romana


Now this may be the shortest post I may ever write, as this tasty and elegant side dish is about as simple as a recipe can get, short of boiling water. 

Make a soffritto by sweating some finely chopped onion in olive oil until translucent. Add some prosciutto, cut across the grain into thin strips, and continue cooking just until the prosciutto has lost its 'raw' look. Then add peas—frozen peas will do nicely—and stir. Allow the peas to cook and absorb the flavors of the soffritto. If using frozen peas, this will take no longer than five minutes. Season to taste and serve! 

NOTES: This is yet another one of those dishes where measurements don't much matter, but for a bag of frozen peas, a half onion and two slices of prosciutto should be enough to flavor the peas nicely. This is a dish where you need not use the finest San Daniele prosciutto. 

If using fresh peas, the cooking time may be considerably longer, depending on how fresh the peas actually are. But don't overcook them or they will lose their sweetness. 

Two fine variations are piselli al guanciale and piselli alla pancetta, which use guanciale or pancetta instead of the prosciutto. They are more 'down home' but every bit as delicious.

Sunday, May 9, 2010

Saltimbocca alla romana


One of the most famous of all meat dishes in the Roman culinary repertoire, these veal scaloppini known as saltimbocca typify Roman cooking in their simple, lusty deliciousness. And they are really quite easy to make, too, so long as you keep a few cardinal points in mind. 

You begin with slices of veal known as scallopine. Trim off any loose meat or connective tissue and pound them very thin between two sheets of wax paper (or plastic wrap), then lay a thin slice of prosciutto and a single sage leaf over each slice of veal. Skewer them all together with a wooden toothpick like this:


Then heat a skillet or sauté pan large enough to hold all your veal slices comfortably until properly hot  (see link below) and add a bit of olive oil and butter. When the butter melts, add your veal slices, with the prosciutto and sage side facing down, and allow it to brown for just a minute.  (NB: The prosciutto will harden if it fries too long.) Then flip each over and brown on the other side, again for only a minute or so, seasoning with salt (just a bit, since the prosciutto is already salty) and pepper: 


Remove the veal slices from the pan and arranged on a warmed serving platter. Then deglaze the sucs that will have formed in the pan (assuming you've used stainless steel, see Notes below), remove the pan from the heat and swirl in a dab on butter until it has completely melted, and pour the resulting sauce over your veal slices and serve immediately. 

NOTES: The main 'trick' to this otherwise easy dish is to ensure tenderness. Veal scallopine are typically cut from the top round. You can find them pre-sliced in the better supermarkets or butchers, but they are rarely made correctly here in the US. They should be cut across the grain but are almost always cut with the grain, which means the muscle fibers remain intact and the meat tends to curl and toughen as it cooks. What to do? Well, if you are on good terms with your butcher (assuming that you have a butcher, a professional that is sadly quickly disappearing) you can ask him to give you properly made scallopine. Otherwise, it becomes essential to pound the meat very well. The pounding will partially break up the fibers and tenderize the meat. And make sure that you trim off any silverskin or other connective tissue attached to the meat.

Like many traditional dishes, saltimbocca has a good number of variations. The oldest recipes I have found—including the recipe given by the romanissima Ada Boni and by Artusi—call for cooking the dish entirely in butter and using water, not wine, for the final deglazing. These traditional techniques are repeated in the authoritative La cucina romana e del Lazio by L. Jannattoni. The official cookbook of the Italian Academy of Cuisine, on the other hand, calls for deglazing with wine (but no final butter enrichment).

Most modern recipes, however, including almost all the ones you are likely to find online, call for adding the wine to the pan while the veal slices continue to cook—some recipes call for just a bit, others for a generous pour. This adds flavor to the meat and, even if I usually find the original versions of traditional recipes more appealing, this is one modernism that may actually improve on the original. A number of modern recipes also call for lightly flouring the veal slices, which, of course, aids in browning them and provides for a nice liaison for the sauce. If you do this, however, you will need to add wine, and a fair amount at that, or else you will wind up with a stodgy, gooey sauce—which is all too often what you get when you order this dish in an "Italian" restaurant outside Italy. 

Finally, there is the eternal question: do you place your sage leaf between the veal and prosciutto, or on the outside? I prefer the latter option, as it allows the sage to lend its flavor to the sauce. And I find that the sage taste is just too strong if the leaf is 'protected' by the prosciutto. 

This is one recipe where the choice of your cooking utensil will make a real difference in the end product. Many modern recipes call for using a non-stick skillet. That works fine, especially if you follow the modern practice of simmering the veal slices in white wine. But if you follow the traditional recipe, you'll want those lovely sucs that will only form if you use a stainless steel (or copper) pan. Many people these days shy away from these materials because they are afraid of the meat sticking, but if you heat your pan properly, that should not be problem. For proper use of stainless steel for pan frying, take a look at this excellent instructional video from the Rouxbe Online Cooking School.

It is common to make this and other veal scallopini recipes using with other meats instead of veal. Here in the US, the most common substitute is probably chicken, as in this recipe for chicken piccata. In Rome, however, I would dare say that chicken saltimbocca would be seen as a kind of heresy. But given the cost of veal, even in Italy, substitutions are not unheard of when making scallopine; slices of turkey breast or pork loin, however, are much more common than chicken. 

Even though saltimbocca is one of the most iconic Roman dishes you can find, it is actually rather uncharacteristic of Roman cuisine in its use of butter as a cooking medium and  its final deglazing and butter enrichment—all rather 'Frenchified' and not very Roman. Some gastronomes, including Ana Boni, cast doubt on its Roman origins. Indeed, according to Jannattoni, Boni's uncle Adolfo Giaquinto, in his Manuale pratico di cucina, includes an identical recipe called saltimbocca alla bresciana, or "Brescia-style" saltimbocca. 

Saltimbocca is usually served with a green vegetable as a contorno. This time I made piselli alla romana, Roman-style Peas, which will be the subject of a post in the near future. 

The name saltimbocca, as many of you probably already know, means 'leap into the mouth', a reference to how very good they really are.

Saturday, May 8, 2010

Fagioli all’uccelletto


Tuscans love beans. They eat them as part of many of the famous Tuscan soups like ribollita, they eat them in a salad with tuna as an antipasto, and, of course, they eat them as a contorno, or side dish, especially with grilled meats like the mythical bistecca alla fiorentina. In fact, they are so well known in Italy for their love of legumes that Tuscans are sometimes jocularly called mangiafagioli, or 'bean eaters'.

I love Tuscan cuisine not only because I love legumes of all sorts, but also because it embraces the qualities that, for me, epitomize good eating: it is simple but delicious, rustic yet elegant, hearty yet healthy. This dish, fagioli all'uccelletto, or beans made in the manner of little birds, is a perfect example. 

You begin by making a simple tomato sauce: gently sauté a few garlic cloves and some fresh sage leaves in olive oil. When the garlic is just beginning to brown, add either fresh or canned tomatoes, which you will have puréed through a food mill, and let it simmer, always on gentle heat, until the tomatoes have reduced nicely to a saucy consistency. Then add boiled or canned cannellini beans, season with salt and peppers, and allow them to simmer in the tomato sauce for about 10 minutes or so, just long enough for them to absorb the flavor of the sauce. Test for seasoning, adjust if need be, and serve immediately. I like to drizzle a little olive oil over the top before serving.

As far as measurements go, the key is the ratio (by weight) of tomatoes to beans: if you want a rather 'saucy' dish, then use a ratio of 1:1. For a drier, less tomato-y version, add more beans, up to a 1:2 ratio. 

NOTES: Fagioli all'uccelletto, as mentioned, is a usually served as a side dish. It goes particularly well with roasted or grilled meats, and is a staple of our backyard barbecues—that is, when I don't opt for the equally delicious fagioli al fiasco. It is a forgiving dish, and because of the assertive flavors of the tomato sauce, I find that canned beans work very well here. Just make sure that you buy a brand that is not too 'mushy' straight out of the can, and then rinse and drain them well before adding them to the sauce. If you use canned tomatoes as well, the dish is extraordinarily quick to make—I usually use the side burner on my barbecue to make it while the meats are grilling. It is done in about the same time. 

Although cannellini are the beans typically associated with this dish, of course many different kinds of beans—and other legumes—lend themselves well to this treatment. Feel free to experiment! 

According to Florentine gastronome Giuliano Bugialli, the curious name of this dish comes from the manner in which little songbirds were traditionally cooked. 

By the way, Il mangiafagioli is the title of a well-known  painting by the Baroque  painter Annibale Carracci.  If you're ever in Rome, it hangs in the Galleria Colonna. It is also featured on the cover of various editions of the iconic Italian cookbook, Il Talismano della Felicita'

A. Carracci, Il mangiafagioli (1583-84)

Friday, May 7, 2010

Seppioline alla griglia


Grilled seafood is extremely popular in Italy, especially in the warm weather months. One of my favorite restaurants in Rome, a place called "La Torricella" (The Little Tower) in the Testaccio section of town, served wonderful seafood. And perhaps my very favorite dish to eat there was seppioline alla griglia, or grilled baby cuttlefish. But you don't need to take a trip to Rome to enjoy it—it's simplicity itself to make.

Begin by marinating cleaned baby cuttlefish or squid (see Notes below) in some olive oil, lemon juice, salt, pepper and parsley. If you like, you can add some red pepper flakes or a bit of chopped garlic to 'kick it up a notch' as the famous TV chef like to say. Let it sit in this marinade for an hour or two. 

Now get your grilled nice and hot. Depending on the size of the fish, you can either lay it directly on the grill, use a grilling basket or a flat grilling plate. Grease your grilling surface to prevent sticking and lay your fish on the grill. Personally, I like to flip the fish fairly often to ensure even cooking, but if you're a fan of neat grill marks, then you will need to leave the fish to cook on one side until it browns nicely. Although the fish will cook in no time, it actually takes a surprisingly long time to brown, so be patient. Once the fish is browned to your liking, transfer it to a serving dish, pour over the remaining marinade and, if you like, top with a bit of chopped parsley and serve with lemon wedges. 

NOTES: Baby cuttlefish are best for this dish, as they remain tender even after grilling. For this dish, as pictured above, I had found some incredibly small baby cuttlefish, pre-cleaned and frozen, in a local Asian supermarket. In Italy, seppioline are small but not tiny, but no matter—the flavor was incredibly good. In a 'regular' supermarket, you are more likely to find squid rather than cuttlefish. Buy it whole—not cut into rings—and, if it has not been cleaned, you'll need to do it yourself by cutting it in half just at the 'joint' between the body and the legs, then remove the cartilage 'pen' inside the body. Cut the legs into pieces, then proceed. 

Try to find smallish squid, as the large ones don't really lend themselves to this kind of treatment, as dry cooking methods like grilling tend to toughen them if left to cook more than just a minute or two. Like tough meat cuts like shoulder, they are better cooked using moist heat like a braise. 

Post-scriptum: A reader from South Africa tells me that, for those who don't have access to baby squid , larger squid can be tenderized by soaking for 5-10 minutes in warm water to which a spoonful of bicarbonate of soda has been added. Thanks for the tip!

For a great demonstration of how to clean squid, see this video from the Rouxbe Online Cooking School:

Wednesday, May 5, 2010

Another milestone (Updated)


2 May 2010

Gentle readers,

A quick note to share with you some wonderful news: Memorie di Angelina now has over 4000 subscribers via email, readers and various social networks, up from 2000 in February, only three months ago!

And that doesn't count those of you who read Memorie di Angelina through the Gnocchi ai Funghi Recipe Exchange Club, which has also experienced enormous growth and now has over 4750 members...

I want to express, again, my sincerest thanks for your readership and all your kind comments.  And to all those new readers out there, welcome! 

Con grande affetto e gratitudine,

Frank

PS: Well, well... the good news continues! Only three days later, and the numbers above are already out of date. Memorie di Angelina now has over 5000 subscribers, and the Club has over 5000 members! Thanks again, friends. Your support is an honor! (5 May 2010)

Sunday, May 2, 2010

Risotto agli asparagi


These days you can find asparagus in the market all year round but, for me, they signify Spring. This most noble of Spring vegetables can be made in an infinite variety of ways but perhaps my favorite is as a risotto.
I like the flavor of asparagus so much that my preferred way to make asparagus risotto is entirely vegetarian, using the asparagus itself to make the broth. Just make a kind of vegetarian broth (see this post) beginning with the usual aromatics—onion, carrot, celery and parsley—and after say 15 minutes of cooking, adding your asparagus—skipping the other vegetables. Cook for only 5 minutes or so and fish the asparagus out of the simmering broth. Cut the asparagus into three parts: the fibrous bottom third goes back into the pot, to continue cooking and lending its flavor to the broth. The middle third gets chopped up, and the tips are held back as a garnish.
Then you make the risotto in the usual way (see this post) beginning with your onion soffritto sweated in butter (or butter and oil) then add the chopped asparagus and allow it to insaporire for a few minutes. Then proceed as usual, using your asparagus broth instead of meat broth. When serving, I like to top each serving with a few asparagus tips which, if you like, you can sauté in butter beforehand.
And that’s it—simple but very elegant. 
NOTES: Measurements you ask? Follow the usual rule of thumb: a 1:1 ratio by weight of asparagus to rice, both uncooked. I find that 75g (2.5 oz.) of each is enough for a single serving, but you can up this a bit if you don’t intend to serve a second course.
You can make this dish with either thick or thin asparagus. The thick variety needs to be peeled; the thin kind can be used as is. And, as noted above, don’t trim off the bottom as you would normally do for other dishes—use it for the broth! I have not tried white asparagus for risotto, but I’m sure it’s also very good.
Of course, you can—and people usually do—make this risotto with ‘normal’ broth (see this post), in which case I still like to simmer the asparagus in the broth for a few minutes before beginning the risotto itself. But to save time, you can add just the fibrous base of the asparagus to the broth and add the rest raw to the risotto itself. The result will still be quite good, but with a less intense asparagus flavor.
Some recipes call for cooking the asparagus until fully tender, then puréeing it before adding to the risotto—a few minutes before it’s done. I’ve not tried this technique, but it does sound good.
Although unorthodox and perhaps not very Italian, I sometimes add a bit of cream along with the parmesan cheese during the final mantecatura.


Saturday, May 1, 2010

For a May Day Picnic: Fave e pecorino


Fave e pecorino is not really a "dish" at all, you just set out the fava beans, in their pods, and a hunk of pecorino cheese. Each diner opens the pods for themselves and eats the raw fava beans they find inside with a bit of pecorino, washed down with a well-chilled dry white wine. Odd as it may sound, it is a combination that was just meant to be. 

Romans traditionally eat fave e pecorino on May 1, preferably while they picnic fuori porta, or literally 'outside the gate' meaning outside town. Romans will pick up and find any green spot (even city parks if they can't get out of the town) to set out their picnic lunch. When we were living in downtown Rome close to the Campo dei fiori, we'd often go up the Gianicolo, a high hill just across the river, for our May Day picnics. When we moved to a country setting on the outskirts of town, we could just sit outside on the terrace; and we would often come across strangers picnicking down the hill from our house!

If you want to get fancy, you can de-pod and shell the fava beans, cube the cheese and combine the two with a bit of oil, salt and pepper to make a salad. That is how I had this once in a tony restaurant in Florence. But personally I like the rustic informality of eating the raw ingredients.

Fava Beans on Foodista