Wednesday, December 29, 2010

Fagiolini alla panna


When most people (myself included) think of Italian style green beans, fagiolini in umido (green beans in tomato sauce) is likely to come to mind or perhaps fagiolini all'agro, a simple green bean salad. Here is a less well known but perfectly delicious dish from Lombardia that I recent came across while  perusing a little cookbook called La cucina lombarda by Alessandro Molinari Pradelli: green beans simmered in cream. I can almost guarantee that once you try this, it will become a regular part of your repertoire!

Ingredients (for 4-6 servings)

1 kg (2 lbs.) green beans
A shallot, fine chopped
50g (3 Tbs) butter (or more if you're feeling indulgent)
2 dl (3/4 cup) cream (or as much as you need)
Nutmeg
Salt and pepper
A handful of parsley, finely chopped

Directions

Trim off the ends of your green beans, then plunge them into a big pot of well-salted boiling water. Cook them until they are quite al dente, remembering that they will cook some more later. This should take no more than 5 minutes or so, depending on the size and quality of the beans.

While the green beans are boiling away, gently sweat your chopped shallot in the butter in an ample skillet or sauté pan until soft but not browned.

Transfer the green beans from the boiling water right into the skillet and mix them well with the butter and shallot soffritto. [NB: If you like, you can 'refresh' the green beans in cold water before adding them to the skillet, which will help them retain their color, but being a bit lazy I often skip this step.] Raise the flame just a bit and let the green beans braise for a few minutes, stirring frequently, so they can absorb the flavors of the soffritto.

Now add your cream, enough to just about cover the beans. Season with salt, pepper and nice scrape of nutmeg. Raise the flame a bit more so that the cream bubbles fairly vigorously. Continue stirring from time to time, and simmer until the cream has thickened into a saucy consistency. Taste and adjust for seasoning if need be.

Mix in the chopped parsley and serve immediately.

NOTES: The great thing about this dish, as for any braised vegetable dish, is that you can use green beans that may have been around for a while without much trouble. That is, in fact, what I did this time and I can tell you the results were more than satisfactory. 

This makes for a fine contorno for grilled meats, in particular. I would not serve it, on the other hand, with a braised meat dish. And I actually had it as a vegetarian lunch one day, with a nice chunk of crusty bread.


Sunday, December 26, 2010

Viennese Goulash


For some reason, I must be feeling nostalgic for my Vienna days as I keep coming back to the dishes I made during those years. Perhaps it's the cold weather that calls out for the hearty cooking of Mitteleuropa. In any event, here's another favorite from that time and place: Viennese Fiakergulasch.

Goulash is a simple beef stew that follows the usual dry followed by moist heat method, but with two twists: the use of lots of onion—half as much by weight as the meat—and, of course, Hungarian paprika. The cooking fat can be oil, lard or even rendered beef fat.

Ingredients (for 4-6 servings)

1 kilo (2 lbs.) stewing beef, cut into cubes
500g (1 lb.) onions, chopped
Oil, lard or rendered beef fat
Salt and pepper
Hungarian paprika, to taste
Beef broth, enough to cover the meat
1-2 Tbs. tomato paste
A pinch of caraway seeds
A sprig of fresh marjoram (or thyme)

A spoonful of flour mixed with some water

Directions

Add enough cooking fat to cover the bottom of a Dutch oven or braiser. Brown the beef cubes nicely in the fat on all sides and set aside.

Now add the onions and gently sweat them in the same pan until they are nicely soft and browned, but not burnt. Season with salt and pepper as you go. Add back the browned meat and mix well. Allow the meat and onions to simmer together for a few minutes, then sprinkle over the paprika. Most recipes call for 1-2 tablespoons, but I just 'eyeball' it, and I'm pretty sure I add more than just a spoonful, as I love the taste of paprika. You then allow the paprika to simmer in the fat to release its full aroma, again for just a minute or two. Paprika can burn if heated too much, so moderate your heat as needed.

Add enough beef broth to just cover the meat, along with the tomato paste, caraway and marjoram. Cover and simmer it all gently until the meat is quite tender, usually about two hours. This can be done over the stove or, if you prefer, in a moderate (180C/350F) oven.

Just before serving, add your flour and water slurry to the pan, a spoonful or two at a time, to give the sauce a nice liaison. If, on the other hand, you find that your sauce is too thick or there is simply not enough of it, add some water.

Serve warm, with buttered noodles, spätle or Knödel.

NOTES: There is a certain linguistic confusion over the name of this dish as it is used in its homeland of Hungary. This article explains, as I had heard before, that gulyás, from which we get our word goulash, actually refers to a soup, which back in Vienna was called Gulaschsuppe. What we call goulash is called pörkölt in Hungarian (but please don't ask me how that's pronounced...)

Many recipes call for you to sauté the onions first, and then brown the beef with onions, which is more straightforward than the procedures outlined above (which is more typical of a French daube). But I like to use the Frenchified method, as you can caramelize the meat nicely without any worried about burning the onion.

There are lots of different kinds of goulash, with or without meat, and with or without vegetables. The Viennese version, in my humble opinion, is by far the best of the lot, although admittedly I am biased. After all, we all tend to like what we know best.

Wednesday, December 22, 2010

Struffoli!


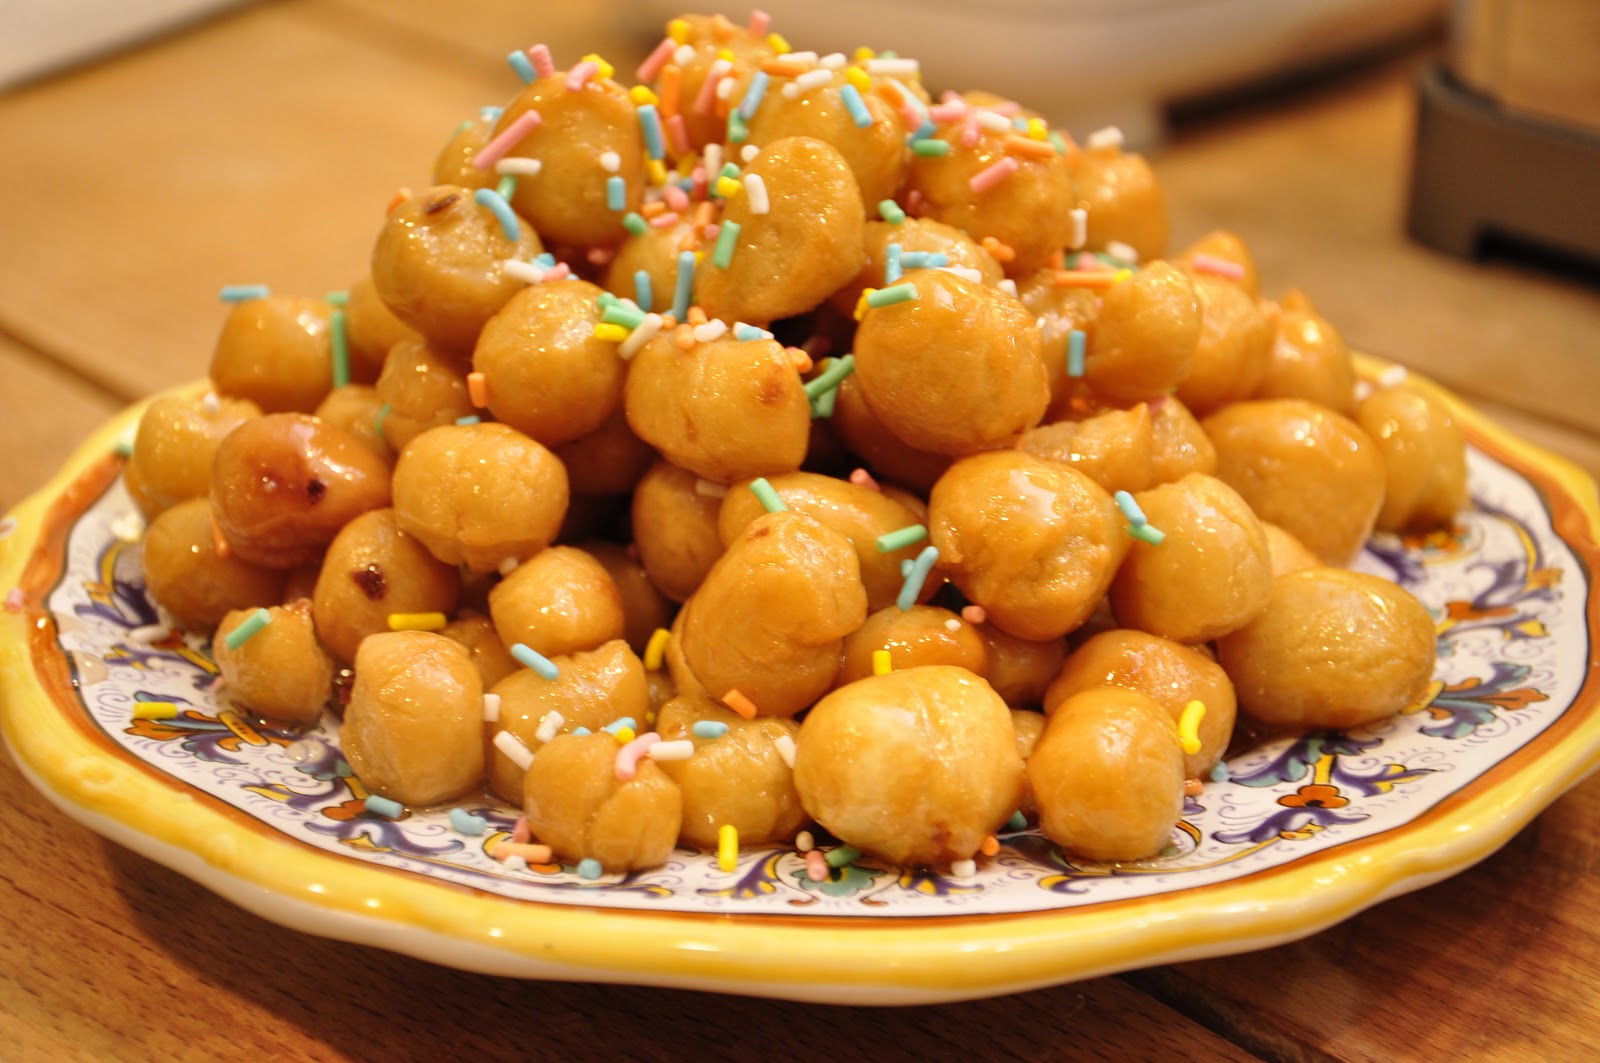
Struffoli, small balls of dough fried and then covered in honey, is the quintessential Christmas sweet of Naples and its region of Campania. Although I don't have much of a sweet tooth, it is very dear to my heart; it was one of nonna Angelina's signature dishes, and it never failed to make an appearance each year around the holidays. In our family they were known as 'Nana's honey balls'. As a child I took the name literally, and until I moved to Italy, I thought that they were my grandmother's invention. You can imagine my surprise then, when, on vacation on the Amalfi coast one year, I peered into the window of a pasticceria and saw... Nana's honey balls! Where on earth, I thought to myself, had they gotten the recipe? Well, I soon enough learned that Nana's secret recipe was actually no secret at all. In fact, the recipe is ancient, dating all the way back to the Greeks who settled southern Italy, founding, among other things the city of Naples or Neapolis, meaning 'new city' in Greek.

In any event, these little babies are actually quite simple to make, but, like many old-fashioned dishes, they require a bit of time and tender loving care:

Ingredients (for a small plateful of stuffoli)

300g (3 cups) flour
3 eggs
Butter, a walnut-sized chunk or 3 Tbs. oil
Rum,  or other spirit (optional)
Zest of one lemon
Salt, a pinch

Vegetable (or olive) oil for frying

300g (1 jar) honey
Candied fruits (optional)
Confettini or candied 'sprinkles'

Directions

You begin by making dough with the first six ingredients. This was traditionally done by making what the Italians call a fontana, or fountain of flour, in the middle of which you make a well for other ingredients, then slowly incorporating the flour into the well by hand as you beat the eggs and other liquid ingredients with a fork. These days, however, a stand mixer makes short work of this. Just put in your flour, then the other ingredients, and mix until you get a nice dough, just as if you were making pasta.

Once the ingredients have formed a smooth dough, form it into a ball and wrap it in plastic wrap. Let the dough rest for a good 30 minutes or so.

After the dough has rested, take a handful of it at a time and roll them out into 'cords' as if you were making gnocchi, about the thickness of your little finger (if you can manage it, otherwise as close to that as you can get). Then cut the cords into short lengths, again just like you are making gnocchi.


 Take each little piece of dough, one by one, and quickly rub them between your palms in a circular motion to form little balls, the smaller the better. Place the little balls on a floured towel as you work, making sure that they are all in a single layer so they don't stick. Just before proceeding to the next step, you grab the ends of the towel and swish the balls around to lightly flour them.


Heat the oil in a large pan. You want lots of oil so the little balls can deep fry in it. When the oil is nice and hot, but not boiling, plunge the dough balls into the oil a handful at a time. The oil will immediately bubble up vigorously. Not to worry, it's supposed to be that way.


Fry the dough balls until they are lightly browned. Drain on paper towels while you proceed to the next step.


 Now, in an ample sauté pan or saucier large enough to hold all of the dough balls, gently heat the honey until it liquifies. Add the dough balls, stir them gently to coat. Allow the balls to soak up the honey for just a minute or two. (They should not get soggy at all.) If using candied fruit (see Notes below) you will want to add some at this point.


Remove your struffoli from the pan with a slotted spoon and arrange them on a plate. It is common to arrange struffoli in a ciambella or ring, but you can also simply pile them high. I like to form them into a little 'Mount Vesuvius' as picture above. Then sprinkle your pile with confettini  (or candy sprinkles). It is also customary to decorate and flavor struffoli with candied fruits, in particular little bits of candied oranges and cherries, in addition to the spinkles. You can do this if you like, although—as far as I can remember—Angelina never did, so I follow suit. They can be eaten immediately, but improve with age.

NOTES: Although it takes a few steps, the recipe is really pretty much foolproof. The only trick, the extent there is one, is to make your struffoli as small as you can manage, as that will mean more honey flavor and less chance of an undercooked middle.

There are a few variations on the dish, although none that change its essential character. Like many traditional recipes, the original fat for both making and frying the dough was strutto or lard, not oil. Today, it is more usual to use butter for the dough and vegetable or even olive oil for frying. Not all recipes call for the liquor. And some recipes call for orange rather than lemon zest. And the ratio of egg to flour varies from recipe to recipe. Here I have indicated the same 'golden rule' as for pasta dough: 1 egg per 100g (1 cup) of flour. But recipes may call for more or less egg, some for an extra yolk for color and richness. Some recipes omit the fat from the dough—be it butter, oil or lard—altogether, while others call for significantly more fat than indicated here. And, finally, some modern recipes, especially Italian-American ones, call for a pinch of baking powder, which lightens the honey balls considerably but is obviously a modern permutation.

To tell you the truth, struffoli were not all that popular among the younger generation of my family. I like them well enough, but one of my sisters actively despised them. Being a natural born politician, however, that didn't stop her from complimenting our grandmother profusely one Christmas. Well, our ever thoughtful grandmother took note and the following Christmas  brought a double batch of her 'honey balls', one for the family as usual, and another just for my sister, since she loved them so much! You should have seen the look on my sister's face as Angelina handed her that enormous second bag full of struffoli...

Sunday, December 19, 2010

Canederli


Canederli is the Italian name given to the bread dumplings so popular in Austria and other parts of central Europe, known in German as Semmelknödl or just knödel. During my years in Vienna it was one of my favorite things to eat, so when I re-discovered them in Italy, on a visit to an old friend from Paris who had wound up living in Bolzano, a city in the German-speaking region of Alto Adige (aka Südtirol) in northwestern Italy, I was delighted. Not only did they bring back fond memories—they were probably the best I had ever eaten! (No offense to my Austrian friends...)

In any event, you don't need to travel to Austria or northwestern Italy to enjoy these dumplings. They are quite easy to make at home. The technique is a bit like making potato dumpling or gnocchi, but actually easier. These bread dumplings are much less prone to becoming stodgy as gnocchi can be if not made right. And it's a great way to use old bread, a nice change when you're not in the mood for a bread soup like ribollita or pappa al pomodoro.

Ingredients (for 4-6 servings)

300g (3/4 lb.) stale bread, cut into cubes
100g (1/4 lb.) speck or other cured pork product (see Notes), finely minced (optional)
2 eggs
A glass of milk
1 medium onion, finely minced
2 Tbs. flour (or more)
Parsley, finely minced
Salt and pepper

Directions

Toss together in a large bowl the bread and speck (if using), then add the eggs and milk and parsley. Mix together. Let the mixture rest for a good 20 minutes or so. The bread should be rather moist at this point, but not soaking wet. If you find the mixture a bit dry, then add more milk.

Mix in the flour, along with the onion and parsley. (NB: For added flavor, you can sauté the onions in a bit of butter before adding them to the mix.) Season well with salt and pepper.


Now form the resulting 'dough' into balls about the size of golf balls.


By the way, if the mixture does not hold together, or if you notice that it is exceedingly wet, then add more flour, a bit at a time, until you find that the mixture has reached a nice dough-like consistency that will hold together well.

Now bring a pot of well-salted water (or, for a richer taste, broth) to a gentle simmer. Add the canederli, one at a time, with a slotted spoon—or just use your hands like I usually do...  If you are not experienced with making these dumplings, just form one ball to begin with, and try simmering it. If it falls apart, then you know you need to add some more flour to your mixture. Then try again with another. If all goes well, then add all the rest.


Simmer the canederli for about 15 minutes. They should have come to the surface of your simmering liquid, much as gnocchi do.


NOTES: There are various ways to serve canederli. The simplest is the way I had them at that wonderful meal in Bolzano: in a rich, homemade broth—a kind of Italo-Austrian matzo ball soup. My personal favorite way to enjoy canederli is to accompany them with a creamy mushroom sauce as pictured above, the same kind of sauce that goes so well with potato gnocchi. Also very good, and very popular in Vienna, is to serve them with beef goulash, which I hope to blog on some time quite soon.

Unlike pasta or gnocchi, however, you do not generally pour the sauce over or mix it with these dumplings, but rather lay down a 'bed' of your sauce and lay the dumplings on top. They are big enough that you will need to cut them into bite-sized pieces with a knife and fork, using your fork to fare la scarpetta as they say in Italian: dip each piece of dumpling in the sauce.


You can also make one big dumpling of the bread mixture, by forming a loaf and wrapping it in cheesecloth before simmering it. Of course, this big dumpling will take a bit longer, say 20-30 minutes, to cook. You serve it sliced like a meatloaf.

Speck is a smoked pork product that is common to Austria and this part of the Italy. It is quite delicious but can be hard to find. Feel free to substitute prosciutto or even slab bacon if you like, or omit the meat altogether, as I often do anyway.


By the way, Alto Adige, or Südtirol, is one of the most beautiful areas of Italy. It has an Alpine landscape reminiscent of nearby western Austria. In fact, it was once a part of Austria, ceded to Italy after Austria's defeat in the First World War. (It was nearby that my grandfather fought and won his posthumous medal and picked up his taste for polenta—which is why we ate that northern dish in our southern Italian family.)

In any event, the region today still retains much of its Austrian heritage, notwithstanding the best efforts of Mussolini, who 'shipped' in many Italians, especially from southern Italy, to colonize and, to his mind, 'civilize' the place. There is, in fact, a triumphal arch built by Mussolini in downtown Bolzano, the capital of the area, to celebrate the Italianization of the area. It is still the object of the occasional sabotage attempt, or so I was told when I visited, although the region was granted considerable autonomy after the Second World War. And when I was there in the late 90s the place seemed as tranquil as any I've ever been to. Besides beautiful scenery and great food, they make wonderful wines, including the popular pinot grigio, but also some excellent Chardonnays, Riesling, Sylvaner, Gewurztraminer, and Kerner. It's well worth a visit.

Beautiful Alto Adige-Südtirol


Wednesday, December 15, 2010

Mushroom Barley Soup


What to do with a spare ham bone if, like me, you don't care too much for split pea soup? Well, what about a barley soup? While barley soup is usually made with beef, it tastes just a delicious with pork and ham in particular.

Ingredients (for 4 servings)
1 onion, finely chopped
1 carrot, finely chopped
1 clove garlic, finely chopped
1 cup barley
A ham bone (or ham hock)
A sprig of rosemary
Salt and pepper
Olive oil
Enough water to cover generously (or a mixture of broth and water)

100g (1 cup) sliced (or chopped) fresh mushrooms
1 handful of parsley, finely chopped

Directions
Sauté the onion and carrot until soft, then add the garlic and stir. Season as you go. Add the barley, allow it sauté gently as well for just a minute or two to absorb the flavor of the aromatics.

Place the ham bone (or ham hock) over the barley, together with a sprig of rosemary. Pour in enough water to cover all the ingredients generously, by at least 5 cm/3 in.

Simmer the barley and other ingredients for at least an hour, until the barley is nice and tender but not mushy. Add water from time to time if you need to—and chances are, you probably will, since barley absorbs a lot of liquid.

About 15 minutes or so before the soup is ready, sauté some thinly sliced mushrooms in a bit more olive oil until nicely browned and reduced, mixing in a bit of minced parsley just before you remove the mushrooms from the heat. Add the sautéed mushrooms to simmer along with the barley until done.

Remove the ham bone from the pot, scrape off any bits of ham meat, chop it up and add the meat back into the pot. Adjust the seasoning to taste.

Serve hot, topped if you like with un filo d'olio and a generous grind of black pepper.

NOTES: This is a wonderfully rustic soup that lends itself to any number of variations. Probably most common is the substitution of dried mushrooms, reconstituted in warm water but not sautéed, for the fresh mushrooms, which gives the soup a much more assertive mushroomy flavor. You can also vary the aromatics by, for example, adding some leek and/or celery. You can also vary the herbs—instead of rosemary, a bay leaf and/or some fresh thyme is a nice change of pace. Some recipes also make this soup 'creamy' with the addition of buttermilk, milk or cream.

The soup can be made ahead, but if you do, you'll need to add more water or broth, as the barley will just keep absorbing the liquid until none is left. Perhaps there is a limit to the liquid that barley can absorb, but if there is, I haven't encountered it yet.


Sunday, December 12, 2010

Tiramisù


Here's an elegant dessert 'cake' that even non-bakers like myself can make easily. The truth is, the 'cake' part of this dessert consists of those elegant elongated cookies called 'ladyfingers' in English and savoiardi in Italian. The ladyfingers are lightly dipped in espresso, then layered with mascarpone creamed with egg, sugar and marsala, then 'baked' in the fridge for a few hours (or even days) and finally dusted with cocao before serving. There is really nothing to it and yet serving a homemade tiramisù, with its reputation as a fancy dessert, will ensure that your guests will be mightily impressed.

Ingredients

500g (1 lb) store-bought ladyfingers
3 freshly made single espressos
Simple sugar syrup (or some sugar) to taste
500g (1 lb.) 4 oz. mascarpone
5 eggs, separated
About 250g (1/2 lb.) sugar
Marsala
Powdered cocoa

Directions

Begin by making some strong shots of espresso coffee: 


If you don't have an espresso maker, a potful of espresso made in a  stovetop pot will do quite fine. Then mix your espresso with some of the simple syrup, if you have some on hand, or just a few spoonfuls of  sugar, to taste. You can also use the coffee without sugar, as the  mascarpone cream will add sweetness.

To make the mascarpone mixture, separate the yolks from the whites. Set the whites aside for the moment. Then whisk the yolks together with the sugar briskly until they form a kind of cream; you should be able to see 'ribbons' in the mixture as you whisk it. A stand mixer makes short work of this job.


 Then add the mascarpone and a dash of marsala, and continue whisking until you have a homogeneous cream mixture. 


Now, in a separate bowl, beat the egg whites until they form soft peaks. 


 Fold the egg whites gently into the mascarpone mixture:


 Now that you have your coffee and mascarpone mixture ready, it is time to assemble the dish: take a ladyfinger, dip it on both sides in the espresso, very briefly, just to barely coat the outside. (Don't linger or your ladyfingers will soften to mush!) As you dip the ladyfingers, arrange them in a rectangular or square baking dish. Continue until you have covered the bottom of the dish with them. (NB: Depending on the size of your dish, you may need to lay them in different directions and/or break some of the ladyfingers into shorter lengths.)

Once you have your first layer of ladyfingers, spread some of the mascarpone mixture over them, enough to cover them entirely. Then lay another layer of ladyfingers on top of that:


 Finally, lay over another layer of the mascapone mixture:


Put the dish into the fridge for at least an hour, better several hours or even overnight. The longer you let it sit, the more the mascarpone mixture will penetrate the ladyfingers and soften them up. It will also help the elements to form a more solid mass. A freshly made tiramisù will be very creamy and rather loose when served,  as pictured above, while a well-rested one will be more cake-like. Each version has its charms.

In any event, right before you're ready to serve, dust the top of your tiramisù with unsweetened cocoa powder (the kind you would bake with). Use as much or as little as you like. Personally, I prefer just a light dusting.


NOTES: The two main ingredients for this dish, ladyfingers and mascarpone cheese, can be surprisingly hard to find. They are also both rather expensive to buy. You can make the ladyfingers yourself--they are not at all hard to make. I have seen suggestions for using spongecake or pound cake, which should (more or less) work as well, but since these are already quite soft, your tiramisù will not need as long as rest in the fridge. As for the mascarpone, you can substitute regular cream cheese ('Philadelphia' style) loosened with some cream. (I have also heard of substituting ricotta, whipped until perfectly smooth, but that would give you a rather different flavor.)

A common variation for tiramisù is to use zabaglione in place of the mascarpone mixture. Zabaglione is simply marsala wine thickened with egg yolks heated over a double-boiler, usually in a round-bottomed copper pot which is made expressly for the purpose. I will blog on zabaglione one day, as it is delicious and wonderful just on its own as a dessert or snack. Also common is the substitution of rum or other liqueur of your choose instead of the marsala.

The main thing to remember when making tiramisù is that the success depends largely on balancing the sweetness of the sugar with the bitter flavors of the coffee and cocoa. Neither should predominate. Be careful, then, when adding sugar. And if, as sometimes happens, you find ladyfingers sprinkled with sugar, reduce the sugar you add to the coffee and/or cream to compensate.

Otherwise, as I said, this dish is simplicity itself and a real crowd-pleaser. No need to tell anyone how easy it is to make... Enjoy!

Sunday, November 28, 2010

Zuppa di porri


'Tis the season for soups! When the temperatures dive, there is simply nothing that takes the chill off like soup. The wonderful thing about soups is their enormous variety: they can be thick and stick-to-the-ribs, whole meals in themselves, or they can be light, even austere, just enough to whet the palate as the start of a formal meal or as a light supper.


Here is a lovely example of a medium-bodied soup, none too heavy but very satisfying at the same time. It's particularly nice during the holiday season, when you may feel like something warming but not too filling, a nice respite between those humongous holiday meals. The starring role is played by the leek, an often overlooked member of the onion family. Or, at least, I tend to overlook it, which is too bad because it has an incomparably savory yet mellow taste that makes any dish that contains it truly special.


Ingredients (for 4-6 servings)


5 leeks
100g (4 Tbs.) butter, or a combination of equal parts butter and olive oil, or just olive oil
20g (2 Tbs.) flour

Salt and pepper to taste

1 liter (4 cups) broth

4-6 slices of good-quality crusty bread

Grated parmesan or gruyère cheese


Directions


Rinse the leeks if necessary (see below) and trim off the root end and green tops. Cut the stalks into thin slices.


Sauté the leek slices in the butter, butter and oil mixture or the oil over gentle heat until they are well reduced and quite tender, without browning, about 15-20 minutes. Season the leeks with salt and pepper just after you add them to the skillet.


Sprinkle the flour and mix it in well, letting it sauté as well for a minute or two. Then add the broth, mix it well to fully incorporate the flour into the liquid, and let simmer, semi-covered, for another 15-20 minutes.


Meanwhile, toast your slices of bread and place each slice in the bottom of a soup bowl for each diner. Sprinkle the slices with some grated cheese. When the soup is done simmering, ladle over a nice serving into the soup bowls. Sprinkle over some more cheese and top with a nice grinding of black pepper and—if you like—a drizzle of best quality olive oil.


You can serve this soup immediately, but it is best after a few minutes' rest, which allows the soup to soak into the bread.


NOTES: These days leeks are often sold pre-washed, and can be used without fuss. But if you see that your leeks are gritty, make sure to wash them well before using. You will need to split them down the middle to make sure you remove all the grit. And, by the way, don't throw away the green tops—they are a great addition when making homemade broth, either instead of or in addition to the onion.


Speaking of which, for a simple soup like this one, where success or failure will depend on the quality of the ingredients, the broth should really be homemade. (See this post for the master recipe.) You can make your broth with beef (the usual choice) or chicken or a mixture of the two—the so-called brodo classico—and, this time of year, you can also use a turkey carcass if you happen to have one around the house…If you want to go vegetarian, then vegetable broth will, of course, do the job.


The choice of sautéing medium will subtly influence the dish. The traditional recipe calls for all butter, which gives the recipe a pleasant sweetness. But, personally, I prefer to use olive oil or a mixture of butter and olive oil, which provides a more 'rustic' taste. Some recipes add potato to the soup, which gives it more body. You can pass the soup through a food mill for a smoother texture. And instead of the toasted bread, you can fry up some croutons in olive oil, which again makes the soup a bit richer.


If you want to get fancy, you can gratinée this soup in terracotta soup bowls as you would a French onion soup, placing the bread on top of the soup, then sprinkling over all the cheese (use gruyere for this variation), drizzle with some olive oil (or melted butter) and run the soup under the broiler or in a very hot oven for a few minutes, until the top is nicely browned.

Sunday, November 21, 2010

La ribollita


We've already gone over the basic recipe for minestrone on this blog. Once you've mastered that, it is a lot of fun to explore the many varieties of minestrone from all over Lo Stivale (meaning 'the boot' one of the many nicknames Italians give to their country).

Perhaps the most delicious version of all is the Tuscan classic called la ribollita, or 're-boiled' because it is made ahead, layered with bread in a pot (preferably made of terracotta) and reheated before serving. Like any minestrone, it tastes so much better the day after—or even after a few hours—and the bread gives it a special flavor.

Ingredients (for 4-6 servings)

For the flavor base:
Olive oil
1 large red onion, cut into cubes
1-2 carrots, cut into cubes
1-2 stalks celery, cut into cubes
A handful of finely chopped parsley
1 leek (optional)
1 thick slice of pancetta, cut into cubes (optional)

More vegetables:
1 bunch black kale (aka lucinato kale), stemmed and shredded
½ head of Savoy cabbage, shredded
1 bunch Swiss chard (optional)
A few canned tomatoes, cut up (or some tomato paste)
250g (1/2 lb.) potato
250g (1/2 lb.) or more boiled or canned cannellini beans, drained

For the final assembly:
Slices of well-structured bread (preferably saltless Tuscan bread)

To finish:
Best-quality, fruity olive oil
Freshly ground black pepper (optional)

Directions

Make your minestrone, using the above ingredients, following the master recipe.

When the soup is done, place some slices of bread in the bottom of a good-sized terracotta casserole or soup pot (if you don't have a terracotta cooking vessel, the enameled cast iron or, in a pinch, a regular soup pot will do). Then ladle over a good portion of the soup.


Add another layer of bread, then another layer of soup, and so on, until you have filled the pot or used up your ingredients. End with a layer of soup.

Let the soup rest for several hours or overnight.

When you are read to eat, gently re-heat the soup. As the soup heats up, mix it up with a wooden spoon, which will break up the bread and mix it in with the rest of the ingredients. The result will be very thick, almost more a stew than a proper soup.


Serve when nice and warm, drizzled on top with un filo d'olio and, if you like, some freshly ground black pepper.


NOTES: The number or types of vegetables vary quite a bit from recipe to recipe, but the two essential ingredients—typically Tuscan—are the cannellini beans and the cavolo nero, or black kale, also marketed as lucinato kale or Tuscan kale. I have even seen a recipe that called it 'dinosaur' kale—not sure where that came from! Once impossible to find, I am happy to report that I now find black kale pretty regularly at my local supermarket here in the US. Similar in flavor to other sorts of kale, it has long, rather slender dark-green (not literally black!) leaves.


Black kale is much more tender and has a more subtle taste. To use it in the soup, you need only to remove the central stem, which can be very tough, then roll it up and shred it with a sharp knife. Other leafy greens, like Savoy cabbage or Swiss chard (or even beet greens) add a nice variety but can be omitted if you don't have them on hand, as can the leek, another vegetable used more frequently in Tuscany than in most other parts of Italy. Another typically Tuscan touch is the use of red onion, which Tuscans seem to prefer, but of course yellow or white onions will do if you don't have red onions on hand.

The choice of bread is of utmost importance. If you have Tuscan bread around, that is, of course, the best choice. Failing that, any well-structured bread that will stand up to cooking will do, although I would avoid sour-dough just because it has too strong a taste. Above all, avoid sandwich breads, which will turn to mush and give your ribollita an uncharacteristic texture.

Ribollita is best when made the day before, but you can make it in the morning for dinner or even an hour or two before—although the longer it sits, the better. The texture is thick and hearty but not heavy, and the bread gives a flavor that is really something very special.

Friday, November 19, 2010

Crostata di mele


As regular readers of this blog will know, I am not much of a baker. Nor do I have much of a sweet tooth. But, for some reason, I felt inspired the other day to make a baked dessert for some dinner guests. Foolish, perhaps, to start my baking career by 'experimenting' on guests, but all's well that ends well. I actually liked the way this turned out, and so did the guests.

Of course, I wasn't totally rash: a crostata di mele, or apple tart, is really very simple to make. If you break it down into its component parts, it is really quite manageable: a base of pastry, called pasta frolla in Italian and pate brisée in French, on which you lay a bed of frangipane, almond paste mixed with butter, sugar, eggs and a bit of liqueur if you like, then sliced apples, arranged in concentric circles. Once baked, you can top this off with an apricot glaze, which gives your tart a lovely sheen and extra layer of flavor. The whole process does not take much more than an hour, and you can make it ahead.

Ingredients (enough for 4-6 servings)

For the pastry shell: 
200g (2 cups) pastry or all-purpose flour
150g (1-1/2 sticks) butter
1 Tbs. sugar
A pinch of salt
1 egg yolk (optional)
Cold water (about ½ cup)

For the frangipane base: 
50g (½ cup) butter
50g (½ cup) sugar
75g (2/3 cup) of almond paste
1 egg plus 1 egg yolk
2 Tbs. flour
Calvados (optional)

For the filling: 
3-4 baking apples (see Notes below)
Sugar, q.b

For the apricot glaze: 
A small jar of apricot preserves (or jelly)
Sugar, q.b.
Water, q.b.

Directions:

To make the pastry shell:

1. In a bowl (or stand mixer) mix together the flour, sugar and a pinch of salt. Then mix in the butter, using your hands or the paddle of your stand mixer, until well incorporated. The resulting mixture will look a bit like little pebbles. Then the egg yolk (if using) and enough cold water so that the mixture just forms a solid dough. Do not knead or overmix, which will make the dough tough. And you should do this all quite quickly, so that the butter does not start to soften too much.

2. Wrap the dough in plastic wrap and put it in the fridge for 30 minutes or more, to let the dough rest and stiffen up again.

(NB: While the dough is resting, you can make the frangipane base and slice your apples.)

3. Take the dough out of the fridge, remove the plastic wrap, and roll it out with a rolling pin into a round that is at least an inch wider than the tart pan in which you intend to bake your crostata.

4. Using your rolling pin, roll up the dough and then unroll it over the tart pan, trying as best you can to center it well. Gently push the pastry into the bottom of the pan with your fingers. (If, as sometimes happens, your pastry doesn't quite reach the edge of the pan, you can always 'nudge' the pastry outwards to cover the edges of the pan.) Prick the pastry with a fork all over to prevent puffing while it bakes. Then trim off any excess pastry, using the edge of the tart pan as your guide. (NB: If you prefer, you can leave the excess on and fold them inward over the filling when the time comes.)


To make the frangipane:

5. In a large bowl, cream together butter and sugar in a mixing bowl. Add the rest of the ingredients and mix them well until you have a smooth paste. You can use a wooden spoon to start and then, once the ingredients are mixed, switch to a whisk to smooth the mixture out. But you can do with in one go, in a fraction of the time and with little effort, using a KitchenAid or other stand mixer, with the whisk attachment.

6. When your pastry shell is ready, take the frangipane and slather it out evenly over the bottom of the shell with a rubber spatula. This will act as a 'bed' for your apples and help anchor them in place.


To make the filling and bake the tart:

7. Peel, core and slice the apples into thin half-rounds. Then arrange them attractively in the tart pan. Push one side gently into the frangipane bed, then lay it on its side. Proceed with the next piece, slightly overlapping the proceeding one like roof tiles, continuing around in concentric circles until the entire shell is filled with a single layer of apples slices. Trim off any excess pastry—or, if you prefer, you can fold the edges over the outside of the apples.


8. Now you are ready to bake your tart: If you have one large enough, place the tart pan on a cookie sheet (this will catch any spillage from the tart, but is not 100% necessary.) Place the tart pan in the hot oven (200C, 400F) for about 15 minutes, then lower the temperature to a moderate oven (180C, 350F) and bake for another 10 minutes, then sprinkle the apples with ample sugar, and bake for another 10 minutes or more, or until the apples have nicely browned along their edges and are perfectly soft when pierced with a knife.

9. Remove the tart from the oven, place it on a cooling rack and let it cool off in its pan.


To finish off the tart (optional):

10. If you like, you can finish off the tart with an apricot glaze. To make the glaze, take apricot preserves and force them through a fine sieve with a wooden spoon or rubber spatula—this will smooth out the consistency, as preserves usually have little bits of fruit in them. Then take this purée and heat it gently in a small saucepan with a spoonful or two of sugar to taste, depending on how sweet the preserves are in the first place. Thin out the purée with some water, until you have reached a brushable consistency.

11. Once the tart has cooled, brush over the warm glaze evenly over the entire surface of the apples, but avoiding the pastry.


Now you're done! Enjoy your crostata di mele either by itself—it is perfectly delicious—or, if you want to gild the lily, with some whipped cream or vanilla ice cream.

NOTES: First of all, I have a confession to make… the foregoing recipe really should be called tarte aux pommes à la normande. Probably some of you might have guessed it from the Calvados… but although torta di mele (apple pie) is probably more popular, Italians also make costata di mele in basically the same way. The most important difference is that the Italian version will more often have a different 'bed' for the apple filling—rather than frangipane, crema pasticcera (egg yolks emulsified in hot milk, sugar and flour), marmalade or homemade apple sauce. And crostata di mele is less likely to have an apricot glaze.

For this recipe to succeed, you need to choose the right kind of apples. The best apples for tart-making are not too sweet and crisp, so keep their shape in cooking. Others will break down and turn to mush if exposed to heat—which is fine if you want to make apple sauce (or even an apple pie) but not a tart. For this first try, I used Cortlands and they were fantastic: they have a nice, crisp texture, pristine white flesh which was not too sweet and—and at least the ones I used—didn't even need to be cored. Other favorite baking apples include Galas, Golden Delicious, Braeburns (one of my favorites for eating, too), Rome Beauties, Honeycrisps and, if you like a rather tarter tart, Granny Smiths. These, at least, are some of the options here in the US. Varieties to avoid for a tart include McIntosh and Red Delicious (which, in my humble opinion, are definitely not delicious!)

Pastry dough has a reputation for being tricky to make, but—perhaps it was beginner's luck—I found it remarkably easy, and it came out just as it should—friabile (flaky) and nice and buttery. They say the most important point is not to overwork it, so that the gluten does not develop too much—gluten will bind the dough together, which is what you do not want—and to keep the dough well chilled. Neither of these tips are at all difficult, but you do need to work quickly. Note this dough is quite fragile compared, say to pasta dough. Once rolled out, if you try to pick it up, it will fall apart in your hands, so use a rolling pin.

There are various types of tart pans you can use. I personally like my ceramic tart pan with fluted edges, from which you can bring to the table for serving, as pictured in this post. But the more elegant and classic solution is the metal tart pan with a removable bottom, for serving the tart out of its pan and on a platter. And even a regular old pie dish will do, of course, in a pinch.

Sunday, November 14, 2010

Bagna cauda


Bagna cauda or, more properly, bagna caôda, means 'hot bath' in English. It refers to a typical Piedmontese dish for communal eating that is popular in cold weather months, a kind of cross between fondue and pinzimonio, if I can put it that way. It is, quite simply, a collection of raw and steamed vegetables, which you dip into a garlic and anchovy sauce that you keep warm like a cheese fondue in a little terracotta pot placed over a flame.

Here's the recipe for making the sauce:

Ingredients (to serve 4 or more):

4 (or more) cloves of garlic
100g (4 oz.) fillets of anchovy
200 ml (1 cup or small glassful) olive oil
50g (2 oz.) butter
Freshly ground pepper

Directions

Pour the olive oil into a small saucepan and heat gently. Add the garlic, which you can either slightly crush, for a milder flavor, or slice or even finely mince for a much more assertive flavor. Keep the flame quite low. You are infusing the oil with the flavor of the garlic, which should not brown at all. (If you like you can remove some or all of the garlic at this point to avoid its flavor from becoming overpowering.) After about 5 minutes, add the anchovy fillets and butter and continue to simmer very gently for another 10 minutes, until the fillets have completely melted and the various flavors have been well amalgamated. Season with a bit of ground pepper.

Pour the sauce into a small fondue pot, preferably made of terracotta, and keep warm at the table. Regulate the flame so that the bagna cauda simmers gently all the while you are eating. Serve with various raw and steamed vegetables in season, which you dip into the sauce.

NOTES: The typical vegetables that go with bagna cauda include roasted or raw red peppers, cardoons, artichokes, steamed potatoes, steamed or raw carrots, steamed cauliflower, fennel, celery or leafy vegetables like savoy cabbage, radicchio and endive. Harder vegetables are best lightly steamed, (or roasted) while larger vegetables should be cut into bit sized pieces or sticks. To this dish I added a somewhat unusual choice of Brussel sprouts—they were delicious in this sauce. I also used a bit of frisée, which go very well with the anchovies. But really just about any seasonal vegetable would be fine.

There are lots of variations in making the sauce. While the measurements are quite flexible,  as is the order of ingredients: whether you add the butter or oil, or the garlic or the anchovy first or at the same time. But most of the variations revolve around different ways to 'soften' the flavor of the garlic. The recipe above calls for adding the garlic, raw, to the sauce, but many recipes call on you to simmer the garlic beforehand, for up to an hour in milk or cream. The garlic is then drained and crushed or puréed, and the recipe continues from there. With this method, you can use larger amounts of garlic, as the simmering considerably softens the garlic's pungency. I even found this remarkable recipe for bagna cauda from the esteemed Kyle Phillips of About Italian Food, which calls for an enormous amount of garlic—5 heads (yes, heads, not cloves)—that simmer in milk for an hour before proceeding with the sauce. Some recipes also call for adding a bit of milk or cream at the end, before serving, which also is meant to smooth out the flavor. (Being a garlic hound, I like my garlic 'straight up'.)

In Italy, it is quite usual these days to serve bagna cauda in individual little terracotta fondue pots called forneletti (known in Piedmontese as fujòt). Unfortunately, I didn't bring any back from Italy and they are apparently impossible to find here in the US, so—as you will see above—I improvised with a terracotta soup bowl placed over a fondue burner. A regular fondue pot would also do fine. The one from Emile Henry is made from terracotta and is the best one I've seen for the purpose on the market here.

While usually categorized as an antipasto, bagna cauda can easily serve as a meal, followed by some stewed fruit, for example pere in vino rosso. Serve with a robust red wine and lots of water, too, to quench your considerable thirst.

Saturday, November 13, 2010

Stracotto alla fiorentina


Some readers may remember last winter's post on brasato al vino rosso, the wonderful red wine pot roast from northern Italy, in particular Lombardia and Piemonte—where it is often made with Barolo, the local big red, and called brasato al Barolo. Well, here is another typical pot roast, this time from central Italy: Florentine-style 'stracotto', which literally means 'overcooked', made with tomato sauce.

Ingredients (for 4 servings)

One eye round roast (about 1-1.5 kilos/2-3 lbs.)
A carrot (young and thin if possible)
A small chunk of pancetta (cut into four thin strips)
Olive oil
1 medium onion, chopped
1 carrot, chopped
1 stick of celery, chopped
Salt and pepper, q.b.
Red wine
1 large can of tomatoes (500g or 1 lb.)
A spoonful of tomato paste (optional)
Water or broth

Directions

Eye round is a nice cut for company since it keeps its shape, but it can be a bit dry and tasteless as compared with chuck, so it needs a little help. This comes in the form of 'larding' the roast with a carrot and some strips of pancetta. If you have a larding needle, that's the best tool for the task, but if not, you can simply take a paring knife and force it through the middle of the roast like so, creating a small 'tunnel' for your carrot:


As you can see, the knife should come out the other side. It should then be a fairly simple matter of shoving the carrot through the roast, trimming off any part of the carrot that sticks out on either side.


You do the same now with the strips of pancetta, making a tunnel on each side of the carrot, except that, being soft, you cannot simply push the pancetta through the meat. (Here's where a larding needle would really come in handy!)


Use your finger to open the 'tunnel' up a bit, then guide the pancetta through, again with your finger playing the part of the larding needle. Rather than trying to pass a two long strips of pancetta all the way through the roast, I take four shorter pieces and guide them halfway through from each side.

Now tie the roast up with kitchen string to help it keep its shape. (These days, roasts often come pre-tied in the store, in which case you simply need to be careful not to break the strings as you lard the roast.) Salt and pepper the roast generously.

Now that this chore is done, you're on Easy Street for the rest of the recipe: Make a soffritto by sautéing onion, carrot and celery in some olive oil in a Dutch oven (preferably oval) and when they have wilted, raise the heat a bit and add the roast, browning it lightly all over.

Pour over a bit of red wine and turn the roast so it is covered all over with the wine. Let the wine evaporate completely, as you scrape any brown bits from the bottom of the pot.


Now pass the tomatoes through a food mill into the pot. Turn the roast again. Add the tomato paste, if using, and enough water or broth to come up at least 2/3 of the way up the roast, if need be.


Allow the pot to come to a simmer, lower the heat and cover the pot. Let the roast braise until it is quite tender, turning every 15 minutes or so and adjusting the heat so that the tomato sauce simmers very gently (what the French call 'mijoter'). Most recipes call for a cooking time of 2 hours, but it may well take longer, up to 3 hours, depending on the meat and the size of the roast. Add water or broth if the sauce gets too thick, and adjust for seasoning at the end of cooking.

Serve, sliced, on a warmed platter with boiled potatoes. Pour some of the tomato sauce over the roast slices and serve the rest in a gravy boat for guest to add more, which they are very likely to do.

NOTES: Usually I like chuck (shoulder or spalla) for pot roast, as it is very juicy and turns very tender after a slow braise like this. Exquisite eating, but not the prettiest cut—it has an irregular shape and tends to fall apart when cooked. So when cooking for company, a bottom or eye round, from the hind quarter is probably a better choice. They are also roughly equivalent the cuts that most Italians would use for a brasato or stracotto: the scamone, girello or noce, although in Italy, too, the shoulder cuts like girello di spalla are popular for slow cooking These cuts are leaner than chuck and tend to have less flavor, however, hence the larding, which takes a bit of work. Of course, larding is not strictly necessary, but it makes an incredible difference in the final flavor. The carrot sweetens the meat and the fat from the pancetta keeps it nice and juicy.

If you like, you can add some herbs to the sauce as it cooks for an extra layer of flavor: bay leaves, a sprig of fresh rosemary or fresh thyme, or a bouquet garni of all three, would all be nice. Some recipes call for adding a clove of garlic to the soffritto.

You will probably have extra tomato sauce, which is delicious over pasta—perhaps better than the meat itself! The taste, if I may say so, is very reminiscent of a good Neapolitan ragù.

Wednesday, November 10, 2010

Quick Note: Crema di cannellini


Here's a quick and easy weeknight supper for you: a purée of cannellini beans, seasoned with garlic and rosemary, and thinned out with water or broth to create a soup. Nothing could be simpler or more satisfying. And if you are using canned beans—which you can, why not?—the soup can be done in five minutes. There is no cream in this soup, by the way, the Italian word crema does not mean cream, as in the dairy product, but simply refers to any smooth, creamy textured purée.

Ingredients

Olive oil
1-2 garlic cloves (or more if you like), whole but lightly crushed
A sprig of fresh rosemary
Boiled or canned cannellini beans
Broth or water (or the cooking liquid if using boiled beans)
Salt and pepper
A handful of parsley, finely chopped

NB: No exact measurements for this one; use as much or as little of each ingredient as you need or feel like using. This recipe is pretty much ad lib.   

Directions

Begin by lightly sautéing your garlic and rosemary in abundant olive oil over moderately low heat. Once the garlic takes on some color, remove both the garlic and the olive oil from the pan. Then pass your cannellini beans through a food mill into the seasoned oil. Allow the beans to insaporire for a few minutes, then add enough water, broth or cooking liquid to thin out the bean purée to the consistency of a soup. Simmer the mixture for a few minutes to let the flavors meld. About a minute before its' done, stir in the chopped parsley. Drizzle with raw, best-quality olive oil just before serving.

NOTES: This basic recipe is incredible flexible and versatile. Usually, it can be served with some crusty bread on the side, or top of a piece of toasted bread laid at the bottom of the plate, or topped with croutons fried in olive oil, and—as picture above—with boiled rice mixed in. Or some soup pasta instead of the rice.

The same method lends itself to just about any other bean or legume: borlotti, lentils, fagioli all'occhio (black eyed peas), chickpeas… you name it. For a more 'refined' taste, you substitute a soffritto of onion, or onion, carrot and celery, for the garlic, in which case don't remove them from the pan as you would the garlic. For a bit more substance, you can also fry some cubed pancetta in the seasoned oil. Or top your crema with some sautéed shrimp or scallops, which makes for an elegant presentation fit for company.

Boiling dried beans takes some time but is very easy. If you have the time, soak the beans in water to cover them amply, either overnight or save yourself some time by bringing them to a boil and let them soak in the hot water for an hour. Pre-soaking is not strictly necessary, but it does save time and helps the beans to retain their taste and texture—although that's not too important if you're going to use them in a purée, of course. Then simmer them in water to cover generously, along with a drizzle of olive oil and a sprig of fresh sage (if you have some on hand) until tender. Season with salt a few minutes before the beans are done. The simmering liquid has lots of flavor and can be used to thin out the crema.

If using canned beans, on the other hand, make sure to rinse them off and drain in a colander. The canning liquid has stuff you don't want to ingest and, besides, it gives a funny 'canned' taste to the dish. When using canned beans, it is best to use broth to give the crema some extra flavor.

Crema di cannellini, when it is kept quite thick, makes for a nice topping for crostini.

Sunday, November 7, 2010

Verza e salsiccia


Not sure about you, but the weather here has crossed the line from pleasantly crisp to downright cold at night. That's as good an excuse as any for some good, stick to the ribs eating. It may sound eastern European, but Italians, too, like their cabbage, especially in colder weather, and like to combine it with pork. The typical Italian cabbage is verza, the kind with fairly loose, crinkly, finely threaded leaves known in English (at least in the US) as "savoy" cabbage, which develops a delicate, sweet taste when cooked. Like other types of cabbage, it marries perfectly with sausage. The dish is not the prettiest thing to look at, but it tastes wonderful, and it warms the body and soul on a cold night.

Ingredients (for 4-6 servings)

4-6 (or more) mild Italian sausages
Olive oil
1 medium onion, thinly sliced
1 head of Savoy cabbage, finely shredded
1 apple, peeled, cored and diced (optional)
Fennel seeds (optional)
Salt and pepper
Broth or water

Directions

Prick the sausages and sauté them over medium heat in a bit of olive oil until lightly browned in a sauté pan or braiser. Remove them from the pan and set aside.

Add the sliced onion and let the onion sauté for a few minutes, lowering the heat if need be to prevent it from browning. (A few drops of water will help things along.) Then add your shredded cabbage and mix it well with the onion. Season well with salt and pepper. Continue cooking, stirring often, until the cabbage has reduced down quite a bit. (You can cover it between stirs, which allows it to steam in its own liquid, which quickens the process.)

When the cabbage has reduced in volume by about half, you can add some diced apple if you like, which gives the dish a slight sweetness. Stir again to mix the apple evenly into the cabbage. You can also add a few fennel seeds, which adds another layer of flavor.

Then add the sausages back into the pan, nestling them into the cabbage at even intervals, and pour in enough broth (or water) to almost cover the cabbage. Lower the heat, then cover the pan, and let the dish simmer for a good 45 minutes to an hour, until the cabbage is literally melting and the sausages are quite soft, too. If there is a lot of liquid left in the pan, raise the heat to high and boil it (almost completely) off. Adjust for seasoning and serve immediately on a warmed platter or straight from the pan.

NOTES: You can use just about any sausage for this dish, although personally I would not choose a spicy variety. The thin, rope-like luganega sausage would be a great (and very typical) choice if you can find it. Otherwise, I usually just use the kind labeled as 'sweet' or 'mild' Italian sausage in stores. You can, of course, use 'regular' cabbage, which would give a different but also very nice result. You could even use red cabbage if you like—not a typical Italian vegetable but tasty nonetheless. The flavorings can also vary—caraway seeds are nice eastern European touch, for example. And if you like, some recipes calls for a dash of white wine vinegar at the very end, which 'brightens' the dish and gives it a sweet-and-sour taste. (Others use vinegar in substitution for the water/broth). A number of recipes call for adding some cubed pancetta to the onion soffritto at the beginning, but I usually don't as I find that the sausage provides enough 'porkiness' on its own. And you can use lard instead of olive oil, if you really want to 'pig out'.

This dish is sometimes served as a hearty soup, by adding much more broth and cutting the sausages into little pieces. The dish can also be used as a condimento for pasta or risotto (again, cutting up the sausage into bite-sized pieces).

Friday, November 5, 2010

Fried Catfish


While Italian or other European dishes appear on our table most days, once in a while I do like to cook a dish from the New World, too. American food has a less than stellar reputation abroad. For many Europeans, it usually brings to mind junk food, fast food and just plain bad food. The stereotype is not totally unjustified—like many stereotypes there is some truth behind the caricature—but what most non-Americans and even a lot of Americans don't realize is that the US does have its own repertoire of wholesome, authentic traditional dishes. And not all of them are heavy, either, like this simple but tasty Southern dish: fried catfish.

In this recipe, catfish fillets are simply dredged in seasoned cornmeal and fried in vegetable oil. Since catfish, a bottom-feeder, can have a slightly gritty flavor, it benefits from pre-soaking in buttermilk (or just plain milk) before frying.

Ingredients (for 4 servings)

4 catfish fillets
Buttermilk (or milk) to cover the fillets
Cornmeal for dredging
Salt and pepper
1-2 tablespoons of Old Bay seasoning (optional)
Vegetable oil
Lemon wedges (for garnish)

Directions

Place the catfish fillets in a wide bowl and cover with the buttermilk or milk. Let it soak for about an hour (although even 30 minutes will improve the flavor).

Remove the fillets from the milk and dredge them in the cornmeal. Pat them on both sides to make sure the cornmeal coating adheres well.

Fry the fillets in about an inch of moderately hot oil, about 5 minutes per side, until nice and golden brown. Serve hot with lemon wedges.

Lively but gentle bubbling is a good sign...

NOTES: As you can see, the recipe is simplicity itself. Like all frying, though, you do need to take care to regulate the temperature of the oil: too hot, and the coating will brown too quickly or even burn, not hot enough and your fish will turn out greasy. Your temperature is right when the oil bubbles in a lively but gentle fashion around the edges of the fillets.

The simplest recipes call for seasoning the cornmeal with just salt and pepper, but living as I do on the shores of the Chesapeake Bay, of course I add a dash of Old Bay seasoning. Many southern recipes I've seen, on the other hand, call for Lawry's Seasoned Salt, cayenne pepper, paprkia or Cajun seasoning. Some recipes will tell you to mix flour with the cornmeal and/or add some baking powder, which I assume will give you a 'puffy' crust—although I have yet to try it.

The frying medium, too, can vary. While most recipes call for vegetable oil of some type, you will see recipes that use butter or another kind of oil (even olive oil, which I assume is a modern adaption) or—and I tend to think this is the most traditional—bacon drippings. Many (perhaps most) recipes call for deep frying but I think shallow-frying works just as well.

I like simplicity, so for me this dish needs nothing more than some lemon wedges as garnish, but, of course, some people will want to use 'tartar sauce', a combination of mayonnaise, capers, and finely chopped pickles and shallots (or onions). As a side dish, to keep it simple, I find a rice pilaf goes very well, followed by a simply dressed green salad. More classic accompaniments include 'hush puppies', deep-fried cornmeal beignets, braised collard greens and—what else?—macaroni and cheese. Any of these will make for a much more substantial meal.

Saturday, October 30, 2010

Chicons au gratin


There's something about chilly weather that demands a nice gratin—that piping-hot, cheesy, gooey goodness is just the thing to warm your body and soul on a mid-Autumn evening. And here is one that is sure to satisfy: another Belgian classic, chicons au gratin, also known in France as endives au gratin. It consists of Belgian endives, braised in butter, wrapped in ham slices and covered with a rich mornay sauce before getting browned in the oven. (I get hungry all over again thinking about it!)

Ingredients (for 4 servings)

4 medium-sized Belgian endives
30g (2-3 tablespoons) butter (plus a bit more to butter the baking pan)
Salt and pepper
500ml (2 cups) of béchamel sauce (see recipe here)
200g gruyère (or other good, meltable Swiss cheese), shredded
4 slices of best-quality cooked ham 

Directions

Begin by removing any discolored leaves from the endive and trimming the root end. Place the endives in a sauté pan with the butter and a glassful of water. Season with salt and pepper.


Allow the endives to simmer, covered, until they are quite soft, about 20-30 minutes. If you like, you can let them go longer, allowing them to turn a nice golden brown. Either way, drain the endives, root ends up, so that any excess water will drain off. (You may be tempted to skip this step, but don't—otherwise, you may wind up with soggy vegetables and a runny sauce!)


While your endives are braising, make your béchamel sauce in the usual way, and when it is done, add the gruyère, holding back about a third, however, for later. For extra flavor,  you can add some of any cooking liquid left over from the braising or draining of the endives. (This sort of béchamel with cheese is called a sauce mornay.)

When your endives are well drained, take them one by one, and place them on one of the ham slices, then roll the slice around the endive, covering it completely.


Butter a baking dish just large enough to contain your endives. Arrange them neatly in the dish, then pour over the mornay sauce. Cover the dish with the remaining cheese. Dot the top with some additional bits of butter.


Bake the dish in a hot oven (200C/400F) for about 30 minutes, or until the top is nicely browned and the sauce is bubbling hot. Let the dish cool off for a few minutes before serving.

NOTES: The success of this simple dish will rely heavily on the quality of its ingredients. Besides the endives themselves, which should be fresh, of course, and ideally free of any green leaves, you want to use the best quality ham and cheese you can afford. If you use packaged ham slices and supermarket 'Swiss cheese', you will wind up with something tasty enough but pretty pedestrian. Use real, good ham and true gruyère and you will have something very special indeed.

You can save some time by simply parboiling or, better yet, steaming the endives in lieu of braising. Many if  not most recipes call for it, in fact, and it takes only about 10-15 minutes. But I find that braising in butter makes a subtle but significant difference in taste and texture. And, not to nag, but  let me repeat: draining the endives any excess liquid is perhaps the single most important 'trick' to success, so don't forget!

This dish can be served on its own as a hefty starter. As a main course, it is often accompanied by potatoes, being Belgian, some pommes frites would be an obvious choice, although I find they go very nicely with either mashed or even just plain steamed potatoes which are delicious dipped in that mornay sauce....