Sunday, August 29, 2010

Carne alla pizzaiola


One of the pillars of everyday Neapolitan cuisine, this simple dish is a great solution for those times when you feel like a bit of solid sustenance but don't feel much like cooking something elaborate. A bit like slapping a piece of meat on the grill only a bit tastier. The name of the dish translates loosely as 'pizza-style meat' because of the sauce of tomato and oregano, a combination not nearly as ubiquitous as non-Italians often imagine but commonly associated with pizza. It goes by various names—manzo alla pizzaiola, fettine alla pizzaiola, bistecca alla pizzaiola—but, more often than not, it is simply called 'la pizzaiola'.

There are two primary ways of making pizzaiola, quick or slow, depending on the kind of meat you are using:

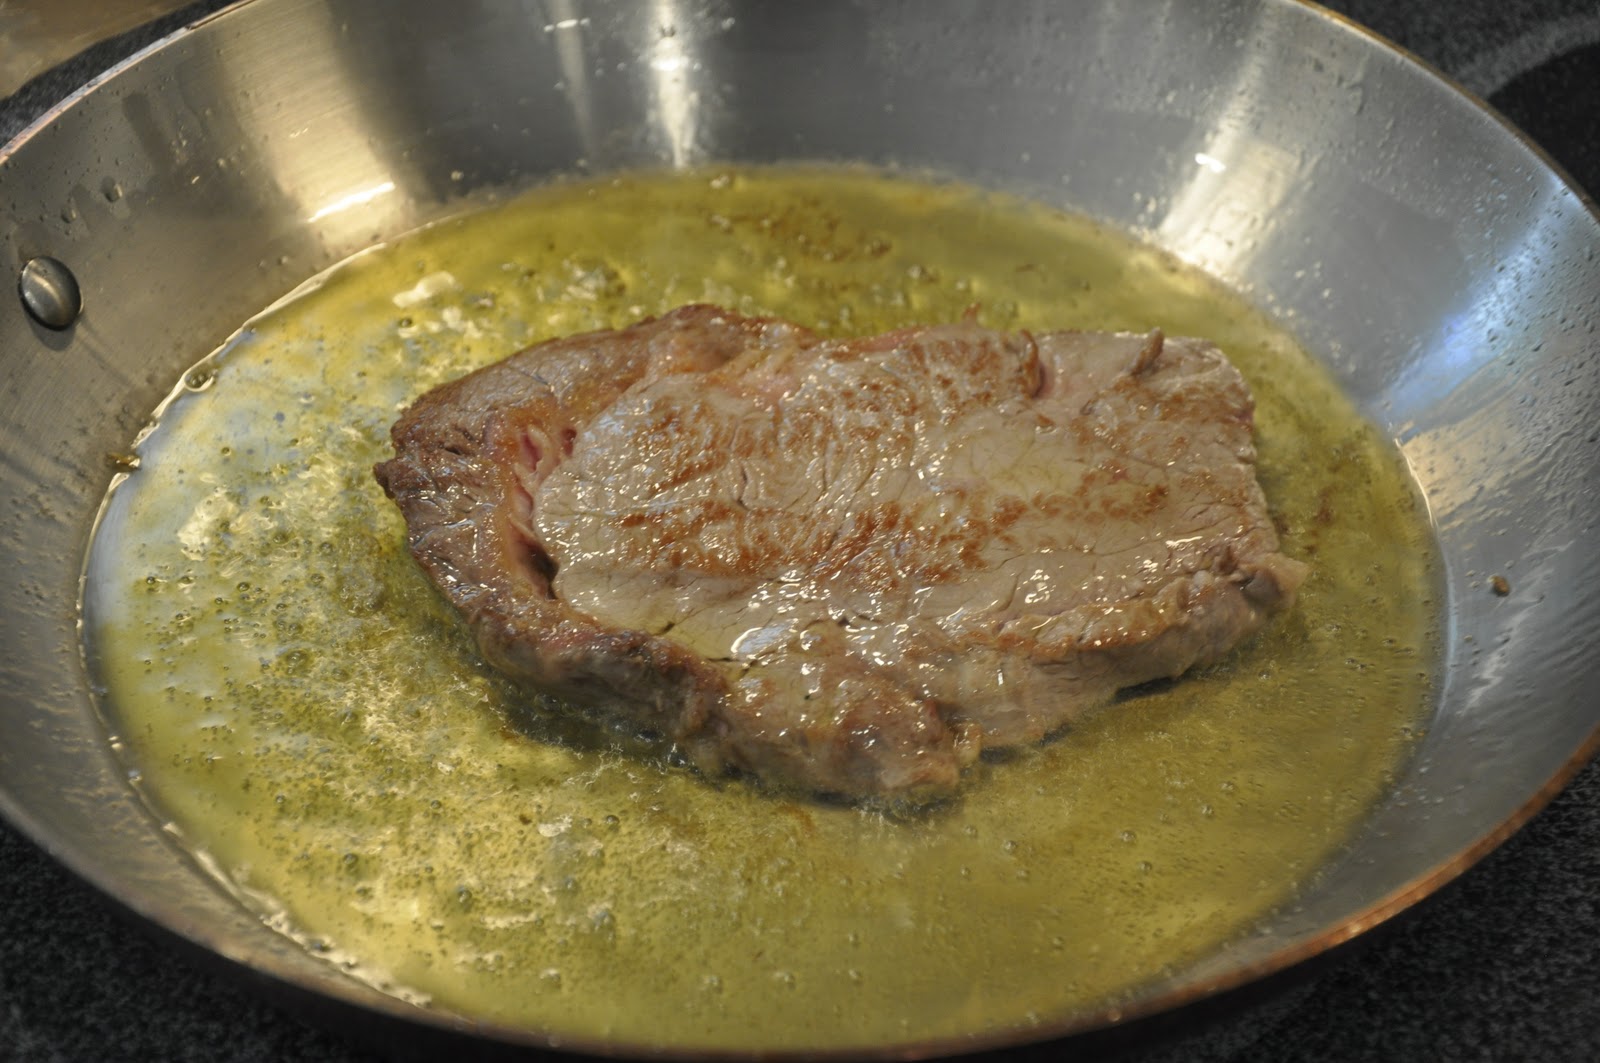
The Quick Method: If you are using tender, lean beef, then you want to opt for the quick version. In Italy, they sell thinnish (but not paper thin) slices of beef called fettine di manzo or just fettine. If you can't find anything like that, you can use boneless steaks (as pictured). If they are any thicken than say, 2 cm (1/2 inch) then I would suggest that you cut them into half thicknesses. In either case, pound your slices with a meat pounder or the back of a heavy skillet. Pat each slice dry to ensure good browning.

Add enough olive oil to nicely coat the bottom of a heavy skillet. Turn the heat to high and when the oil is very hot, quickly brown a clove or two of garlic (taking care that it does not burn) then add the beef slices and sear them quickly on each side. They should be just lightly caramelized. Don't crowd the slices which, as you probably know, would impede proper browning—you can do them in batches if need be. Remove the slices as they brown. 

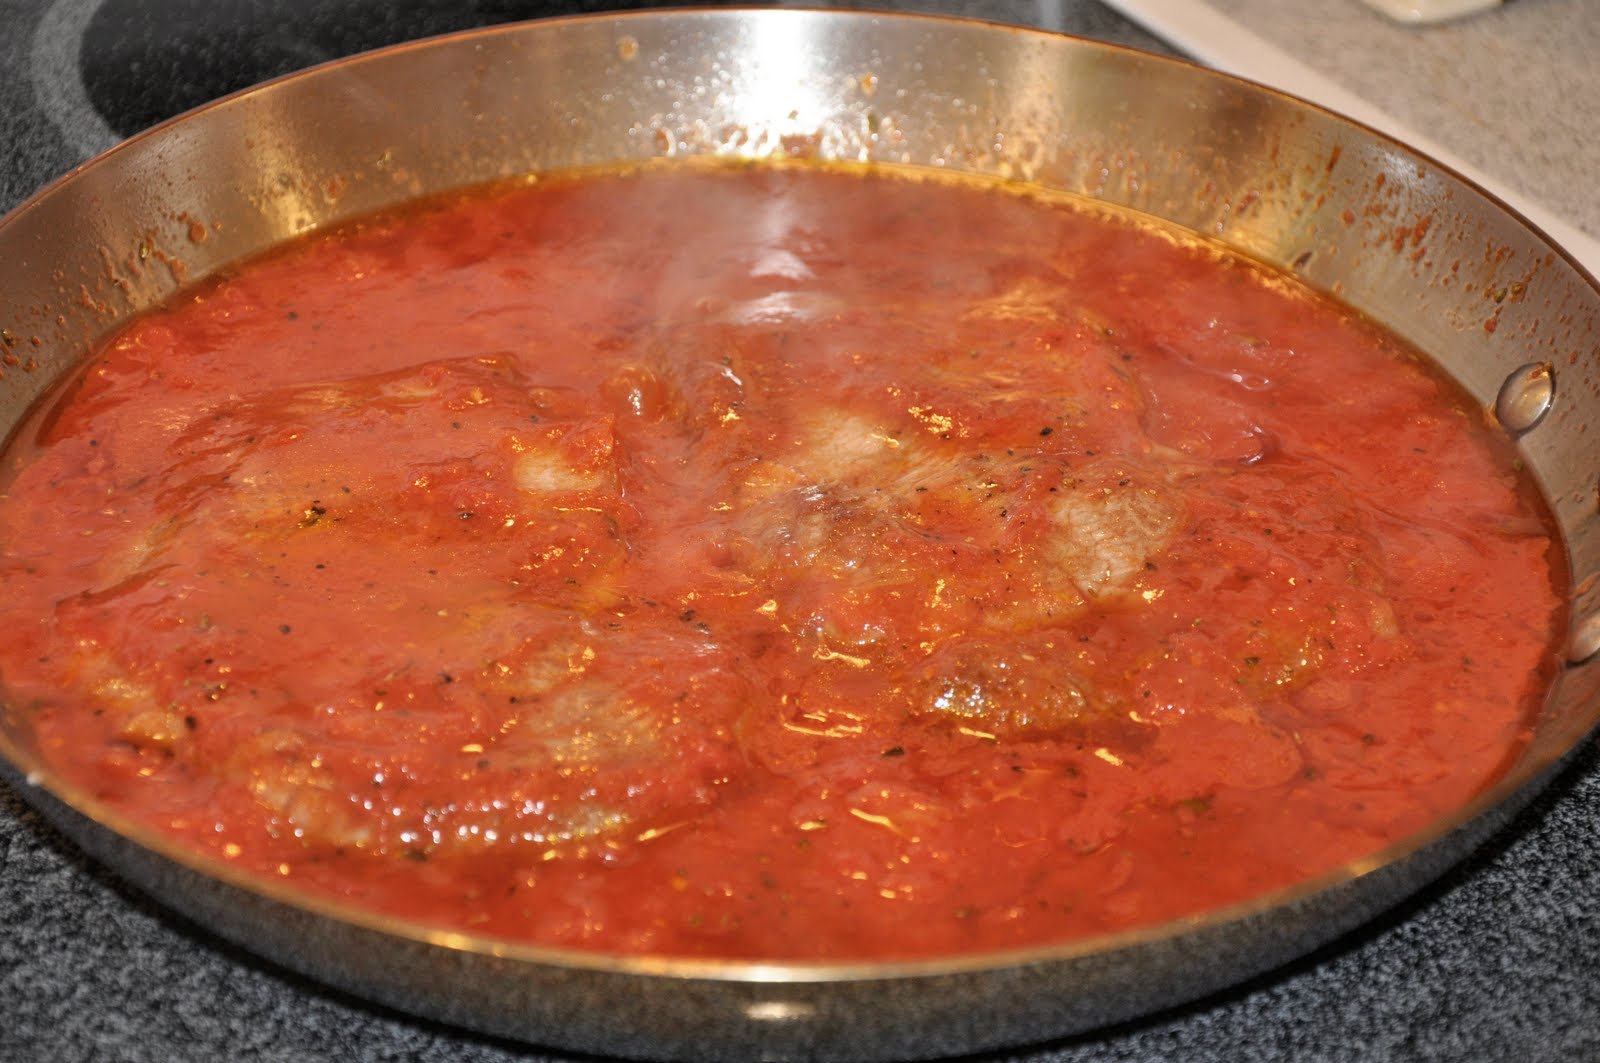
Add an ample amount of best-quality canned tomatoes, which you can simply crush with your hands, to the oil. (In the summer, if you have really good ripe fresh tomatoes, you can chop them up roughly and use them instead.) Lower the heat, season with salt, pepper and a nice sprinkling of dried oregano. Now, a word of advice: even if the oregano gives this dish its characteristic 'pizza' flavor, don't go wild with it. A little dried oregano goes a long way and you want its aroma to complement but not to overwhelm the taste of the meat.

After the pizzaiola sauce has simmered for a minute or two, add back your beef slices and continue to simmer away for about 10 minutes, until the sauce has reduced nicely and the meat is fully cooked through. You want to keep your sauce simmering at a moderate pace—not too slowly or the sauce will not reduce, but not too quickly either, which would tend to toughen the meat. Although I usually love my beef 'barking' rare, this is one dish where the meat really has to be well done, both so that the beef has time to absorb the flavor of the sauce and because, for whatever reason, tomato sauce and rare beef do not really pair very well.

The Slow Method: Although the above method is perhaps the most common way of making pizzaiola these days, the original recipe used a rather tougher cut of beef, cooked slowly. According to the authoritative JC Francesconi, author of La cucina napoletana, the typical cut in Campania is called the colarda, taken from the rear leg of the steer, a cut that is not often found even in other parts of Italy. Other places, the costata (rib) or noce, a fillet taken from the inner thigh, are used. In the US, I'd use the kind of cut you'd use for a pot roast, sliced, like a bottom round perhaps. All the ingredients are placed together in a Dutch oven, covered, and simmered over low heat for about an hour, adding a bit of water or white wine if the sauce gets too thick. This method results in a wonderfully savory version of the dish, but it does not lend itself to a 'spur of the moment' approach.

NOTES: The measurements are really pretty loose in this dish, but you may want to make ample sauce, which is wonderful with pasta, either as a first course to the meat or saved for another occasion. The sauce from the slow method is, of course, much more savory.

Variations abound, in particular for the quick method: for a lustier sauce, you may want to add olives, capers, anchovies and/or a bit of red pepper flakes. Some recipes, including Francesconi's, recommend adding a bit of white wine as well which gives the sauce a little 'zip'. Some recipes head in the opposite direction, so to speak, and omit the oregano and other flavorings in favor of a pure tomato sauce, although frankly that sounds a bit dull to me. Some modern recipes will substitute a soffritto of onion, carrot and celery for the garlic, which provides a more 'refined' but less characteristic flavor. Not all recipes call for the initial searing of the meat slices, but I find that it lends a nice depth of flavor. 

And if you are feeling particularly extravagant, you can place the cooked slices in a baking pan, nap with the sauce and lay over slices of mozzarella. Then pass under a broiler just long enough to melt the cheese and serve.

The basic method is very versatile. Other sorts of meat or even fish can be made using the same method: older veal, for example, or chicken or turkey breast. As for fish, choose one with nice, firm texture that will stand up to the assertive sauce, say some swordfish, tuna or mackerel, cut into 'steaks'. And you can even make hamburger patties this way!

Saturday, August 28, 2010

Lasagne in bianco


As the summer wanes here in the northern hemisphere and the temperatures begin to dip, it will soon be time to think about turning the oven on again. And, in our house, that means it's time to get ready for lasagna! One of the most versatile ways of making lasagna is in bianco, meaning without tomato sauce. It is a style typical of central and northern Italy. Instead of tomato sauce, you fill your lasagna with béchamel layered with whatever condimento you feel like, whether meat, fish or, my personal favorite, any sort of vegetable in season, sautéed in butter or oil olive, often with garlic or onion to lend savor.

Back in the spring, I made an example of this style of lasagna, lasagne agli asparagi. That post took you through the basic technique, with step by step, illustrated instructions, so I won't go into details here. The same technique can be used with any other vegetable, with the only difference being how you treat the vegetable condimento.

This time, rather than asparagus, I used spinach as my condimento. If you are using young spinach, you simply prepare them in padella, adding the rinsed spinach directly into your seasoned olive oil, without draining them too well, and sauté until they have fully wilted, no more than a few minutes. If you are using older spinach, the kind with crinkly leaves, you'll need to trim the leaves of their stems, then parboil the leaves in abundant salted water for a minute or two before sautéing them.

Then proceed as usual, layering fresh pasta, béchamel, sautéed spinach and abundant grated parmesan until you have exhausted your ingredients, ending with bechamel sprinkled with grated cheese and dotted with butter. (Don't build up more than four layers, however.) Bake in a hot oven (200°C/400°F) for about 20 minutes, or until just a bit browned on top. As with all lasagna, you should let it cool off for at least 10-15 minutes before serving it. 

The first layer: pasta covered with bechamel, sauteed spinach and cheese

NOTES: As mentioned, the same technique can be used with just about any filling that strikes your fancy. In the late summer, I particularly like zucchini, for example, which you can sauté just like the spinach in garlic and olive oil. Or, something different, why not try some luscious summer tomatoes? Fellow blogger Don Hogeland, also known as "Sortachef", just posted an especially nice version of lasagna, a kind of caprese style, with fresh, uncooked tomatoes and mozzarella.

If you are not feeling too ambitious, you can save considerable time by using store-bought lasagna sheets. Here, though, you need to be a bit careful. A lot of so-called 'fresh' store-bought pasta is made with semolina flour, which makes for a tougher dough that is fine for southern-style lasagna but not very apt for a delicate lasagna in bianco. Your better bet is actually using dry 'no boil' lasagna, but be aware that no boil pasta absorbs a lot of liquid as it cooks, so use a rather loose béchamel, and lots of it.

As the weather cools off, you may want to switch fillings—I think mushrooms are particularly wonderful, or radicchio, pumpkin, butternut squash… but I am getting ahead of myself. Late summer is a special time of year, with its abundance of fresh produce, so enjoy the last of the summer vegetables while we can—and this is a particular delicious way to do so.

Friday, August 27, 2010

Panzanella


Panzanella, a Tuscan bread salad, is a great way to use old bread and avoid cooking in hot weather at the same time. And it is so simple to make, too. Take some slices or chunks of stale bread and dunk them in water until they begin to soften. This should not take long. Remove them and squeeze out the water, then shred the bread with your hands into a salad bowl. Throw in some chopped ripe tomatoes, sliced or chopped red onion and a few basil leaves. Dress your salad in the usual manner, with abundant olive oil, some wine vinegar, salt and pepper. You can serve panzanella immediately if you like, but it doesn't mind a wait. In fact, it develops flavor if let it rest for a while, say an hour or two. It can even be made well ahead, in which case you may want to hold off on the vinegar, which can become overpowering, until you are ready to serve.

NOTES: It is quite common to add some chopped cucumber to the above basic recipe, which I do whenever I have it on hand. It lends a certain brightness to the recipe. Chopped celery can also be a nice addition. In fact, I sometimes like to experiment with panzanella—with apologies to my Tuscan friends—with all sorts of additional ingredients (see my post on panzanella «con un po' di tutto»).
 

Red wine vinegar is usual for panzanella—remembering that Tuscany is the home of Chianti wines—but personally I prefer to use white wine vinegar which doesn't 'stain' the salad and, to my taste anyway, has a less assertive flavor. A few drops of lemon juice would not be amiss, either. There are also recipes that omit any acid altogether. Some recipes call for you to add the vinegar to the water in which the bread is soaked, rather than as part of the dressing.

Whether you chop your vegetables large or small is also a matter of taste. I vary according to my mood, although I tend to like moderation in all things, so I usually use a 'medium' chop. So those of you who like to get fancy, you can use a very fine chop and form the panzanella in a ring mold in individual portions as an antipasto for an elegant summer meal.

The ideal bread would, of course, be Tuscan bread, traditionally the darker pane scuro. But if you don't happen to live in Tuscany, any good quality, well-structured bread will do the trick. Just make sure it is the kind of bread that will stand up to being soaked, squeezed and shredded without turning into mush. Sandwich bread won't do—you need the kind of bread that you buy in a whole, unsliced loaf. One good test to see if the bread has adequate structure is to squeeze the loaf when you buy it: if it collapses easily (like Wonder bread) then it won't work for this dish. The more resistance it gives, the better—well, to a point, of course…

The measurements are really totally up to your taste. I've seen the dish made with mostly bread, or with mostly vegetables. This being an old peasant dish, surely the proportions depended entirely on what was on hand at the time you made the dish, and that is what I do, too. A good rule of thumb, however, is that bread should make up about half the volume of the salad.

Sunday, August 22, 2010

Pollo fritto alla toscana


Is there anyone who doesn't like fried chicken? Nice and crispy on the outside, tender and juicy on the inside… I can get hungry just thinking about it!

Tuscans have a particularly savory and simple way to fry chicken: you cut up a young frying chicken, called a pollo novello in Italian, into smallish pieces, making sure to cut the breasts in half and split the thighs from the drumsticks. If you like, you can bone the pieces, which is relatively easy to do when the chicken is cut up.

You then dredge the pieces lightly in flour, then in beaten egg and shallow-fry them in olive oil over moderate heat. When they are nice and golden brown, season them with salt and serve them right away, with lemon wedges if you like.

And that's all there is to the basic recipe! It could hardly be simpler.

NOTES: Of course, this kind of simplicity relies on the best quality ingredients for success. The chicken, in particular, needs to have great flavor. Modern chickens, as we all know, can be pretty flavorless, so if you're not working with a fine, organic free-range chicken you are confident about, although it is not part of the original recipe, you may want to marinate the chicken beforehand. My favorite marinade for chicken includes salt, pepper, a finely chopped garlic clove, chopped fresh rosemary, freshly squeezed lemon juice and a good splash of olive oil. Leave for an hour or so before proceeding with the frying.

You can use pre-cut chicken pieces, of course, which saves time. This time, I happened to have some chicken 'tenders' (cut up and boned chicken thighs) on hand, and they worked very well indeed.

The main alternative to this version of Tuscan fried chicken is to substitute a pre-made batter for the usual flour and egg. The batter is made with flour, salt, olive oil and egg, then thinned out with some white wine. It needs to rest for an hour or two before using. You can also add some seasoning to the beaten egg, some grated cheese, chopped parsley, salt, pepper, although these additions are definitely heterodox. In fact, many traditional recipes admonish you not even to add salt to the egg, but to salt the chicken when serving, to keep the batter crisp and the tastes 'clean', in true Tuscan style.

In Italy, fried chicken is typically accompanied by fried vegetables appropriate to the season. For this meal, some nice fried zucchine 'sticks', dipped in the same flour and egg, went very nicely. And you can add to that other fried meats, typically chicken and calves' brains, for a fritto misto.

The trick to making fried chicken lies in maintaining the oil at the right temperature while you fry. If the oil is too hot and the chicken will brown before it is fully cooked inside; if it is not hot enough, the chicken will turn out a greasy mess. Keep your flame moderate, adjusting it up or down as needed while the chicken fries so that the oil bubbles up around the chicken pieces in a lively but not furious manner. If you have any doubts about the chicken being fully cooked, you can pop them in a hot oven for a few minutes as well—which you should do anyway to keep the chicken warm if you need to fry in batches, or to keep the chicken hot while you enjoy your first course. I find a rack is perfect for the task; it allows the hot oven air to circulate around the chicken pieces, ensuring they stay nice and crispy.


Pollo fritto alla toscana is, in fact, very similar to—albeit a bit more austere than—the Jewish-style fried chicken for Hannukah that I blogged about back in December. 

Saturday, August 21, 2010

Parmigiana di melanzane


Being a lover of good food, I find it almost impossible to answer the question 'what's your favorite dish?' But if I had to, my answer would probably be eggplant parmesan--parmigiana di melanzane--the way Angelina used to make it.

This is a simple dish to make, but it involves several steps. Allow yourself a good two hours to prepare this dish. It tastes much better made ahead, so if you have the time, make it in the morning and have it for dinner or, even better, make it at your leisure the day before.

Step 1: Prepare the eggplant. You begin with eggplant, of course. For this dish, the large, purple variety is preferable; about two should do you for a good sized baking dish. You cut the eggplants into fairly thin slices. Now you should 'purge' them of their excess liquid, which can be bitter. Sprinkle the eggplant slices with salt, and then lay them in a colander laid on top of a plate. Cover the slices with a small plate on which you should place something a bit heavy like a can of beans or tomatoes. This will help press the liquid out of the eggplant. Leave them for about an hour.


You should notice a small puddle of brownish water below the colander, which you should discard, of course. Remove the slices from the colander and pat them dry.


Step 2: Fry the eggplant. Now you dip the eggplant slices in flour, followed by an egg and cheese 'bath' made from beaten eggs, grated pecorino cheese, finely chopped parsley, salt and pepper. Shallow fry the eggplant slices over moderate heat until they are golden brown on the outside and tender inside.


You will need to fry the eggplant slices in batches. As each batch is done, drain and set on paper towels to absorb the excess oil as you continue with the next batch. Repeat until you're done.


Step 3: Prepare the tomato sauce. While this is going on, prepare a very light tomato sauce by combining chopped tomatoes (fresh if in season, but canned tomatoes are fine), a few leaves of fresh basil, salt, chopped garlic and just a few drops of olive oil. (Some people omit the olive oil altogether since the eggplant, even after draining, can be a bit oily.) Simmer for about 15 minutes, until the tomatoes have melted into a sauce If using canned tomatoes, add a bit of water to loosen the sauce before simmering. You will want a good amount of sauce, so be sure to make a potful--you can always any extra to dress pasta.

Step 4: Prepare the cheeses. Take a large mozzarella, preferably fresh, and slice it. Grate lots of parmesan cheese, at least a cupful (you can grate it as you assemble the dish).

First layer down...
Step 5: Assemble the dish. You are now ready to assemble the dish. In a bake-and-serve pan, place a layer of the fried eggplant slices, then a bit of the tomato sauce, then a few mozzarella slices, a bit of shredded basil (optional) and grated parmesan cheese. Season. Then add another layer of eggplant and continue until you've used up your ingredients. End with tomato sauce and parmesan. (Don't put mozzarella on top, it will brown too quickly in the oven and burn.)

Ready for the oven...


Step 6: Baking. Bake in a hot oven (400 F, 200 C) for about 30 minutes, or until the dish is bubbling hot and the top a bit brown. Don't worry if it even looks a bit 'burnt' around the edges--that's normal and, to some tastes, the best part! Let the dish cool a bit before eating, at least 15 minutes. In fact, it tastes best made ahead and reheated (just a bit) before eating. It can also be eaten at room temperature. Just don't eat it piping hot, because you will miss the full, wonderful flavors!

NOTES: A friend from Naples once told me that this version of parmigiana--made with eggplant slices dipped in egg--is typical of the interior of Campania, the region where Naples is located and of which it is the capital. In fact, that's where Angelina was from, a small mountain town near Benevento. In Naples proper, this dish is made with eggplant slices that are simply lightly floured and fried. Most modern recipes you will find follow the Neapolitan method. I've tried it that way and it makes for a lighter dish. But I still like Angelina's version best! For an even lighter dish, you can brush the eggplants with olive oil and grill them instead of frying. The result is actually very nice, but you are getting pretty far from the original flavor and texture of the classic dish. They also make this dish in Sicily (in fact, the Sicilians claim the dish is theirs-see below) but without the mozzarella cheese.

If you are pressed for time, you can skip the initial 'purging' of the eggplants. As long as the eggplants are reasonably fresh, it should not make that much difference. I sometimes skip this step myself. But be aware, there is a chance that the dish will have a bitter aftertaste. And if you want an even quicker dish, instead of a tomato sauce, you can use passata di pomodoro or crushed canned tomatoes--it will cook in the oven--a drizzle un filo d'olio over each layer.

Some recipes calls for baking the dish in a moderately slow oven and for a longer period, from 45 minutes up to an hour, raising the temperature at the very end if necessary to brown the top. The advantage of this method is that you are less likely to burn the top.

This dish can play many roles in an Italian meal. It can serve as an antipasto, as part of a buffet, as a light secondo or as a piatto unico: a single-dish meal in itself. And, to be honest, I even eat it, the morning after I make it, for breakfast!

By the way, as is typical for a popular dish with many variations, there are a good number of different stories about the origins of this dish. some of them place it in or around Naples, while say the dish originated in Sicily. Despite the name, however, it is very doubtful that this dish comes from Parma. The name may refer simply to the generous use of parmgiano cheese in the dish. Some early sources say that the parmigiani were known for making layered vegetable casseroles. The Sicilians say that the name comes from  parmiciana, which the dialect word the slots in window shutters (persiane in proper Italian) since the eggplant slices lined up in the baking dish were said to resemble said shutters.

This interesting article discusses the various claims and their relative merits. If you can read Italian, Wikipedia also has an article on the dish. Both place the probable origin to Campania and to the 18th century chef and writer Vincenzo Corrado.

My sous-chef....


Eggplant Parmesan on Foodista

Sunday, August 15, 2010

Insalata di riso


Mid-August, when the temperatures climb to tropical heights, is a time when even the enthusiasm of even the most avid cook can begin to wane. Italians often turn to easily prepared dishes that need minimal or no actually cooking. Salads are an obvious choice, and rice salads are a favorite. Not only are they delicious, but they are easy to prepare, adaptable to just about whatever happens to be in the cupboard and can be easily made ahead—which makes them perfect picnic or summer buffet food.

Begin by boiling your rice al dente. It will take anywhere from 10-15 minutes to boil your rice, depending on the variety of rice you use; rice cooks more quickly when boiled in abundant water than for a risotto. Drain the rice in a colander and rinse it quickly under cold water to stop the cooking. Give it a good shake or two to get out all the water and transfer to a large mixing bowl.

Then add your choice of condiments from your pantry. My favorite is based on tuna fish, which you add to the boiled rice together with a handful of capers, some chopped gerkins and a handful of olives (green and/or black, as you prefer). I sometimes add some chopped anchovies as well. Some people add even more ingredients, usually pickled onions or pimentos, or both. Today I had some mozzarella on hand, so I chopped that into cubes and added it, too. 

Finish off with some chopped parsley for color, a good drizzling of olive oil, salt, pepper and some freshly squeezed lemon juice—just enough to 'brighten' the dish. Mix gently but well with a spatula until the ingredients are evenly mixed. (Try not to break up the tuna completely—it's nicest with little chunks here and there, I find.) You can serve the salad immediately, but it develops flavor if you let it rest for an hour or more.

Rice salad can be made as much as a day ahead—in which case, leave it in the fridge, of course, and take it out about an hour ahead so it returns to room temperature. Before serving, you may want to 'refresh' the salad with a bit more oil and lemon juice before serving.

NOTES: And unlike risotto, you can really use just about any kind of rice. Italians often use a slightly lesser grade of rice—called 'fino' rather than a 'superfino' like arborio, carnaroli or vialone nano that you would use for a risotto. These go by the names of ribe or Roma, and you can sometimes find these in specialty shops. You can also use long grained rice if you prefer. In fact, many Itailans use parboiled rice, since it holds its texture well when made ahead. Personally, I rather like sticking with a superfino.

As for measurements, I follow the 'golden rule' of 100g of raw rice per person. The amount of condiments really depends on your taste, but for 200-400g of rice I use a small to medium-sized can of tuna, plus about a handful of each of the other ingredients. Just trust your instincts.

Like pasta, there is an almost infinite variety of rice salads—and you can really just make up your own version using whatever suits your fancy. Besides this tuna-based salad, another very popular salad includes—believe it or not—sliced würstel, the German word that Italians use for those little smoked sausages otherwise known as 'hot dogs'—cubed boiled ham can substitute—usually combined with cubed pieces of swiss cheese, olives and some of those pickled vegetables. Also popular is a completely vegetarian version with mixed pickled vegetables called giardiniera. Or dress your rice with prepared seafood salad from a deli for an insalata di riso marinara. Some halved cherry tomatoes can be added to any of these varieties if you like. And all are finished off with a dressing of olive oil, salt, pepper and lemon juice.

Feel free to give full rein to your imagination and creativity. Italian cuisine has all sorts of 'rules' that Italians take very seriously even if they are often broken—but there is something about summer that makes people want to let their hair down, so why fight the urge?

Sunday, August 8, 2010

Baccalà alla napoletana


Baccalà, or salted codfish, marries especially well with tomatoes, and the marriage reaches its apogee of deliciousness in the summer, when tomatoes are at their best. And who does tomatoes better than the people of Campania, home to Italy's best tomatoes?

Baccala alla napoletana, Naples-style codfish, is a simple dish of bold flavors reminiscent of pasta alla puttanesca. You begin, as usual, by soaking the salt cod for up to 24 hours in several changes of water. Drain the cod, pat it dry, and cut it into serving pieces.

Now make your sauce, in a skillet or flame-proof baking pan, by very lightly sautéing a soffritto of chopped garlic and parsley in olive oil until it just begins to give off it fragrance. Immediately add roughly chopped very ripe tomatoes and simmer gently. When the tomatoes start to melt into a sauce, toss in a handful each of capers—preferably the salt-packed kind, rinsed and dried—and olives—preferably the small black Gaeta or Niçoise variety.

While the sauce is simmering, lightly flour and fry your baccalà pieces in olive oil until they are lightly browned. As they brown, transfer them to the pan or skillet with the sauce.

When all the baccalà has been added to the sauce, take a spoon and nap a bit of the simmering sauce over the fish pieces. Now you have a choice: you can continue simmering the dish over the stove, or you can place the dish in a hot oven (200°C, 400°F) for 10-15 minutes, until the sauce has reduced to a nice consistency. I like the oven method, as serving the baccalà direct from its baking dish makes for an attractive presentation at table.

Remove the dish from the oven, sprinkle with a bit more chopped parsley for color, and serve with some nice, crusty bread.
 
NOTES: For some pointers on buying and soaking baccalà, check out this post.

If tomatoes are under-par or out of season, you can use canned tomatoes for this dish. For tips on selecting the best canned tomatoes, see this post.

Even after soaking, you may find that the texture of salted codfish is a bit firmer than you like your fish to be. If you prefer a softer texture, poach the codfish pieces for five minutes or so, drain and let them cool off before flouring and frying them.

Tuesday, August 3, 2010

Pomodori ripieni di riso

A staple of summer picnics and tavole calde, pomodori ripieni di riso, tomatoes stuffed with rice and oven roasted, make for a simple and relatively quick weekend dinner, part of a buffet or a tasty antipasto for a summer dinner for guests. Here's the recipe:

Take as many tomatoes as you have dining companions, cut off (but don't discard) the tops. Scoop out the insides of the tomatoes and chop them up, making sure you don't lose the juices. Mix the chopped up insides with some rice, which you will have parboiled until they are about half-tender. Season the rice mixture with salt, pepper, a drizzle of olive oil, just a bit of finely minced garlic and some minced herbs, typically oregano, basil and/or parsley.

Spoon the seasoned rice mixture into the insides of the tomatoes, taking care not to pack them too tightly, and place their tops back on top of the rice stuffing. Place them in a well-oiled baking pan and scatter some wedges of potato around the tomatoes. Season the dish with salt and pepper and, if you like, a sprinkling of oregano. Drizzle everything with some more olive oil. Roast in a hot oven (200C, 400F) for about 45 minutes, or until the rice and potatoes are fully cooked, the tomatoes nicely roasted—they will crinkle up and their edges will char a bit. Check on the dish from time to time while it is roasting. If it seems dry, drizzle over a bit more oil. You can also move the potatoes around so they cook evenly and are well coated with the oil.

Pomodori ripieni di riso are usually left to cool and eaten at room temperature or just slightly warm.
 

NOTES: In Rome at least, these tomatoes are invariably served with potatoes but if this is too much carb for your taste, you can omit them. Some recipes call for reserving a bit of the tomato pulp and mixing it with the potatoes so they too get some tomato flavor and a bit of color.

You can also play with the rice stuffing. As indicated, the herbs can vary with your taste. Some recipes omit the garlic, others call for some grated pecorino or parmigiano. Some add capers, olives and/or chopped anchovy, although these ingredients would change the character of the dish pretty radically and, in my humble opinion, upset the balance of flavors.
Needless to say, the success of this simple dish will depend on the quality of its ingredients, especially the tomatoes. This is really something you should save for the best, tastiest summer tomatoes you can find. The tomatoes themselves should be large enough to stuff, of course, but should not be gigantic, either, or you will wind up with too much stuffing, making for a rather stodgy dish. The tomatoes should be fully ripe, but not at all mushy, or they will disintegrate in the roasting process.

As far as the rice is concerned, the typical rice would be short-grained, but this is a forgiving recipe. You can even use leftover Chinese take-away, which is what I used tonight! Some recipes calls for adding raw rice, but in my experience this inevitably leads to a dry, chalky filling. As mentioned, it is important not to pack the stuffing too tightly or to overstuff the tomatoes; they will otherwise expand and rip open the tomatoes—not the end of the world by any means, and the tomatoes will still taste good, but you may fare una brutta figura (make a bad impression) if company is coming…

Sunday, August 1, 2010

Maiale Ubriaco

 
They don't make pork like they used to. Modern pork is raised lean for health reasons but in the process a lot of flavor got lost. But there are ways to make up for the lack of intrinsic flavor, like this simple Tuscan method for making pork chops called maiale ubriaco, or 'drunken pig'. (NB: It could also be translated as 'drunken pork', since Italian does not have separate words for 'pig' and 'pork'.)

Make a trito by finely mincing a garlic clove or two and a handful of parsley. Add it to a skillet large enough to hold all your pork chops in a single layer, together with salt, pepper and a sprinkling of fennel seeds. Sauté over moderate heat until you begin to smell the garlic and fennel.

Add your pork chops (well dried with a paper towel to aid browning) and brown just lightly on each side, for about 3 or 4 minutes per side, taking care to regulate the heat so that the garlic does not burn. Pour over some red wine, just a glassful or so, lower the heat a bit so the wine simmers gently. Continue simmering, turning the chops from time to time to ensure even cooking and coating with the red wine. They should turn a nice burgundy color as they absorb the wine.

When the red wine has almost completely evaporated, transfer the chops to a serving dish. Raise the heat to high and add a bit more red wine to deglaze the pan, reducing the wine to a syrupy consistency. Pour over the pork chops and serve immediately.

NOTES: This version of the dish is suitable for lean pork chops like loin and center cut chops, as it cooks fairly quickly, no more than 20-30 minutes total. This relatively short cooking time should ensure that the chops do not dry out too much, but do look for chops with a bit of fat on them.

Another version calls for adding much more red wine—enough the barely cover the chops—and a much longer cooking time (45-60 minutes) covered. Of course, this gives the pork a much more intensely 'winey' flavor and produces a wonderfully thick sauce. A nice dish for cooler weather. For this 'winter' version of the dish, you need a cut of pork that will stand up to long, slow, moist cooking, like a pork shoulder chop.

Some recipes do not call for the fennel seeds, but they are typical of this dish and lend a nice, somewhat unusual flavor. In some versions, you reduce the wine until it has entirely evaporated and serve the chops without a sauce. Conversely, some other versions will have you cook the chops completely without wine, remove them, and then add the trito, sauté briefly, then deglaze the skillet with red wine. You then pour the resulting sauce over the chops.

For the wine, a Tuscan red would naturally be ideal. You could simply use a bit of whatever wine you plan to drink with your meal. Nothing too fancy, mind you, a young Chianti or a simple sangiovese would do nicely. For the winter version, you may want a wine with more body.