Sunday, January 31, 2010

Cavolfiore alla napoletana


Here's another quick and easy vegetable side dish or light supper: "Neapolitan style" cauliflower, known in Naples itself as cavolfiore con passi e pinoli.

It may come as a shock, but this dish contains no tomato, giving lie to the notion that all Neapolitan dishes rely on that ubiquitous vegetable. You begin by lightly boiling a trimmed head of cauliflower for 5-10 minutes, depending on its size, draining it and letting it cool a bit. Then cut the head into flowerets, dividing the largest ones so all of them are of more or less equal size. You can cut up the stem as well—which is perfectly edible as well—into sections. Allow the flowerets to braise over gentle heat in some olive oil and a clove of garlic for about 20 minutes, or until just tender. Regulate the heat if need be—the cauliflower should brown only slightly—and stir from time to time to ensure even cooking. (Remove the garlic clove if it browns too much.) When the cauliflower is just about done, add a mixture of equal parts chopped parsley, pinoli nuts and raisins (which you will have softened in lukewarm water for about 15 minutes or so and drained).  Season with salt and pepper, mix well and continue cooking until the cauliflower is tender.

NOTES: The combination of sweet and savory is not a very common one in Italian cooking, but it works very nicely here. Raisins are often a sign of oriental influence. They feature in southern Italian cooking— particularly in Sicily, where the Moorish influence is strong—as well as in Venice, which carried on an active trade with the Near East. 

Since we were out of pinoli nuts at home, I used roasted Mexican pumpkin seeds known as pepitas. There were an excellent substitute and perfectly delicious. 
A recipe for this dish is contained in the classic tome, La cucina napoletana by J.C. Franscesconi (recipe 527 on page 534).

Saturday, January 30, 2010

Cipolline all’agrodolce


If there were an 'all purpose' side dish, this might be it. Cipolline all'agrodolce, also called cipolline in agrodolce, in English 'sweet and sour baby onions', go with just about any meat dish, although it is particularly lovely with roasts. And, the best part is, it is quite simple to make and is even better made ahead.. This is one of those truly indispensable dishes. 

There are various ways to make the dish. Here is my favorite method, which is also the simplest:

Peel and trim your onions, then place them in a saucepan. Add enough water to come up, say, halfway up their height, together with some oil, salt and pepper to taste, a pinch of sugar and a dash of white wine vinegar. Allow the onions to simmer gently until the liquid has totally evaporated. At this point, the onion will begin to caramelize as the oil and sugar do their thing. Continue until the oinions are nicely browned and quite tender. Allow the onions to cool  a bit before serving; they are also fine at room temperature. 

Another method calls for boiling the onions for about 5 minutes in salted water, then browning them in oil (or lard) until brown, then adding the sugar and vinegar and seasonings at the end of their cooking period. This method provides a more assertive sweet and sour flavor. 

Yet a third method is a kind of fusion of the two foregoing methods: simmer your onions in water and oil until the water evaporates and the onions are fully cooked. Then add your sugar and vinegar, together with salt and pepper, and until they are well amalgamated. 

NOTES: In Italy, the onion to use for this recipe is the somewhat squat onion called, of course, the cipollina. The well-known cipolle di Tropea, especially sweet red onions from Calabria, are also quite good made this way. Cipollina-type onions are now grown in the US and sold in the more upscale markets and, I would assume this is probably true elsewhere. But the same method works for other sorts of small onions, including those very small ones known as 'pearl onions'. You can even use the same methods for frozen baby onions, although the result will not as fine. Fresh onions like green onions (aka scallions) are not really suited, however, to this use. 

The 'trick', if there is one, to a successful dish is to balance the sweet and sour tastes so that they balance each other. Ideally, neither should dominate. Since both vinegar and sugar can vary, the best way to make sure you've got the balance right is to taste—but be careful as boiling sugar is very hot. You can also dissolve the sugar into the vinegar before adding them to the dish. This allows you to taste them together while they are still cold. 

And personally, I like a rather subtle sweet-sour flavor, which is why I generally add the sugar and vinegar at the beginning rather than at the end of cooking. White wine vinegar is preferably with white onions to avoid discoloration, but red wine vinegar will do fine as well. As for the sugar, I particularly like brown sugar, which caramelizes more readily than white, refined sugar. I have even used honey with good results. But there is room here to vary the type and amount of both ingredients to suit your own taste and imagination. 

The only real difficult part with this dish is the initial preparation of the onions for cooking. Of course, the smaller the onion, the fussier the preparation will be. In Italy, cipolline are often sold ready to cook, but  not where I live now. To prepare an onion for cooking, you peel it, using a sharp paring knife, starting from  the tip and moving to the root. You then trim off a bit of the base and cut a cross into it to aid  even cooking. The peeling can be made considerably easier by blanching your unpeeled onions for about a minute just before peeling. Run under cold water for a moment so the onions will be cool enough to handle, then peel them while they are still warm. The skin should slip off easily. 

Besides onions, carrots are very nice made this way. In Sicily, zucca (Italian pumkin) is also made in agrodolce, with the addition of raisins and mint. In summer, peppers can also be made in agrodolce by sautéing them in oil with a bit of garlic and, when they are nearly done, adding vinegar and sugar. Zucchine can also be made in a very similar way. In Italian Jewish cookery, braised cabbage is made in agrodolce by adding vinegar, sugar and raisins, softened in lukewarm water, at the end of cooking.

Friday, January 29, 2010

Fagiolini in fricassea


So far on this blog we have seen many of the most common techniques in Itailan cuisine for cooking vegetables, including in padella (lightly boiled and then sautéed in garlic and olive oil), fritti (deep-fried in a flour and egg batter), gratinati (baked in the oven with a topping of cheese with or without béchamel), in umido (stewed in tomato sauce), all'agro (boiled and dressed with lemon and olive oil) and as a purée. Here is a less common, but very delicious way of making vegetables (and other foods) called 'in fricassea'

This technique has little to do with the fricassees most non-Italians will be familiar with.  In Italian cooking the term rather refers to the addition of egg yolk and lemon, off heat, just before serving. To make green beans in fricassea, you boil the green beans (see post on fagiolini all'agro for instructions) but  drain them slightly underdone. While the green beans are boiling, sweat some chopped onion in olive oil in a heavy pot or casserole and, when the beans are done, drain them and add them to the oil and onions. Mix well to coat the beans and cover the pot. Allow the beans to braise, turning them from time to time, until they are quite tender. 

Just before serving, while the beans are still quite hot, take the pot off the heat and immediately add a mixture of egg yolk and lemon juice (I use two yolks and the juice of half a lemon for each 500g/1 lb. of green beans) seasoned with salt and pepper. Mix well, allowing the mixture to thicken using just the residual heat in the pot, until a creamy 'sauce' coats the beans well. Serve immediately. 

NOTES: Made this way, green beans make a great contorno, especially for roasted or grilled lamb. They are hearty enough to also make for a fine light supper with some bread, followed by a piece of fruit. 

Other vegetables can be made following the same technique shown here: cardoons, for example, are lovely made this way, as are artichokes, fennel, mushrooms, swiss chard stalks (called coste in Italian), peas… I've even come across a recipe for eggplant in fricassea, but I'm a little skeptical of that one.

Most recipes will call for more lemon juice than I have specified,  usually the juice of a whole lemon for every 2 yolks, but personally I am not a big fan of harshly sour tastes. Suit yourself. One thing to avoid is using bottled lemon juice; it is much too acid and, unless you are very sparing, will ruin the dish.

But, in fact, the most common use for this technique is with meat, particularly lamb. Indeed, lamb and artichokes in fricassea is a classic spring dish. Italians also make chicken, rabbit and veal in fricassea. For meat fricasee, you proceed as for a French fricassee, browning the pieces of meat and then braising, before adding the egg-and-lemon mixture before serving. You can even take leftover lesso (boiled meat) and treat it as you would vegetables in fricassea. I will blog on these some time soon, but in the meanwhile, a number of excellent recipes can be found at liquida.it (in Italian). 

Despite some hunting around, I have yet to discover the origins of this technique. A fricassea recipe (for veal, lamb or chicken) was featured in Artusi, but I am fairly sure that the technique is older than that. The egg-and-lemon is obviously reminiscent of Greek cooking, in particular the famed avgolemono, which can be used to thicken a stew just before serving, but whether this technique was imported from Greece, I cannot say.

Monday, January 25, 2010

Baccalà alla vicentina


Baccalà, or dried salt cod, is a favorite meal around our house, even if it only appears occasionally on the dinner table. One of the most delicious ways to make baccalà has got to be in the style of the northern Italian city of Vicenza, slowly simmered in milk flavored with a savory soffritto of garlic, onions and anchovies.

Before going any further, I should mention that the 'baccalà' in this dish is actually what in other parts of Italy would be called stoccafisso, or stockfish, codfish that is not salted but sun and air-dried until it is almost rock hard. Stockfish needs to be soaked in several changes of water over 3 or even 4 days before you can cook it. Some recipes even tell you to beat the cod with a mallet to soften it before soaking. Salt cod, by contrast, is usually still more or less pliable to the touch and requires a much shorter soak, usually 24 hours or less. Stoccafisso is the usual codfish used in the cooking of the Veneto, where this dish originates, while in other parts of the Italy baccalà predominates. But if you can't find stoccafisso—it can be hard to find—this recipe works perfectly well with baccalà, with a few adjustments.

Begin, as mentioned, by soaking the baccalà in water. Depending on how long it has been cured, baccalà can take as much 24 hours to soak, or as little as 8 hours for some lightly salted, relatively fresh varieties. In any case, for this dish, which is seasoned with anchovies, you will want to make sure that the fish is well soaked and almost all of its saltiness removed. Change the water several times during the soaking period. If in doubt, taste a bit of the baccalà; if it is still very salty, keep soaking.


Meanwhile, make a soffritto by sweating an ample amount of thinly sliced (or finely chopped) onion—about half as much as the fish by weight—in olive oil until quite soft and translucent. Season with some salt and pepper, and add a few anchovy fillets and a handful of chopped parsley. As soon as the anchovies have 'melted' into the soffritto, turn off the heat.


Once the baccalà is ready, dry the fillets thoroughly, cut them into relatively even square pieces and dredge them in flour. Spread a spoonful or two of the soffritto on the bottom of a casserole dish, preferably of terracotta, then lay the pieces of baccalà over the soffritto, snugly but in a single layer.


Spread the rest of the soffritto on top of the baccalà. (If you have more fish than will fit in a single layer, then add just a bit of the soffritto on top of the bottom layer, place another layer of fish on top of that, and then spread the rest of the soffritto on top of the second layer. If you have more fish than will fit in two layers, then your casserole is too small!)


Pour over enough milk to just barely cover the fish pieces. Then sprinkle the top with abundant grated parmesan cheese. (This is one of the relatively rare cases in Italian cooking where fish and aged cheese are combined—an exception that proves the rule.) Then drizzle the whole with a generous filo d'olio.

Now you have two choices: either you can simmer the dish on top of the stove—over very gentle heat—or you can place the dish in a moderate to slow oven (no more than 180°C/350°F, but better at 150°C/300°F). The dish should just barely bubble as it cooks. In either case, the baccalà should simmer for about 3-4 hours, shaking the pan once in a while to avoid the bottom burning or the fish sticking, but not stirring, until the the liquid is almost entirely consumed and the fish is very tender. Your patience will be richly rewarded, as the flavor of the dish is absolutely ambrosial!


Serve with soft polenta, preferably the polenta bianca that is typical of the Veneto, but in a pinch your average yellow polenta (as pictured above) will do fine.

NOTES: As noted above, the main concern when using salt cod rather than the original stockfish is to avoid over-salting, so be sure that the codfish is well soaked in several changes of water. You may or may not need to season the dish at all.

There are many subtle variations on the above recipe. Some recipes call for butterflying and 'stuffing' the salt cod fillets rather than simply layering them top and bottom. Some recipes say you should roll the fillets in the soffritto before flouring them. Some recipes call for mixing the soffritto into the milk rather than stuffing or layering the fish with it. Some recipes call for browning the floured pieces of cod before adding them to the casserole. Some recipes call for including a bit of garlic in the soffritto. And some recipes call for adding white wine to the soffritto and then allowing it to evaporate. Ada Boni, in her classic Talismano della Felicità, suggests adding a bit of wine to the dish as it cooks if it starts to dry out during the long cooking process. Almost all recipes call for a long, slow simmering of 3-4 hours, but one source I found specifies only 1-1/2 hours at a relatively high temperature. And, as noted above, you have the choice of simmering on the stove or in the oven. Personally, I prefer the oven method, which avoids scorching the bottom of the casserole and allows a pleasant crust to form on top. Just be careful to regulate the heat so that the crust does not brown too much.

Baccalà alla vicentina is such a famous dish that it actually has its own 'official' website, which sets out the official recipe of the Venerabile Confraternita del bacalà alla vicentina—which is the one set out in this post. The English language version is, unfortunately, poorly translated but mostly intelligible.

For some other ways to make baccala', check out my earlier post on baccala' e ceci.

Vicenza, by the way, is one town in Italy that I have not had the chance to visit, but one I most certainly want to, if only to see some of the 23 palazzi there designed by Andrea Palladio (1508-1580), a native of the city who was perhaps the most influential architect of all time. (If you've visited Monticello in the US or enjoyed the buildings of Christopher Wren or Inigo Jones (not to mention countless neo-Classical stately homes) in the UK, you've seen examples of Palladio's enormous influence. There are so many structures by the famous architect there that UNESCO has designated Vicenza as the "City of Palladio" on its list of World Heritage Sites. Among other noteworthy natives of the city are Sonia Gandhi, Indian politician and wife of Rajiv Gandhi, Prime Minister of India, and Roberto Biaggio, famed football (soccer) player.

The Loggetta Palladiana, an example of Palladian architecture in Vicenza

(By the way, this post reminds me of a story an old friend once told me. As a young girl, she lived with her Italian nonna. It happened that she was luxuriating in the bathtub a bit too long, as she was wont to do, and her nonna knocked on the door and shouted, "Hey, get outta the tub, you baccalà!")

Sunday, January 24, 2010

How to Make Polenta

Polenta is one of the most emblematic dishes of the northern Italian cuisines from the Veneto to Lombardia to Piemonte. It is also one of the oldest foods eaten in Italy, dating back at least to 990 BCE. In its original form, polenta—known to the ancient Romans as pulmentum—was a porridge made from spelt. In later ages other grains such as barley and millet as well as pulses and even chestnuts were used to make various kinds of gruels eaten generally by the poor. It is said to have originally been an Etruscan dish, which the Romans adopted and spread throughout the Empire, although today polenta is not particularly important in the cooking of Tuscany or (with one exception) Lazio. In the 1600s, after maize, a New World grain, was introduced into Italy by the Venetians, polenta took on the form we know today.

Polenta, as befits la cucina povera, is quite simple to make but requires patience and care. Polenta was traditionally made by the fire, cooked in a copper pot known as a paiolo, hung close to the fireplace and stirred  with a wooden stick known as a tarai (or tarel in some areas). Polenta today is usually made on top of a stove, and besides the traditional method, some modern methods have been developed.

Traditional method for making polenta: In a paiolo or other large pot, preferably made of copper, bring some lightly salted water to the simmer. I find that a ratio of 1 liter (1 quart) of water for 250g (1/2 lb.) of polenta flour works well. Have some more water on hand, simmering in a saucepan or kettle at the back of the stove:


When the water in paiolo has come to the simmer, add the polenta in a constant but gradual stream—in Italian they say 'a pioggia' or like rain—stirring the pot all the while with a whisk or wooden spoon in one direction until all the polenta has been incorporated into the water:


NB: This technique should avoid the awful fate of badly made polenta: the formation of unpleasant lumps or grumi. (I find the use of a whisk, while unconventional, is particularly helpful.) But don't be surprised if you wind up with a few lumps on your first few attempts to make polenta; it is part of the learning process.

The polenta will soon thicken. Turn down the heat to low immediately; be careful, as polenta has a tendency to spatter if it 'boils'. If this happens, take the paiolo off heat for a moment and add some water. That will stop the sputtering, and you can return to the heat and continue to stir:


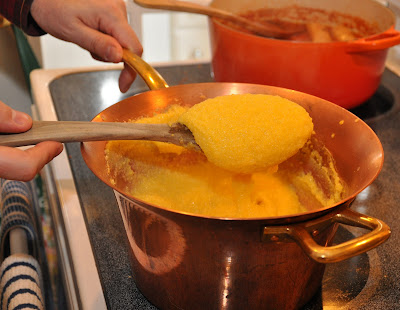
If you have been using a whisk, you will eventually need toswitch to a wooden spoon as the polenta thickens. Continue stirring and, when the polenta gets too thick to stir without great effort, add some of the hot water you have kept in reserve and continue to stir:


Although some recipes call for you to stir constantly throughout the cooking period to avoid scorching the bottom, I find that if the heat is low enough and you keep the polenta rather loose by adding water from time to time, you only need to stir every so often—say every 5 minutes or so. The polenta should simmer like this for at least 45 minutes, and it is even better after an hour. Some recipes even call for cooking the polenta for 90 minutes—something I've never had the patience to do.

The polenta is done when it is perfectly creamy and has attained the consistency you desire. The polenta should pull away from the pot when you run your spoon across the bottom of the pot:


Depending on your tastes and the use you will be making of the polenta, it can be either all'onda, or rather soft like a risotto, or quite stiff. (More on this later.) If you want a stiff polenta, stop adding water for the last 15-20 minutes or so, and allow the polenta to thicken; you will need to stir more during this final period.

 
A nice thick polenta 

Pressure cooker method: The traditional method, even without constant stirring, is quite a job. If you want to cut down both on time and effort, you can make polenta in a pressure cooker. To avoid scorching the bottom, use more water than you normally would (say 25% more) and as soon as the polenta begins to thicken a bit, close the lid and bring the pot up to pressure. Turn down the heat to the barest flame, just enough to maintain the pressure, and cook for 20 minutes. Release the pressure, either gradually by just letting it come down by itself off heat, or 'forcing' the pressure down by opening the valve and/or running the pot under cold water in the sink. Remove the lid. Bring the pot back to the stove and over gentle heat begin stirring your polenta. Depending on the consistency you want, add some more water to loosen the polenta or, if it is already rather looser than you want your final product to be, just keep stirring as the polenta thickens.

Slow cooker/rice cooker method: Although I don't own a slow cooker and only occasionally use a rice cooker, I find this method attractive. You mix your polenta flour with cold water (like the pressure cooker, use about 25% more than you would normally) and a pinch of salt in the cooker, close the lid and proceed to cook according to the instructions for your machine (usually 6 hours on low, 3 hours on high). Some recipes call for you to grease the inside of the cooker with a bit of butter or oil to prevent scorching.

Oven method: This is one I've never tried, but it is said that you can make polenta by mixing cold water and polenta flour in a casserole and placing it in moderate oven (180°C, 350°F) to bake for about 45 minutes, stirring it at least once towards the end of the cooking period. 

Electric polenta pot: My favorite method back in Italy was to use an electric paiolo or polenta pot. After the initial addition of polenta flour, as soon as the polenta began to thicken, you attached a paddle with an electric motor to the top of the pot and plugged it in. The paddle would rotate slowly, stirring the polenta, for as long as you wished to cook it. It is a wonderful invention but I had to give it away before leaving Italy, because of the difference in current. Despite having looked high and low, I have not managed to find anything comparable in the US.

Instant polenta: Even in Italy, partially pre-cooked 'instant' polenta,  sometimes called polenta lampo or 'lightning polenta', which can be eaten after only 5-10 minutes of simmering, is quite popular. Of course, it goes without saying that both taste and texture suffer when compared to 'real' polenta. But the result is acceptable in some dishes where the polenta is paired with an especially hearty condimento, like the Roman classic, polenta con spuntature e salsicce.

NOTES: Polenta is traditionally served heaped onto a large wooden board, in the middle of which a shallow well is formed to hold the sauce or other condimento to go with it. Served this way, polenta is paired with a broad variety of dishes from meat to vegetables to fish. Traditionally, polenta was cut with a heavy string, served with wooden spoons and eaten on wooden plates, as contact with metal was said to ruin its flavor. (This was the original reason for cooking polenta in copper pot, since unlike other metals copper was said not to have this deleterious effect.) These days, a serving platter will do, and the advent of stainless steel has rendered these precautions unnecessary, although like many, I still use copper and wood implements. It just feels right…

There are other ways to serve polenta. While still warm, thickly cooked polenta (either leftover or made for the purpose) can be spread in a shallow layer on a plate or cookie sheet or other flat surface and left to cool; the polenta hardens as it cools and is then cut into squares or other shapes. These can be fried or grilled and used as a kind of contorno, or as the bed of a crostino. The polenta squares can also be arranged in a casserole with béchamel, cheese and sauce like lasagne to make a 'polenta pasticciata'.


There are various types of polenta flour you should use according to the region and dish you are making, as well as your personal taste. The most common type of polenta flour is called bramata, a medium-coarse, yellow cornmeal. It is used for rustic polenta dishes and is well suited for chilling and grilling or baking. It is the kind most often found both inside and (especially) outside Italy. You can use it as a kind of 'all purpose' polenta flour. For a finer texture, which results in a softer, more refined polenta, use the kind of polenta known as fioretto, which is very finely ground. In parts of northern Italy, particularly in the Veneto, a finely ground white cornmeal called polenta bianca is quite commonly used to accompany local dishes like baccalà alla vicentina. A rather unusual, but delicious polenta is made with a mixture of buckwheat and cornmeal, called polenta taragna, both very coarsely ground. It is very typical of the Valtellina—the Alpine area of Lombardia which is home to the buckwheat pasta known as pizzoccheri—and also eaten a further to the south, in the areas around Brescia and Bergamo. Rather than a sauce, copious amounts of cheese and butter are usually added just before serving this kind of polenta.

Although polenta is typically thought of (and is) a northern dish, polenta is eaten all over Italy. And although Rome is not really polenta country, in the winter the aforementioned hearty dish of polenta with sausages and spareribs is much appreciated there. Angelina also made polenta, rather soft, served with a simple sugo di pomodoro or with ragu. In my family the story goes that she learned to make polenta to please my grandfather, who had fought in the First World War against the Austrians and, while up north, developed a taste for the stuff. (Following an long tradition, as puls was the usual ration for Roman soldiers in ancient times.) The story may be apocryphal, however, as polenta is also popular in the area she came from around Benevento and Avellino, perhaps a holdover from the times when polenta was enjoyed all over the Roman world.


Saturday, January 23, 2010

Anguilla alla bisentina


One of the best kept culinary secrets in Italy is the cuisine of northern Lazio in and around the city of Viterbo, an area known as the Tuscia. The style of cooking in this area is a kind of fusion between the lusty cooking of Roman to its south with the simple rusticity of Tuscany to the north.

One of the main geographical features of the area is a large volcanic lake called Lago di Bolsena, very close to the border with Tuscany. The abundant eel from the lake is famous, and has given birth to a local saying that «Vino de Montefiascone e anguilla de Bolsena, nun c'e' mejo cena» or "There is no better dinner than wine from Montefiascone with eels from Bolsena." The inhabitants of the Tuscia have developed several  ways for preparing the local eel, but by far the most famous is this braised dish named after the picturesque island of Bisentina in the middle of the lake. 

Ingredients: eel (about 250g or 1/2 lb. per person), vinegar, 1-2 cloves of garlic,  a sprig of  fresh rosemary, a handful of fresh sage leaves, a small bay leaf, olive oil, salt, pepper, hot pepper flakes, pureed canned tomato.

Preparation: Eel needs to be skinned, trimmed of its head and tail, and cut into shortish sections of 3 or 4 inches. In Italy, the center bone of the eel is usually left on. The skinning can be quite a job, so ask your fish monger to do it. The eel I got was both skinned and (unfortunately) filleted as well, so I had only to cut the fillets into sections.

The method for making this dish is rather unusual, as it inverts the usual sequence of dry followed by wet cooking. You being with a good glassful of vinegar in a skillet, which you bring to a simmer. Then place your eel pieces into the vinegar together with one or two cloves of garlic and a mixture of rosemary, sage and bay leaf, minced very finely, almost to a powder. (A spice grinder is especially useful here.) As the pieces simmer in this aromatic mixture, the flesh will begin to stiffen. Turn the pieces so they are evenly coated with the herbs and absorb the vinegar. Fairly soon, the vinegar will evaporate, at which point you should pour in a generous amount of olive oil, season the eel with salt, pepper and some red pepper flakes. Then add tomato purée, together with a bit of water, cover the skillet and allow the whole to simmer until the eel is tender, about 15-20 minutes. Serve immediately with some crusty bread to 'fare la scarpetta' with that delicious pan sauce.

NOTES: If you get a whole eel and need to prep it yourself, check out this explanation from eHow. It's a rather tricky operation and eels should actually be (quite literally) skinned alive—the longer you wait after they've been done in, the more slippery and difficult the skinning process will be—so hopefully your friendly local fish monger can do the job for you. Ask him, however, only to skin the eel and cut it into sections, and not to fillet it. The bone actually adds a lot of flavor. It can be hard to find eel in your average supermarket, but Italian or Asian fish markets are a good bet.

Eel is unusual for a 'fish', since it actually needs a fairly long braising period. The flesh tightens up when heated, and it needs a bit of time to relax again and become tender, so before serving, test a small piece. If it is still a bit 'chewy', give it a few more minutes.

Viterbo, by the way, is a lovely little town, under appreciated by tourists, that is well worth a visit. I went there fairly often when I was living in Rome. Whenever the stress of city living became too much, I would check into the nearby Terme dei Papi, a hot spring resort, and saunter around the slow paced town. There is much to see: the walls, the towers, the fountains and the historic palazzi built in the local volcanic stone called peperino. The town was once the seat of the Popes, and boasts a medieval Papal palace (1261) as well as several ancient churches. It was from an incident here that the word 'conclave' comes from. After Clement VI died in 1268, the assembled cardinals were taking so long to decide on the new pope that the local population locked them in 'cum clave' ('with a key') to encourage them to make up their minds. They quickly did so, electing Gregory XI after an amazing two years and ten months of deliberation.


The medieval quarter of Viterbo

While once in Viterbo, I picked up a charming little cookbook called Tuscia in tavola. It has all sorts of local recipes, including several ways to prepare the famous local eels. I doubt that the book has been translated, but the official website of the province of Viterbo has a page on the local cuisine. It is also in Italian, but you can translate it with the Google toolbar or some other online translation tool. Among other things, you will find a recipe for making this dish, going by its alternative name of anguilla alla pescatora.


The lovely Isola Bisentina


Monday, January 18, 2010

Pizzoccheri alla valtellinese


Nothing says 'winter' to me like this Alpine buckwheat pasta dish oozing with melted cheese and winter vegetables, a typical dish of the Valtellina in the uppermost stretches of Lombardia, a fairly narrow valley region running northeast from the Lago di Como along the border with Switzerland.

You make the pizzoccheri as you would any fresh pasta, but using 2 parts of buckwheat flour to one part regular wheat flour. (Buckwheat flour lacks gluten and needs some help to form a workable dough. Some recipes call for less regular flour, but the 2:1 ratio works well for me.) I use egg (and a bit of water) to bind the dough, but the original recipe (see below) calls for water only. You roll out the pasta rather thicker than other kinds of fresh pasta (I use setting "3" on my KitchenAid pasta roller) and let the rolled pasta sheets dry on a towel. Once dry enough, cut the sheets into strips, as wide as fettuccine or tagliatelle, say about 1 to 1.5cm (1/2 inch) wide and about 5-7 cm (2-3 in) long. Allow these little strips to dry out further while you prepare the rest of the dish (see photo above).

While your pizzoccheri are drying, prepare the vegetables that will accompany them, typically potato and a leafy winter vegetable, most often Savoy cabbage. Slice or cube the potato, as you prefer (I like them sliced) and immerse them in cold water. Shred your cabbage and add it, too, to the water. Instead of Savoy cabbage, you can also use spinach, swiss chard leaves or—as I did this time when I couldn't find Savoy cabbage at the market—coste, or the stalks of swiss chard, trimmed of their leaves and cut into lengths about the same size as the pizzoccheri. Precise proportions are not critical in this kind of dish, but I like to use about one smallish potato and say 100g (4oz.) of leafy vegetable per serving. Bring a large pot of water to the boil, salt generously, and add your vegetables.


While the vegetables are cooking, melt a nice big piece of butter—at least 50g/2oz. per serving to which you add a clove or two of garlic and a sprig of fresh sage. Allow the garlic and sage to simmer very gently in the melted butter until the butter is infused with their flavors. Do not allow the butter to brown; the garlic should brown, if at all, only slightly. Remove the garlic and sage when you're done.


While the butter is simmering, either slice or shred some mild, semi-soft cheese, the most classic choices being the local cheeses bitto or Valtellina Casera. But since these cheeses are hard to find, even in Italy, outside their zone of production, fontina is often substituted. And if you can't find fontina, I'd recommend staying in the Alps and using either Gruyère or Emmenthal. Grate about half that amount of parmesan cheese or grana padano. I like to use a lot of cheese as well, say 50g/2 oz. per serving, although you can use much less if you prefer a lighter dish.

After the vegetables have been boiling for about 5 minutes, add your pizzoccheri and lower the heat a bit and continue cooking for another 5-7 minutes. Pizzoccheri take surprisingly long to cook for a fresh pasta—if you taste after about 5 minutes, you may see that although the pasta is already al dente, there is a raw quality to it, due to the particular qualities of buckwheat.


While the pizzoccheri are cooking, warm a serving bowl in the oven. When you are ready to serve, take your serving bowl out of the oven and, fishing them out of the water with a large slotted spoon, add a layer of well drained pizzoccheri and vegetables, then top with some of the cheeses, seasoning if you like with salt and pepper:


Working quickly, repeat until you have used up the ingredients, then pour over all the melted butter (which should be hot). This will partially melt the top layer of cheese. Then toss to mix the ingredients (don't overdo it) and serve immediately, while the pasta is still hot.  


NOTES: There are various theories about the origin of the rather odd name of this pasta. According to some, 'pizzoccheri' comes from the local dialect word piz, meaning a 'little bit'. Others say it comes from the verb 'pinzare' or to pinch, others from the dialect word bizzo, meaning a mouthful. Buckwheat, by the way is called grano saraceno—Saracen grain—in Italian. It was introduced into the Valtellina in the early 1600s, it would seem (judging from the name) having come from the Ottomans, although the historical record is apparently very sparse. These days, local production has practically disappeared and most buckwheat in Italy is imported from China. Russia and the US are also major producers.  Besides pizzoccheri, buckwheat is used to make another typical dish of the Valtellina called sciatt, a kind of fritter.

The Valtellina is these days a popular tourist destination, known for its excellent skiing and other snow sports but also for thermal spas. (I rather like the idea of soaking in a hot spring surrounded by snow-peaked mountains!) Pizzoccheri are said to come from one of the larger towns in the valley called Teglio, where they have established an academy dedicated to this dish. The Academy has established an 'official' recipe, which you can read here, which is a bit different in some details from the recipe given above. In particular, the Accademia recipe calls for cutting the pizzoccheri much thinner (the recipe says 5mm, although I wonder if that isn't a typo; perhaps 50mm or half a centimeter was meant.) In addition, 'real' pizzoccheri are made only with flour and water, no egg. The addition of egg is a common modern heresy, however, as it makes the pasta easier to work with and improves the texture. Some modern recipes also call for a bit of milk, rather than water, to round out the dough. Marcella Hazan, in her Essentials of Italian Cooking, has a recipe for pizzocheri that calls for a short baking period just before serving to warm the pasta and melt the cheese. It's not a technique that I've found from any other source, but not a bad idea. The result is a bit more 'solid', if I can use the term, than the traditional method outlined above.

Although originally a very local specialty, pizzoccheri have become popular all over Italy, and can be bought in a box like any other pasta, which make them very easy to make. (Here's a video of them being made in a factory.) I have not found them sold commercially outside Italy, so you'll have to make your own. Not such a terrible sacrifice, however, as they are actually quite easy to make. But the dough does take a bit of getting used to, as it is not nearly as pliable as normal pasta dough, even with a fair amount of wheat flour. Knead the dough especially well to bring out the maximum amount of gluten.

Although I haven't done so, you might want to experiment with other winter vegetables. Kale, for example, could make for a nice (if unorthodox) change, regular cabbage strikes me as too tough for this dish, but might be work a try. If you use swiss chard stalks, don't throw out the leaves whatever you do! They can be used like spinach in any number of dishes—among my favorites, in padella (sautéed in olive oil) as a side dish, combined with ricotta as a stuffing for ravioli, crespelle or cannelloni, or as a dressing for pasta.


The town of Teglio, where 
pizzocheri originated.


Pizzocheri alla valtellina on Foodista


Friday, January 15, 2010

Agnello e patate al forno


Lamb and potatoes have a natural affinity, as we saw in the elegant côtes d'agneau Champvallon. Here is a more rustic dish, made with seasoned chunks of lamb and potatoes baked in the oven until nicely browned on top. Simple, hearty and satisfying.

Take some thickly cut shoulder lamb chops, one or two per person depending on whether you are serving other courses and the appetite of your dinner companions. Bone and trim the chops of excess fat. (NB: Don't try to remove all the fat, just the really thick swaths of it. You want some fat to moisturize the meat during its rather long cooking time.) Cut the meat into cubes and add to a large mixing bowl. Then add a healthy splash of white wine, a pour of olive oil, one medium sliced onion, fresh rosemary, salt and pepper, and mix the ingredients well. If you have the time, allow the meat to marinate in this mixture for at least an hour and up to a day ahead.

When you are ready to cook, add chunks of potato, about the same size of the lamb cubes. Use as much potato as you like; I find that a 1:1 ratio of potato to lamb meat by weight produces a fine result. Mix the potatoes and lamb meat, then pour the entire mixture into a baking dish large enough to hold it all without it coming, say, any more than 5cm (3 in) up the sides of the dish.

Bake in a hot oven (200°C, 400°F) for about a half an hour covered, then remove the cover, raise the heat a bit and allow the casserole to continue cooking until the lamb and potatoes are tender and nicely browned, about 30 minutes more. The lamb will have shed quite a bit of water in the first half of cooking; the liquid should evaporate, but not quite completely, by the time it is done. Mix the lamb and potatoes from time to time to baste and allow the pieces to cook evenly, but leave the dish alone for the last 15 minutes or so, so a nice brown crust forms on top. If you find that the lamb has given off a lot of grease, you can skim the excess off with a spoon but, once again, do not skim all of the fat off, as it provides both moisture and flavor.

When the dish is done, remove it from the oven and allow it to cool and settle for a few minutes before eating. It can be made ahead and re-heated as well, and only improves if you do so.

NOTES: If you don't want to take the trouble to bone lamb shoulder chops, you can, of course, simply buy pre-cut lamb 'stew meat' (about 250g or 1/2lb. of meat per person should do) but try to ascertain whether the meat is shoulder or leg. Shoulder has more marbling and is far better for long cooking. Leg of lamb tends to be too lean for stewing, in my opinion, and is best roasted. And it costs more as well. The potatoes need to be the firm fleshed 'waxy' kind, or all-purpose. Avoid baking potatoes, which will fall apart in the cooking and turn to mush.

Otherwise, the recipe is just about foolproof. The dish is usually served as a secondo but is hearty enough to serve as a piatto unico, rounded out with just a salad and a piece of fruit. This dish was a great hit at a recent dinner at our place--even some finicky kids and adults who usually don't like lamb, loved this dish!

Angelina made a similar lamb and potato dish, but using shoulder chops with the bone still on, mixed with a bit of tomato and pecorino cheese—and omitting the white wine or rosemary. Cut up chicken is wonderful made the same way.

Post-scriptum: For yet another wonderful lamb and potato dish, check out this Lancashire Hotpot from Gourmet Traveller. It's a thing of beauty!

Saturday, January 9, 2010

Fazzoletti di crespelle


It may come as something of a surprise to some, but Italians also make crepes, which are called crespelle in Italian (even if many Italians just call them by their French name, as we do in English). The most common use for crepes in Italian cookery is not as dessert, but as stuffed pasta. They can take the place of egg pasta to make cannelloni, or you can use them to make fazzoletti della nonna, "grandma's handkerchiefs", or fazzoletti di crespelle, or "crepe handkerchiefs": stuff them with a filling of your choice, then fold them into triangles that are said to look like handkerchiefs--hence the name--cover them with béchamel and grated cheese and bake them in the oven until golden brown on top.

For the filling: The filling I used this time was ricotta and swiss chard, which is almost identical to the more familiar ricotta and spinach filling. Taking a whole bunch of swiss chard, you trim the leaves from the stalks and blanch the leaves only in abundant vigorously boiling water for just 2-3 minutes. Drain and refresh immediately in cold water, squeeze out the water with your hands and chop the leaves finely. Then sauté the chopped leaves in butter to remove any lingering liquid and allowing the leaves to absorb the butter. Transfer the chard to a mixing bowl, and mix gently with a healthy dollop of ricotta cheese, a handful of grated parmesan cheese, a pinch of grated nutmeg, salt and pepper.(You can add an egg yolk if you like for a richer and stiffer stuffing.

To make crespelle: Crespelle are, as mentioned, basically are crepes. But they are rather smaller than the average crepe—only around 10 cm or so wide. You make a very thin batter (the thinner the batter, the thinner the resulting crespella) from 1 cup (250ml) of milk, into which you whisk 3/4 cup (125g) of flour, 2 whole eggs and a pinch of salt. (You can also add melted butter to the batter, which eliminates the need to melt butter in the pan.) You heat a small non-stick skillet over moderately hot heat, you drop a sliver of butter and allow it to melt, swirling it around to cover the bottom of the pan. Pour 1/4 cup of batter into the center of the skillet, immediately raise the skillet off the burner and swirl the batter around until it covers the bottom of the pan. (If it doesn't cover the entire bottom, you can always add a bit more batter to the bare spots—it will 'merge' with the rest.) Allow the crespella to form a solid disk that will slide around the skillet, then flip it over and continue to cook until the other side is lightly spottled. Remove to a plate and repeat until you've used up all the batter. (Don't worry if your crespelle are not perfectly round, it will not be noticeable in the finished dish.)

To make bechamel sauce: One of the mother sauces of French cuisine, bechamel is also used in northern Italian cooking in all sorts of baked pasta dishes, including the classic lasagne alla bolognese. See my post of that dish (Step 3 of the recipe) for details.

Then stuff the crespelle with your filling, spreading a fairly thin layer on the 'underside' of each crespella, leaving a small margin around the edge of the disk. You then fold the disk into a triangle so as to resemble a handkerchief, and place 'pointy' side up, in a well-greased gratin dish. You continue placing the crespelle, slightly overlapping as if they were roof tiles, until you have filled the gratin pan (or run out of crespelle or filling!) Nap with bechamel sauce, grate over copious amounts of parmesan cheese, dot with butter, and you're ready to bake.


Bake in a hot oven (400 F, 200 C) for about 10-15 minutes. If the top is not nicely browned, pass the dish under a broiler until the surface is nicely spottled but not uniformly browned. Let the dish settle for 5 minutes or so and serve.

NOTES: Crespelle can be stuffed in an infinite variety of fillings, including with meat, fish and poultry—any filling you can use for stuffed pasta, you can use for crespelle. Instead of triangular fazzoletti, as mentioned, they can be rolled up like cannelloni if you prefer, and for 'chunkier' fillings, this is the preferable way to make them.

Swiss chard has large green ribbed leaves, with stems that can be either red or white, with a taste similar to but more delicate than spinach. Mature chard have stems that are rather more like stalks, which can be cooked separately in various ways. For this filling, the stems or stalks need to be removed. It can be used instead of spinach in just about any recipes that calls for spinach, in salads when young, sautéed or gratinéed when mature.

You can prepare this dish ahead through the arrangement on a baking dish. Just leave it and pop it in the oven when you're ready to eat.  (If you make it the day before and have refrigerated it, take it out of the fridge and let it return to room temperature before baking it.) Unlike pasta, the crespelle will not absorb the filling or topping very readily, so you can assemble it and have it ready for the oven hours (or even a day) ahead. It's a nice choice for a dinner where you want to impress your guests with something elegant.

NB: Fazzoletti are also a kind of pasta, so be careful when Googling for more recipes!


Thursday, January 7, 2010

Salsicce alla romana coi broccoletti


Is there any meat more satisfying than sausages? If there is, I haven't found it. And, in this typically Roman dish, sausages marry particularly well with broccoletti, the cruciferous vegetable known in English as 'broccoli rabe'. The slight bitterness of the broccoletti sets off the savory richness of the sausage perfectly.

You begin by browning some sausages—one or two per person—in lard (or olive oil, if you prefer) along with a clove or two of slightly crushed garlic and one or two dried chili peppers (peperoncini) in a braising pan until the sausages have nicely browned on all sides. In the meanwhile, blanch a bunch of broccoletti in a large pot of vigorously boiling salted water for no more than 3 minutes. When the sausages have browned, remove them to a plate and transfer the broccoletti with a slotted spoon to the braiser, mixing them well with the seasoned fat and seasoning them to taste. Now return the sausages to the pan, laying them on top of the greens, lower the heat and cover. Let the broccoletti and sausages braise until the greens are tender, the sausages cooked through and any liquid in the pan has evaporated.

NOTES: If the broccoletti are young and tender, you can eliminate the initial blanching and simply add them raw to the braising pan, but I find that the blanching cuts the cooking time down considerably and 'sets' the color of the greens. When transferring the greens from blanching pot to braising pan, there is no need to drain the greens perfectly—a bit of water will help them cook—but do not 'water log' them. If you do find that the greens are tender and the sausage is done before the liquid in the pan has fully evaporated, then remove the lid and raise the heat to high to cook off the excess liquid.

Just about any type of fresh pork sausage would work with this dish, but so-called 'sweet' Italian sausages (ie, not spicy) are the most typical choice. Just be sure that the sausages are not too lean (a common fault these days, at least here in the US) because they will inevitably dry out during the braising process.

Unusually for a classic, there are relative few variations on the recipe. A few recipes call for adding wine (in the typical Italian manner, after the sausages are brown, allowing the wine to evaporate before adding the greens) and some call for black pepper in addition to, or instead of, the peperoncino.

In Pugliese cuisine, broccoletti are often paired with orecchiette, and if you cut up the sausages, you could use this dish as a condimento for pasta, something fairly common in Italian-American cooking. You can also find Italian recipes along these lines. as well as with polenta or even as a topping for pizza, but in Rome the dish, at least in my experience, is invariably served  separately as a secondo.

Sunday, January 3, 2010

Carpaccio di salmone affumicato


Here's an elegant yet very quick and easy starter that suits just about any menu: a 'carpaccio' of smoked salmon, dressed simply with oil and lemon.

All you need to do is arrange thin slices of smoked salmon on a plate (this is a dish that is best prepared individually for each diner) and spoon over them a citronette that you will have prepared beforehand by processing together a good pour of olive oil (about 1 dl/half a cup), the juice of half a lemon, a few sprigs of parsley, salt and just a smidgen of garlic (say, half a clove) until the lemon and oil have emulsified and the parsley and garlic have been finely minced. Allow to macerate for just 5 minutes or so, and serve with some crusty bread.

NOTES: As many readers will know, the original carpaccio, as invented by Giuseppe Cipriani in 1950 for his renowned Venice bar, was made with very thinly sliced beef fillets, dressed with a creamy mayonnaise. According to some sauces, the sauce was flavored with a bit of curry and chopped chives. Other sources say that the mayonnaise was tempered with lemon juice, Worchestershire sauce and a bit of milk. Either way, the contrasting red and white of the dish reminded Giuseppe of the paintings of Vittore Carpaccio, the 15th Century Venetian painter whose works were known for their prominent use of these colors.

These days, the term applies to a multitude of dishes featuring thinly sliced or pounded meat or fish, including most commonly not just beef, but veal, venison, tuna, swordfish or salmon, usually dressed with oil and lemon seasoned with salt, pepper and aromatic herbs. The charm of using smoked salmon, of course, is that you can buy it pre-sliced, which eliminates an awful lot of work. And the resulting contrast of orange and green, while perhaps not true to Carpaccio's style, is lovely to behold all the same.


Carpaccio, Pilgrims Meet the Pope (1491-93), Accademia, Venice.

Friday, January 1, 2010

Cotechino con lenticchie


No Italian New Year's celebration would be complete without this dish of a delicious pork sausage served with lentils. New Year's Eve for Italians—like so many other holidays—is marked by a large, festive meal, often an elegant seafood dinner, called the cenone di San Silvestro or cenone di Capodanno, the word 'cenone' being Italian for 'big supper'. Midnight, however, is the time to break out this hearty dish, as Italian custom has it that if you start the New Year by eating coin-shaped lentils, it will bring you prosperity. And the more lentils you eat, the richer you will be—or, at least, that is the theory...

Most people (and I do the same) buy pre-cooked cotechino that is sold in a large vacuum-packed pouch. You just simmer the cotechino, still in its pouch, in enough water to cover for a minimum of about 20-30 minutes to reheat it. The sausage is quite fatty and it needs to be hot enough to start melting that fat, which gives it a wonderfully unctuous texture and flavor. For a large cotechino, I find that a fish poacher is ideal; an oval Dutch oven also works for smaller ones. You can keep the cotechino warm almost indefinitely until you are ready to eat. (For notes on preparing an uncooked cotechino or an American cotechino, see the Notes below.)

In the meanwhile, prepare the lentils. There are various ways to do this, but my personal favorite is the simplest: simmer the lentils in water with a sprig of thyme or sage or another aromatic herb and a clove of garlic until just barely tender, even a bit underdone. In a separate pot, make a simple soffritto of onion (and if you like, some finely minced prosciutto or pancetta) in olive oil and butter until quite tender. Strain and add your just cooked lentils to the soffritto, allowing them to insaporire for a few minutes, then add a ladleful or two of rich broth or the lentil cooking liquid or, best of all, the juice from the cotechino (see next paragraph). Simmer long enough for the flavors to meld and the lentils to become entirely tender. Do not overcook the lentils, however, or they will become rather stodgy.

When the lentils are just about done, carefully remove the cotechino from its pouch by cutting open up one side and allowing its contents—the cotechino itself and a fair amount of fatty juice—into a deep serving dish, preferably oval in shape to accommodate the cotechino comfortably. That juice has wonderful flavor: I like to add a ladleful or so to the lentils and let them absorb that flavor.

To serve, remove the cotechino to a cutting board and slice it thickly. Then lay out of 'bed' of the lentils in a large serving platter, then the cotechino slices in a pleasant arrangement on top of the lentils. You can, if you like—and I do—add a bit more of the juice on top of the lentils for even more lovely flavor and unctuousness.


NOTES: The cotechino is originally from Emilia-Romagna, specifically from the city of Modena. It is made from pork, fatback and pork rind, along with various spices. Some producers add wine as well as other flavorings and preservatives. Cotechino has TGI status, so one made outside its designated area is not a real cotechino. Although originally a local specialty, thanks to modern industrial production and marketing, in modern times cotechino (like panettone, originally from Milan) has become a national holiday tradition.

Preparing an uncooked cotechino (which are available, or used to be back in the day, in Italian areas of New York) is a bit more elaborate: you prick the sausage all over with a pin. (Don't use a fork as it creates holes that are too big; the skin may rupture and the stuffing, which is rather soft, may start to ooze out.) You then wrap the cotechino up in cheesecloth and tie it up with some cooking twine. The cotechino is then simmered in water for 2 hours for a big cotechino, 45 minutes for a small one. The resulting 'broth' can be added to the lentils as indicated above. (By the way, some recipes will tell you to degrease the broth before adding it to the lentils—but why throw away all that lusciousness? After all, it's the holidays.)

In the US, Beretta markets a domestic pre-cooked cotechino that is not half bad. It is a rather leaner rather smaller than a real cotechino, and comes 'dry' wrapped in clear plastic. You remove the plastic and simmer it for only 10-20 minutes. You will not have that luscious juice, however, to use. They can be found in Italian delis and are available online.

Of course, if you don't have a cotechino on hand, you can always use 'regular' Italian sausages, sautéed gently in some olive oil until golden brown and well cooked. When they are done, deglaze the pan with broth, some wine or just water, and add the sucs to the lentils.

As mentioned, there are various ways to make the lentils. In particular, some people prefer to use the classic soffritto italiano of onion, celery and carrot rather than just onion. But I personally find that the addition of carrot and celery for some reason gives the lentils an 'off' taste. Some recipes call for adding tomato which, to my mind, denatures the taste even more. For some recommendations on choosing and cooking lentils, see the post on Ham and Lentil Casserole. Obviously, this is not an everyday dish, but both cotechino and zampone can be eaten on occasions other than New Year's Eve. In fact, I actually prefer to eat this dish for lunch on New Year's Day. For one thing, after a large cenone, there is not much room for yet another dish—and a very rich one at that—and, an added plus, all the fat in the dish is great if you happen to have been' over-served' the night before...

While lentils are obligatory on New Years, cotechino is also very nice served with mashed potatoes or other kinds of legumes such as cannellini beans.

New Year's Eve is known in Italian as San Silvestro, after Pope Sylvester I (reign 314-335) who was buried on December 31. After Sylvester was canonized, the date became the liturgical feast of Saint Sylvester. Like others, Italians like to drink sparkling wine on New Years and enjoy firework displays. One old tradition, especially in Naples, was to throw out something old from your window at midnight to say 'goodbye' to the ending year. And it is also said that wearing red underwear will bring good luck in the coming year, although this is one tradition I have never followed!

By the way, cotechino is not the only kind of sausage eaten on New Years. Personally, I rather prefer the zampone, which is a pig's trotter stuffed with the same mixture. The presentation is much more dramatic and the pig's skin adds even more lusciousness to the final dish.

Though not associated with New Years as far as I am aware, there is a similar sausage from Ferrara called the salama da sugo. It has a more accentuated flavor, being more heavily spiced (usually with nutmeg but sometimes also with cloves or cinnamon) and personally I find it even more delicious than the other two. The salama is typically eaten with mashed potatoes or a purée of zucca (Italian pumpkin)—the flavor is just too intense to eat on its own. (See this article for a description in English.) Unfortunately, it is little known outside Italy and, as far as I know, unavailable in the US. I have found this online source for those in the UK.

Post-scriptum: Just in time for the New Year, Memorie di Angelina has reached yet another milestone, its 100,000th visit! A staggering number, at least to me, and a wonderful way to begin 2010. Happy New Years to all you gentle readers out there!