Showing posts with label Puglia. Show all posts

Friday, July 23, 2010

Fave e cicoria


It has become quite fashionable in Italy, even at some chic restaurants, to serve the traditional peasant dishes of what is called la cucina povera, or the cuisine of the poor. These dishes, based on 'humble' ingredients (some of which have ironically become quite expensive) and simple cooking techniques, were born out of necessity but are well loved in these relatively prosperous times, partly out of sheer nostalgia for what now seem like simpler times, partly because they represent an authenticity that seems to have been lost in modern life—but mostly, I suspect, just because they taste too good to give up, even when you can afford something 'fancier'.

This dish from my grandfather Lorenzo's native Puglia epitomizes, for me at least, the whole cucina povera concept. It is made from two ingredients—dried fava beans and wild chicory—that were and still are dirt cheap. In fact, as I've mentioned before, wild chicory, or cicoria selvatica, can be found growing in open fields in Italy. I can scarcely think of two more unpretentious ingredients and yet, put them together and you get a unique taste experience. It's a dish that shows how, with a little imagination, simplicity can be sublime.

Begin by soaking your fava beans. You can do this one of two ways: either leave them overnight with cold water to cover or boil them briefly (for, say, 5 minutes) and remove them immediately from the heat and let them sit, covered, for about an hour. Unlike other beans, favas need to be peeled, as they skin, while not entirely inedible, does not make for good eating. This is not difficult—once soaked the skins should slide off fairly easily, leaving a pod of two loosely attached halves—but it does require some patience, so sit down with your bowl of favas and listen to some music while you peel.

Put your peeled favas in a pot large enough to contain them and enough water to cover by a couple of centimeters (about an inch). Season well with salt and pepper and, if you like (although this is not original) a garlic clove or two, and/or a small onion. Simmer about an hour or more, until the favas have become very tender. Stir frequently and top up with more water as needed to prevent the beans from drying out and scorching, but you do want to water to reduce, so that by the time the favas are tender, the water will mostly have evaporated.

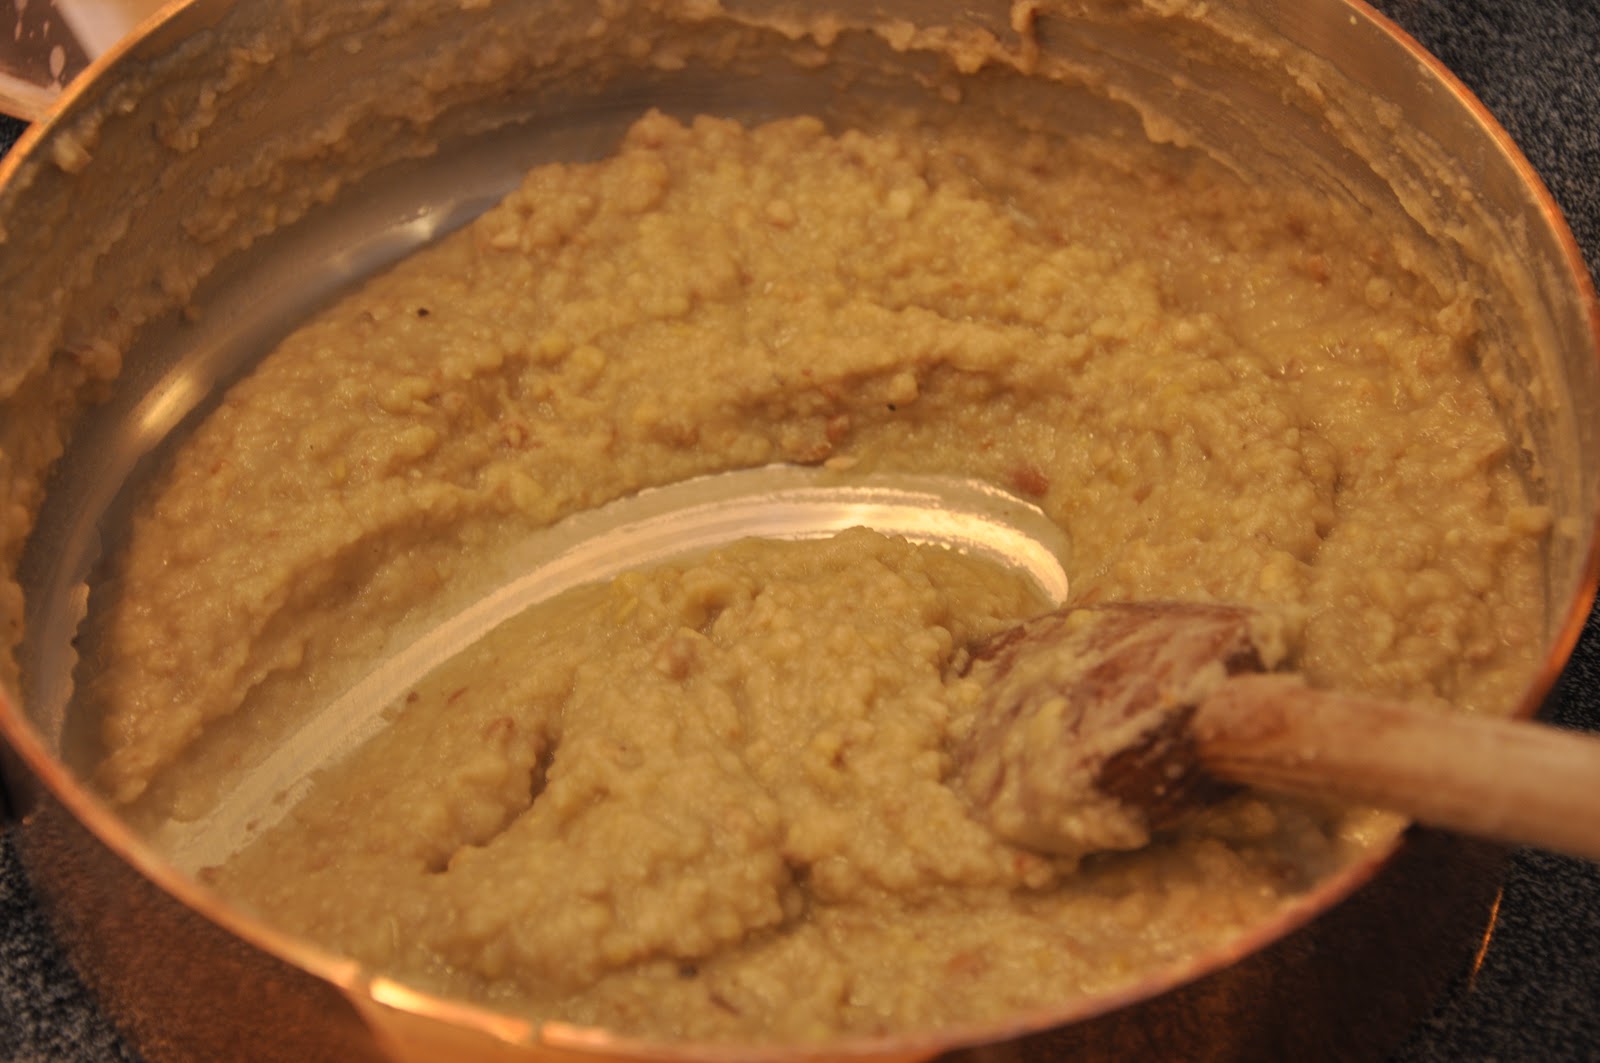
When the beans are tender, begin to mash them with the side of your wooden spoon, until the beans have formed a kind of 'cream'. Add a good filo d'olio to enrich the beans. Continue simmering, stirring all the time, until the beans have formed a purée thick enough that you can form a little 'canal' with a wooden spoon like so:


Taste and, if necessary, adjust for seasoning. Keep warm until you are ready to serve.

Meanwhile, take a good head of chicory (if you can find wild chicory, so much the better) or another bitter green—dandelion greens also work well—and boil them in well salted water until tender. Trim off the root but do not cut the greens into pieces; the leaves should remain whole (see Notes below).

Now you are ready to serve. Place your fava bean purée in the bottom of a soup plate, forming a little well in the middle, then using some tongs, grab some of the boiled greens, let them drain rather well (but not completely) and place them in the center of the plate. Sprinkle with salt and pepper, then drizzle with a generous amount of the best, fruitiest olive oil you can find. Serve immediately.

NOTES: The beauty of this dish lies in the contrast of the bitterness of the greens with the smooth, nuttiness of the beans. The best way to eat it, then, is to take a bit of the greens with your fork, twirling the leaves as you would strands of spaghetti in the purée, which will form a kind of 'sauce' for the greens. Eaten this way, you can make sure you get a bit of greens and a bit of bean in each bite.
There are a few variations on this dish, mostly aimed at the making the dish more refined or savory. As mentioned above, one common variation is to add some aromatics to cook along with the fava beans, usually garlic and/or onion, but also carrot and celery, fresh herbs, etc.  Some recipes call for a bit of tomato and/or potato. Some folks like to add a little peperoncino for heat, either by adding some to the  beans or by dressing the final product with oil infused with chili at the end.  Some recipes call for dressing the chicory separately from the favas with garlic and oil, a bit like making them in padella. And  then some recipes will have you pass the puree through a sieve or food mill to make it  perfectly smooth. But would a peasant do that? I don't think so. And there are different ways to serve the dish. Rather than placing the chicory on top of the fava bean puree, it is also very common to place them side by sides on the dish.

In the US, dried fava beans can be a bit hard to find, but if you have access to a Latin market (or a supermarket with Latin products) the Goya brand carries them. And, of course, Italian markets catering to immigrant Italian-Americans—not the upscale ones, which tend to neglect southern Italian products—should have them also.

You can cut down the cooking time for the fava beans by using a pressure cooker. It should take about 15 minutes once it gets up to pressure. De-pressurize immediately. Since there is less evaporation than using a conventional pot, you may need to drain the beans and do the final simmering in another pot.

For this dish, you really want good, fruity, extra virgin olive oil to given this dish the proper character. If you use any other kind of oil, even the lighter olive oils, will not do. And, of course, if you can find olive oil from Puglia, so much the better! The Cento and Alessi brands both sell Apulian olive oil. 

Saturday, June 19, 2010

Angelina’s Green Beans with Onions and Mint


Although our favorite way of having green beans when we were kids, especially in the summer, was in umido, or stewed with tomatoes, Angelina had another nice way of making green beans with sautéed onions and mint. As it turns out, at least according to this article, the recipe is from Puglia and is called fagiulini spilusieddi, meaning 'imaginative green beans' in the local dialect. Now, I have two theories about this: my grandfather being from Puglia, it is possible that she learned this Puglian way of making green beans to please her husband. It is also possible that in her area, which is not very far from Puglia, they also made green beans this way. 

In any event, the dish is very simple, tasty and definitely worth a try: you boil green beans in well salted water until tender. While the green beans are cooking, sauté sliced onions (perhaps half as much by weight as the green beans) in a generous amount of olive oil over moderate heat until they are nicely softened.  (Adding a sprinkling of salt and a spoonful of water helps them to cook more quickly.) Mix a handful of chopped parsley and mint into the onions. Then, if you like, add some bread crumbs, turn up the heat a bit and let them saute until they turn golden. Otherwise, turn off the heat.

When the green beans are tender, drain them and add them to the skillet with the onions and herbs. Turn them to coat well and let them stew for just a few minutes to insaporire. Before serving, sprinkle the beans with a bit of freshly squeezed lemon juice, just enough to brighten the flavors, season with salt and pepper, and serve hot. 

That's it. Simple but delicious! 

NB: I wanted to dub this dish 'fagiolini alla pugliese' but, just to confuse matters even more, it turns out that there is such a dish, more or less identical to fagiolini in umido, but with a bit of peperoncino for spice. Go figure…

Friday, December 4, 2009

Tiella pugliese


Even though my paternal grandfather was from Grumo Appula, a small town outside Bari in the southeastern Italian region of Puglia, I don't remember eating much pugliese food growing up. Other than a few dishes—orcecchiette with cime di rape (also known as broccoletti), that wonderful calzone di cipolla (onion pie) that I just recently rediscovered, and cavatieddi with tomato and ricotta—the Italian food I remember growing up with was basically from Angelina's native Campania. But I've always been curious about the cooking of Grandpa's native region.

When you mention pugliese cooking to many Italians, right after orecchiette they will often think of tiella pugliese, a hearty casserole of mussels with rice and potatoes, something like a cross between paella and a potato gratin. Although it requires a few preparatory steps and then a layering of different ingredients, it is a remarkably easy dish to make—after it is assembled it almost literally cooks itself. It makes a very satisfying piatto unico for a light dinner or first course of a substantial meal.

You begin by laying down thinly sliced onion, dressed with olive oil, on the bottom of a casserole dish.  Over the onions lay slices of waxy potatoes, chopped parsley and garlic, and diced tomato, season generously with salt and pepper, sprinkle over grated pecorino cheese and drizzle with olive oil:


Next place down a layer of mussels on the half shell (see Notes below), season again and drizzle a bit of olive oil over each bit of mussel:


Then cover with Arborio rice, topping the rice with some more chopped garlic and parsley, chopped tomato, grated pecorino, season again and drizzle over some more olive oil:


Place a final layer of potatoes (which you may wish to arrange in a neat pattern for presentation at the table) then, if you like, season as you have the other layers. (Some recipes call for leaving this layer plain, for a neater presentation.) Pour in the juices of the mussels and enough simmering water (or, for more flavor, dish stock or clam juice) to just cover the potatoes.


Bring the casserole to a simmer on top of the stove and then place in a medium oven (180C, 350F) for 45 minutes to an hour, until the top is nicely brown, the rice is done and all the water absorbed but the casserole is still moist.


NOTES: To make a tiella, you traditionally use mussels 'on the half shell'. Before adding to the casserole, the mussels need to be opened, either by shucking them raw (which I personally find rather tricky) or by very briefly steaming them with a bit of water in a covered pot, and then removing the half of the shell that is not attached to the mussel meat. Although not traditional, for the sake of convenience, you can also simply buy shucked mussels and use them, without their shells. As always, smaller mussels will provide sweeter flavor and finer texture than larger ones. Wild mussels need to be soaked and trimmed but most mussels these days are raised in 'farms' and come ready to use (see this post for background).

The potatoes should, as mentioned, be of yellow-fleshed 'waxy' variety. In the US, red bliss would be a good choice, as would an all-purpose potato like Yukon Golds. Avoid mealy 'baking' potatoes like Russets, which will tend to fall apart as they cook.

The main 'tricks' to a good tiella, other than using the best quality ingredients you can find, are to season the dish adequately—more than you may think you need—and to make sure that the rice is done to the right point, neither chalky nor mushy. You can test the rice for doneness by gently opening the top layer of potatoes and trying a few grains. Add a bit more water (or clam juice) if you find the rice is not yet ready, or if the tiella is drying out too much—and continue cooking. (To avoid undercooked rice, some recipes call for soaking the rice before using, but I would think that this would soften the rice too much and ruin its texture.)

Like most traditional dishes, there are numerous variations. Some recipes call for making the dish in rosso—using not just bits of chopped tomato as pictured here but lots of tomato in layers. In contrast, some recipes call for a few cherry tomatoes, sliced in half, rather chopped tomato. Some recipes call for placing the mussels on the top of the rice, rather than vice versa. Some recipes call for various layers of onion, alternating with the other layers of potato, instead of just one layer at the bottom of the casserole; some recipes even eschew the garlic completely in favor of  generous amounts of onion. And—for a summer variation—some recipes call for sliced zucchini interspersed with the potato. Some recipes call for breadcrumbs on top and/or interspersed with the other ingredients. And some recipes call for a mixture of grated parmesan and pecorino rather than all pecorino. All of these variations (with the possible exception of the last) sound good to me. If you would like a vegetarian tiella, just omit the seafood.

The name 'tiella' by the way, like 'paella' in Spanish and 'casserole' in English, refers both to the cooking vessel and the dish you cook in it. The tiella is typically made of terracotta. If you have a terracotta casserole, but all means use it—it somehow gives the food a special flavor that no other material can mimic—but otherwise enameled case iron or ceramic casserole will work just fine.

Friday, August 14, 2009

Calzone di cipolla alla pugliese


This dish brings back some of my fondest childhood food memories. Calzone di cipolla, or onion pie, is one of the signature dishes of the cuisine of Puglia. My grandfather Lorenzo hailed from a small town outside of Bari, the capital of Puglia, called Grumo Appula. His sister, whom we called Zia Angelina (not to be confused with my grandmother and her sister-in-law Angelina) made this pie her specialty. It has been years since I had last tasted this dish and had lost track of Zia Angelina's recipe, but, as luck would have it, a friend of the family named Maria Savino, also from Grumo Appula, provided us with the following recipe:

Sauté 2 large onions (see Notes for the best onions to use), sliced fairly thinly from from top to bottom, in a generous amount of olive oil over gentle heat, seasoning with a bit of salt and pepper and taking care not to let them brown too much. (At this stage of cooking, it helps to cover the sauté pan. This speeds the reduction process and discourages burning. Add a spoonful or two of water if needed.) When the onions are translucent and well reduced in volume, add 2 or 3 chopped ripe plum tomatoes and continue to cook until the tomatoes have totally melted into the onions and any liquid has evaporated. (Once the liquid has evaporated, you will hear the onions begin to 'sizzle'.) Turn off the heat and let the onion mixture cool completely.

Spread the sautéed onion mixture in a 23 cm/9-inch pie or quiche pan lined with a crust of your choice (see Notes for details on different crusts to use). Arrange some black olives and anchovy fillets, roughly chopped if you like, evenly on top of the onions. You should use enough so that every bite will have a bit of olive and a bit of anchovy. Cover the pie with another round of crust, pinch the bottom and top crusts together and then either trim off the edges (as in the photo above) or fold the extra bit of crust inwards to make a nice border. Make slits in the top crust to allow air to escape. (If you prefer, you can also simply prick some holes in the crust.)

Bake the calzone in a moderately hot oven (180° C, 375° F) for about 30-45 minutes, or until the crust is nicely browned and the pie is giving off a wonderfully savory aroma. Allow the pie to cool before serving. You can eat it warm (not hot) but, to my taste, the pie is much better at room temperature—and it tastes even better the day after you make it.

NOTES: Like any classic, there are any number of possible variations to this dish. There are variations in the onion filling: Zia Angelina's recipe called for a bit of tomato sauce instead of fresh tomatoes, plus a sprinkling of oregano. Other recipes omit the tomatoes altogether and call for adding grated pecorino cheese, raisins softened in warm water, bread crumbs and/or capers. Some recipes allow or call for green olives rather than black. The recipe for a version of this dish contained in Maria Pignatelli Ferrante's excellent Puglia: A Culinary Memoire calls for a stuffing of leeks, escarole, black olives, anchovies, capers and fresh tomato. She notes that in many parts of Puglia, the escarole is omitted, which is clearly the case in Grumo Appula. And some recipes call for adding an egg or two to the filling, which would, of course, give it a much firmer texture when baked.


There are various possible crusts for this pie. The classic crust, which Zia Angelina's (as well as Ferrante's) recipe calls for is made from a pizza-like dough of flour, oil, water and yeast. Some recipes call for adding a bit of white wine to the dough. In Zia Angelina's recipe, the dough is not allowed to rise before being rolled out, but in Ferrante's, it is. Maria Savino's recipe calls for a simple crust of flour and oil, with only a bit of water if needed to bind the ingredients and without yeast, known as sfoglia all'olio—a kind of Mediterranean pâte brisée. And, last but not least, Maria also uses packaged crust (she uses Pillsbury's brand), something which—not being much of a baker—I can heartily endorse as a perfectly acceptable shortcut.

Since onions are the 'star of the show', the choice of onion will strongly affect the end result. In Puglia, the most favored choices are cipolle rosse di Acquaviva delle Fonti, a very sweet red onion, or cipolle sponsali, a kind of a cross between green onion and leek—hence, I would surmise, Ferrante's suggestion of leeks for this dish. Maria Savino suggests using green onions (also called 'scallions' in certain places). Fresh onions, those sold in the spring with their green tops still on, would also work very nicely. And for those in North America, the sweet Vidalia onion—which I used when I made this—is a great choice as well. In a pinch, regular yellow onions will do, but the filling will not have the same sweetness which, combined with the savory elements of the filling, provide the typical character of the filling.

Although none of these recipes specify, it is also important, at least in my book, to slice the onions from top to bottom (ie, vertically) rather than horizontally, across the grain. This helps the onion slices to remain intact; they would otherwise complete melt during the fairly long cooking process they need to soften well. That will give your filling a pleasing bit of texture.

To see one of these other versions made, I would refer you to this excellent demonstration by my "Foodbuzz" friend, Nicoletta Tavella.

A final note: If you are interested in learning more about this dish, and perhaps Googling it, it should be mentioned that this dish goes by a good number of aliases. In pugliese dialect, it is called pizztidd or pizzutello. It can also be called scialcone di cipolla or pizza di cipolla. A bit confusing, but this kind of variety is not uncommon for well-known Italian dishes.


A view of Santa Maria Assunta, the 13th century 'mother church' of Grumo Appula.


Onion Pie on Foodista


Monday, July 6, 2009

Orecchiette ai broccoletti


This (and a piece of fruit) make a fine supper--pretty typical of the kind of thing we like to eat in our house on a weeknight when there's not much time to make dinner. A quick pasta dish with vegetables that you can whip up in less an 30 minutes. The pasta is orecchiette or "little ears", a pasta that is typical of Puglia, the region of Italy that my grandpa Fariello came from. Little disks of pasta made from durum wheat and water are pressed with the thumb so they come out concave, giving them the appearance of little ears--well, at least, if you have some imagination they do.

You cook the orecchiette with an equal amount of roughly chopped broccoletti (broccoli rabe) in well salted boiling water. Meanwhile, saute lightly crushed garlic cloves, dried red chili pepper (peperoncino) or red pepper flakes, and a few anchovy filets in olive oil. (Don't allow the garlic or the red pepper to brown too much or it will turn bitter.) When the orecchiette are done (about 15 minutes if you are using store-bought dried orecchiette) transfer them and the broccoletti with a slotted spoon into the seasoned oil. (For a more 'refined' dish, you can remove the garlic and peperoncini but I never bother.) Simmer until the pasta and broccoletti are well seasoned by the oil--a process known in Italian as insaporire. The broccoletti should have more or less disintegrated by now into a kind of 'sauce'. (This is definitely not nouvelle cuisine!) Add salt to taste and serve hot. Drizzle a bit more olive oil on top of each portion if you like. This is not a dish that calls for any kind of grated cheese.

Enjoy!

NOTE: Orecchiette can be found at Whole Foods and most Italian food shops. They are, unfortunately, quite expensive (around $6-7 per lb.) as real ones have to be made by hand. There are cheaper imitation orecchiette made by Barilla, but don't bother! If you can't find real orecchiette, or would rather not pay that much for pasta, better to use another kind of short pasta like rigatoni or conchiglie. Or you can make them at home: here's a post and a YouTube video that show you how they're made. I've tried it a few times--it's not as easy as it looks. Freshly made orecchiette take a lot less time to cook, so boil the broccoli rabe for 10 minutes or so before adding them to the pot.

While orecchiette is most commonly paired with broccoli rabe, you can use the same recipe using cauliflower instead of broccoli rabe (in which case, add a little chopped parsley for color). They can also be sauced with ricotta cheese softened with a wooden spoon or a lightly cooked marinara-type tomato sauce into which a dab of ricotta is mixed at the last minute. I've also heard of (but never made) orecchiette with clams or mussels. Since orecchiette have recently become 'chic', you'll also find all sorts of fancy recipes for orecchiette around with goat cheese and asparagus and such. Orecchiette are typically cucina povera and I find such extravagances absolutely absurd.