Showing posts with label Veneto. Show all posts

Saturday, February 19, 2011

Baccalà mantecato


A not-so-distant cousin of Provençale brandade de morue, baccalà mantecato is one of the signature dishes of Venetian cuisine and a staple of those wonderful hidden-away Venetian bacari, or wine bars.

The name of the dish comes from the verb mantecare, which is a culinary term meaning to 'beat' or 'whip' or simply to 'stir vigorously' so as to create a creamy consistency. It is the same word used to describe the final stage of making a risotto, when you stir the rice vigorously to incorporate grated cheese and butter, to creating that luscious creamy consistency that we all know and love. The technique serves the same purpose here, but in a wholly different context.

Ingredients (for 4-6 servings)

250g (1/2 lb.) salt cod, soaked for 24 hours and cleaned of any stray bones
1 clove garlic, very finely chopped (optional)
Olive oil, about 100g or as much as you need
Salt and pepper, to taste
chopped parsley

Directions

Cut the salt cod into manageable pieces and place them in a saucepan. Cover with water and bring to a gentle simmer. Add a small pinch of salt, a slice or two of lemon and a bay leaf. Continue to simmer for 20 minutes, until tender but not yet falling apart. When done, transfer the pieces of salt cod to a large bowl with a slotted spoon.

Start to break up the salt cod pieces with a sturdy wooden spoon. When the fish has broken up into shreds, add the garlic (if using) and then start to drizzle the oil into the fish. Stir with the wooden spoon, incorporating the oil slowly into the fish as you stir, as if you were making mayonnaise. Continue like this until the fish has formed a nice, but not entirely smooth paste. There should still be small bits of fish here and there. If you find the paste a bit too thick, you can add a spoonful or two of the cooking water. Taste and adjust for seasoning—you may not need any salt, but you probably will, as salt cod can be surprisingly bland after it has soaked. Mix in some chopped parsley.

Baccalà mantecato should be served at room temperature, typically on top of crostini di polenta as shown in the picture above. In Venice, polenta blanca or white polenta is the most autentic choice, but yellow polenta as shown will certainly do fine if you, like me, you don't have any of the white variety on hand. It can also be served with soft, hot polenta for a more substantial dish

NOTES: To make crostini di polenta, simply make a batch of polenta using the usual method, pour it out on a wooden board or baking sheet, in a thinnish layer, to cool completely. It will have hardened enough to cut into rectangles or square pieces. Grill or griddle your crostini on each side until lightly spottled. These crostini have many other uses—they are perfectly delicious slathered with gorgonzola cheese, for example.

If you are being a bit lazy, you can—if you must—blend the salt cod in a food processor,  drizzling the olive oil through the spout as you use the pulse function to avoid overblending. Of course, this method does not produce a dish with quite as much character but it will certainly save you some effort. What you should avoid, however, is using a blender, which will purée the fish rather than producing the typically 'rough' texture that characterizes the dish.

The recipe given here is from the Dogale Confraternita del Baccalà Mantecato, one of the many confraternita or associations (literally 'brotherhoods') in Italy charged as guardians of the most significant traditional local dishes. This one is, of course, based in Venice. The original recipe calls for stoccafisso, or stockfish, which is another form of preserved codfish, wind-dried rather than salt-cured and so much harder. It requires several days of soaking. It is a rarity in the US, but salt cod is a perfectly acceptable substitute, in my humble opinion. The original recipe does not call for garlic, but most recipes (even Italian ones) will include it these days. For a more assertive flavor, some recipes call for a fillet or two of anchovy.

Many recipes you will find, perhaps most, call for a mixture of milk and oil, often in a 50:50 ratio but sometimes mostly milk (or even cream) and only a bit of olive oil.  I have read—though I can't find the source now for the life of me—that the all-oil version is typical of Venice itself, while the milk and oil version comes from the inland areas around Vicenza. In the old days, olive oil was probitively expensive outside areas where olive tree grew, which meant most of northern Italy outside Liguria. Venice, itself, however, was lucky enough to have olive oil production nearby, where a micro-climate allowed for it. I now begin to doubt this explanation, however, as  its seems that there is olive oil production in several areas in the Veneto (something I never knew until I looked into it) including around Vicenza. In fact, olive oil from the Veneto has its own DOP designation. In any event, the oil you use should not be too fruity. A lighter Ligurian or Provençale olive oil (assuming you don't have access to the local variety!) would probably be the best choices. Avoid those fruity Puglian or Sicilian oils which, as wonderful as they are, would be too 'heavy' for this dish.


Saturday, October 2, 2010

Risotto al nero di seppia


Here's another installment from the colorful world of risotto. Last week we featured green risotto, this week it's black risotto, made with cuttlefish and its ink.

The technique for this risotto recipe is a bit different from the more usual one, in that you don't begin by toasting the rice but rather braising the cuttlefish (or, squid, if you can't find cuttlefish).  But before you start cooking, if your mollusk is not pre-cleaned,  you will need to clean it, making sure to carefully remove and reserve the ink sacs (see below). 
 
Now, make a soffritto of finely chopped onion and garlic, sautéed in olive oil. When the onion is soft and translucent, add your cuttlefish or squid (one small one or half a large one per person), which you will have chopped into little squares or sliced into thin strips, as you prefer. When the fish has turned opaque, add enough white wine to almost cover the fish and, if you like, a spoonful or two of passata di pomodoro (tomato purée) and/or a bit of peperoncino and/or some finely chopped parsley. Let the whole thing simmer until the fish is just about tender, which should take about 30-45 minutes depending on the type and age of the mollusk you are using. Then add the ink—if you've cleaned the cuttlefish or squid yourself, use the ink from the reserved ink sacs or, if using cleaned squid, about a sachet  of store-bought ink per serving—and stir so that it is fully incorporated into the liquid, forming a smooth sort of black ragù.

Add rice, stir to mix well, and simmer until the rice has absorbed the black liquid. Now proceed as you would for any risotto, adding ladlefuls of broth, one at a time, adding more broth only as the previous ladle has been absorbed. Fish or vegetable broth do best, but you can use chicken broth in a pinch, or even water. When the rice is done, remove it from the heat, add some more parsley if you like, and stir it vigorously as you would to mantecare any risotto. Add a dab of butter if you must but do not add grated cheese. Serve hot, topped with a bit of parsley if you like.

NOTES: This risotto is traditionally made with seppia, or cuttlefish, and the ink from the ink sacs that you carefully reserve when you clean it. Cuttlefish can be hard to find, and squid is a perfectly acceptable substitute. You clean both mollusks in the same basic way. Here's an excellent instructions video from the Rouxbe Online Cooking School:
 
 
In the US and perhaps elsewhere, most squid is sold pre-cleaned (which is to say, with the skin, internal cartilage and viscera (including the ink sac) removed. But nero di seppia (cuttlefish ink) is sold in small sachets in some specialty stores. They are also available online, sometimes under its Spanish name, tinta de calamar. Be careful handling the ink, as it really stains—which is perhaps why it was used as a dye and also as actual ink for writing in classical times. And, as you may have guessed by now, the English word 'sepia' comes from the Italian word for this same reason.
 
The dish takes rather longer than your usual risotto because of the initial braising, but the dish lends itself very well to pressure cooking. The cuttlefish or squid will take about 15 minutes under pressure. Then release it, add ink, then the rice and broth, and bring up to pressure again for another 5 minutes.
 
For tips on the best types of rice to use, see my post on the ABCs of Making Risotto. This dish being of Venetian origin, a vialone nano would probably be the best choice, but tonight I used carnaroli and it was very good indeed.

There are a few, but rather limited, variations on this dish. The most important being when you add the ink. Personally, I prefer to add it at the beginning, to ensure that it fully penetrates the rice, but some recipes call for adding it towards the end of cooking. One interesting variant recipe calls for making your squid or cuttlefish 'black ragù', then proceeding to make a risotto in bianco in the usual manner, in a separate pot, and adding the ragù to the risotto only towards the end of cooking.

The black ragù, by the way, makes a fine dressing for linguine, spaghetti or, for a Venetian treat, bigoli. 

Sunday, June 13, 2010

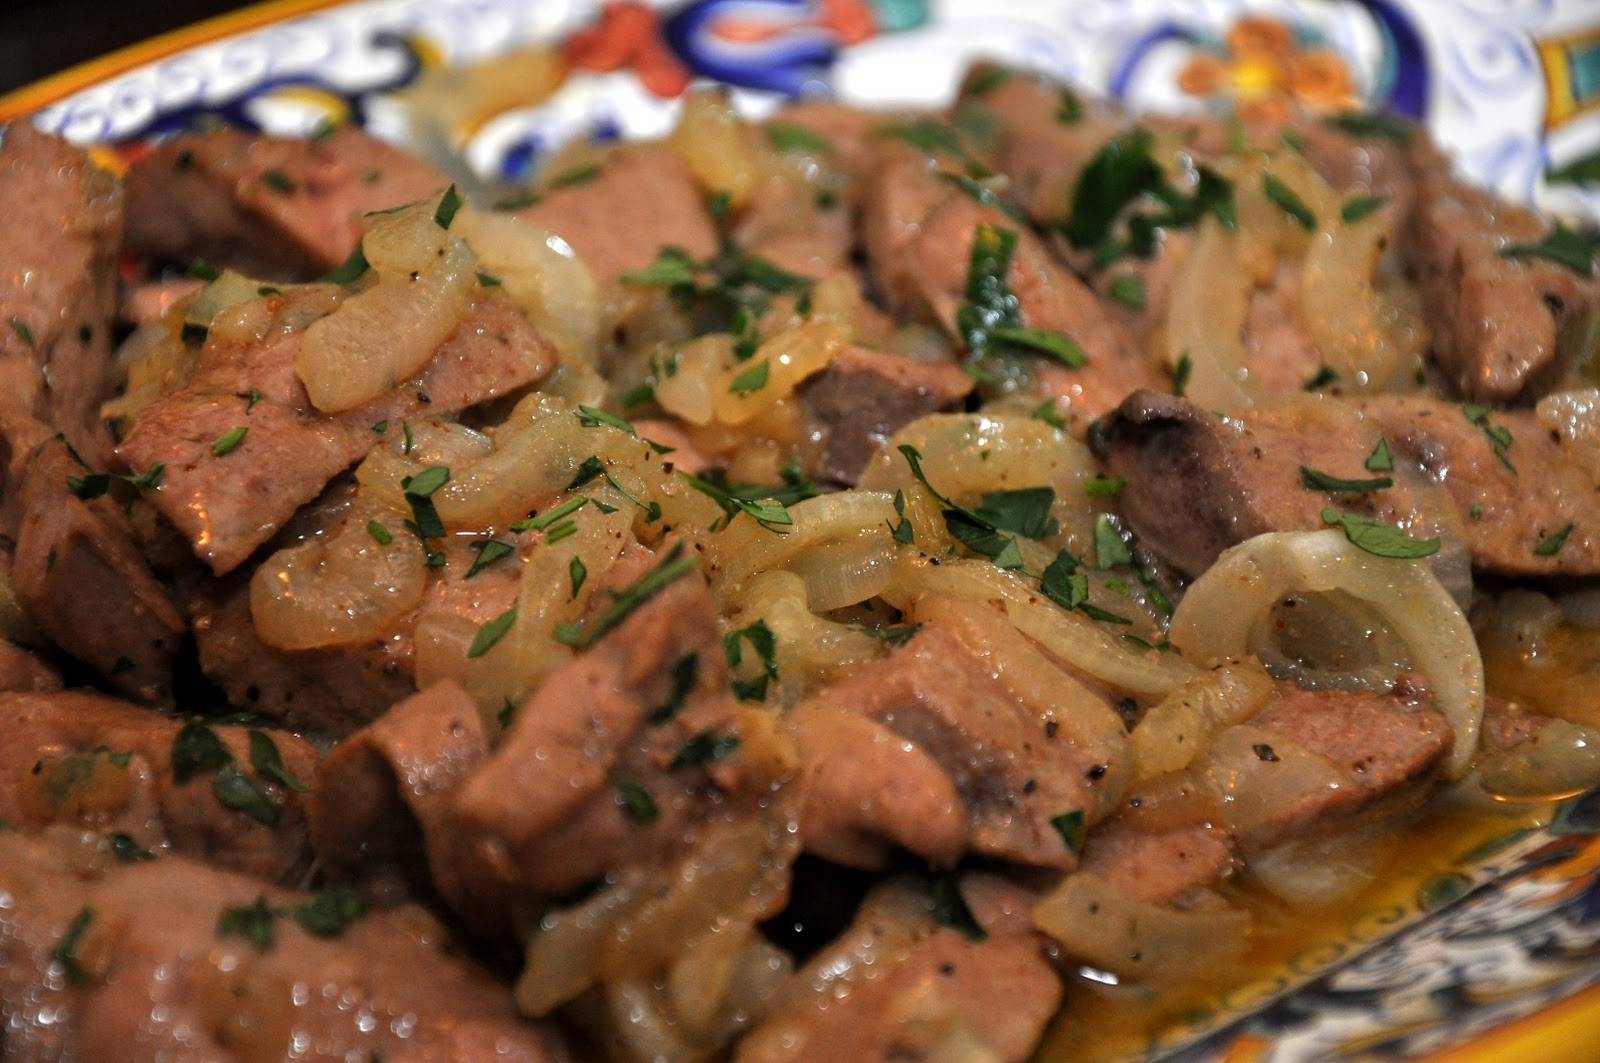
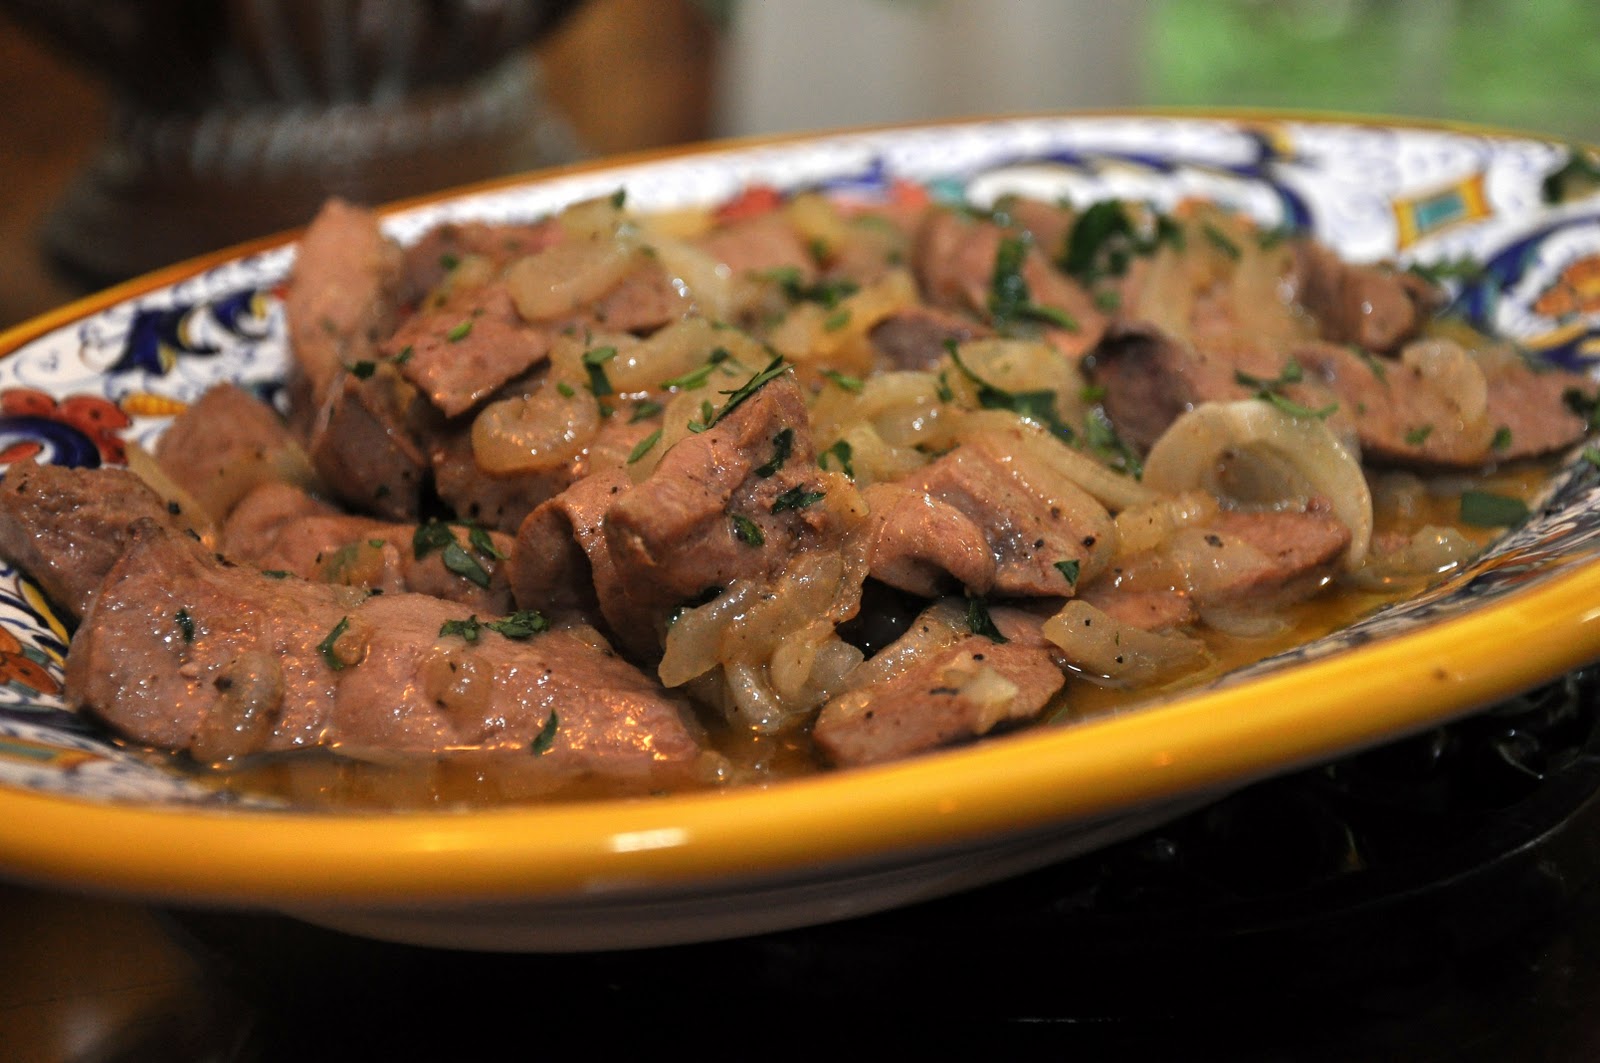
Fegato alla veneziana


A good many people have an aversion to organ meats. Perhaps that's because they are often not very well prepared—overcooking, which tends to accentuate the 'mineral' taste of organ meats and toughen their texture, is all too common. Or perhaps it's just the idea of eating an organ, although why someone would happily eat certain parts of an animal but not others never made much sense to me. 

If you fall into the latter category, you might want to just skip this post. But if you belong the first group, or have an open mind on the subject, you might want to try this dish, Venetian-style Calf's Liver,  which is probably the best known way to prepare calf's liver in the Italian repertoire. It couples thinly sliced liver with lots of well-caramelized onion, which adds sweetness to balance out the liver's earthy flavor, and a splash of vinegar, white wine or even lemon juice to balance out the sweetness of the onion. The combination, I think you will agree, is one that was meant to be. 

Begin by sautéing thinly sliced onion in a combination of butter and olive oil (or just butter) over medium to medium-low heat in a wide skillet until the onion is well-wilted and very soft. The onion should not color—regulating the heat carefully and add a bit of water or wine and salt will help the wilting process along and prevent browning. 

When the onion is ready, push it to the edges of the skillet. Add a bit more olive oil if need be, raise the heat, and add sliced calf's liver, trimmed and sliced into thin strips, to the skillet. Sauté over lively heat, just until the liver has lost its raw color. Then mix the onions and liver well, adding a handful of finely chopped parsley to the mix and seasoning well with salt and pepper. After a minute or so, remove the liver and onions to a warm serving plate. 

Add a good slash of white wine to the skillet and deglaze, scraping up the sucs that will have formed with a wooden spoon or spatula. When the wine has reduced to a syrupy consistency, pour it over liver, sprinkle with some additional chopped parsley and serve immediately.

As for measurement, the main point is to use an approximately 1:1 ratio of onion and liver by weight. The flavor of the onion must balance that of the liver, but not to overwhelm it. The rest is entirely a matter of taste. 


NOTES: The best onion to use for this dish, to my taste, is the white onion, which is mild and sweet. If you are in the US and have access to those sweet Vidalia onions. they work extremely well—and that's what I used this time. In a pinch, regular old yellow onion will also do fine, just make doubly sure that they are well reduced, which will intensify their natural sweetness. 

The original recipe for Venetian-style liver used vinegar rather than white wine. Personally I find that this adds a bit too much astringency to the dish, but no doubt in the old days it was a good way to use wine that had turned and the bolder flavor of vinegar may have been a way to disguise the flavor of less than immaculately fresh liver in the days before refrigeration. (Organ meats are extremely perishable.) In any event, I would suggest you use the freshest liver you can find. A few recipes call for lemon juice, rather than wine or vinegar, something I have yet to try. 

Some recipes, by the way, call for liver than has been cut into small pieces rather than strips. But I find the strips give the dish a more delicate flavor—the liver melds more completely with the other ingredients—and makes the liver cook more quickly, which keeps it tender. Liver slices bought at the store often need to be well trimmed of any 'skin' left around the edges, If you leave the skin on, the liver will tend to curl up, although cutting it into strips will also help avoid this. You can also make lamb's liver this way, and it will be very good. Beef liver, however, is a bit too strong for this treatment.

The final deglazing of the skillet after having removed the liver and onions is actually my personal take on the dish. The original recipe calls for adding the liquid—be it vinegar, wine, lemon juice, plus, in some recipes, a bit of broth—to the skillet with the liver and onions and allowing the whole to simmer together for a few minutes. But I like my liver still pink inside, so I remove it as soon as it is cooked to my taste. 

Some recipes call for you to remove the onions from the skillet before you add the liver, then add it back when the liver is almost done. This avoids any risk of the onion burning, but if you slice the liver into strips, it cooks so quickly there is little risk of that. 

The most typical way to serve fegato alla veneziana is with polenta, either warm and soft or cooled, cut into squares and grilled.  In the Veneto, by the way, the usual polenta is made with white polenta flour. Served this way, the dish can be a piatto unico. But if you want to precede your liver with a primo, it is perfectly delicious accompanied by some steamed potatoes or simply by itself, along with some crusty bread to sop up those wonderful juices.


The original name of the dish, in Venetian dialect, is figà àea Venessiana.  The dish has a longer history, with antecedents going back to ancient Roman days, when they would combine liver with figs, with the same intention of balancing the flavor of the liver with something sweet.

Saturday, May 15, 2010

Risi e bisi


Sweet, fresh peas in their pods can be hard to find, but when I spotted some in a local market I grabbed them up to make a delicious Springtime dish from the Veneto: risi e bisi, or rice and peas in Venetian dialect. Although it resembles a risotto, the technique is quite different. 

Shell your peas but don't throw the pods away. Rinse them and put them in a stockpot with a sliced onion and two sliced carrots, a pinch of salt and just enough water to cover. Simmer for a good half hour or more until you have a flavorsome broth.

Now make a soffritto with very finely chopped onion, pancetta and parsley (a food processor makes short work of the task) gently sautéed in butter and a bit of olive oil. (Some recipes call for a bit of garlic) When the onion is soft and translucent, add your shelled peas and a ladleful of the pea broth. Cover and gently simmer the peas over low heat until they are almost tender. 

Now add the rest of the broth and the rice—preferably Vialone nano but Arborio will do in a pinch—and continue simmering until the rice is tender, stirring from time to time. Add more broth or water if the rice dries out—but this is not a risotto where you should be adding liquid little by little. Remove from the heat and stir in a nice portion of freshly grated parmesan cheese and another nut of butter, continuing the stir until the cheese is entirely incorporated and the rice has taken on a nice, creamy consistency. Serve immediately. The dish should be rather liquid and flow easily, all'onda or 'like a wave' as they say in Italian, the typical of the rice dishes of the Veneto. Some versions are even wetter, almost a soup.

The key measurement is the ratio of pea to rice. Most recipes calls for a ratio of roughly 3:1 by weight, counting the weight of the unshelled peas vs. uncooked rice. I usually follow the rule of about 75g (2.5 oz.) of rice per person, which makes for 200g (7.5 oz.) of peas, rounding off. 

NOTES: I am usually a fan of frozen peas, but for this dish only fresh peas will do, not only because you won't have the pea pods for making the broth—which gives the dish its characteristically deep pea flavor—but also because frozen peas cook much too fast, so they will be entirely done long before the rice is.

There are some variations on the theme, as is usually the case with these mythic dishes, but the recipes you will find are remarkably consistent. The cookbook of the Italian Academy of Cuisine gives a second recipe for risi e piselli—not called risi e bisi—which has you adding the broth ladleful by ladleful, like you would for a risotto. The book explains that risi e bisi is typical of the Lumignano, a mountainous area in the province of Vincenza, while the latter variation was much in use in Venice during the Doge's festivities, although Padova claims to have invented the dish. 

Other variations include adding the peas only after the rice has cooked for about 10 minutes or so, for which you will need very tender, young peas, since they will only cook about 10 minutes total. You can also use some of the peas or the pods and purée them, as in this lovely rendition by my foodie friend and professional chef Carmelita of the Bologna-based Cook Italy cooking school, a technique which lends a lovely green color to the dish and gives it an even more intense pea flavor. Some recipes call for adding the chopped parsley at the end, as part of the final mantecatura, rather than as part of the soffritto. Some recipes call for prosciutto rather than pancetta. And, if you like, you can use meat broth in which you simmer your pea pods rather than water, which will produce a richer dish but less purely pea flavored. 

And if you really must use frozen peas, I would opt for puréeing some of the peas for extra flavor, and using meat or vegetable broth. Use a ratio of peas to rice of about 1.5:1. 

The dish is easily made vegetarian simply by omitting the pancetta, and can be 'veganized' by using oil instead of butter and omitting the cheese—although at that point you are getting rather far afield from the original.
As noted, the rice to use with this dish is Vialone nano, a variety that is native to the Veneto, more specifically to the area known as the bassa veronese, the plains that extend south from Verona. I've raved about this rice before, and it's excellent for all kinds of risotto, but it is practically essential for this dish. 

A vialone nano rice paddy in the bassa veronese

Monday, January 25, 2010

Baccalà alla vicentina


Baccalà, or dried salt cod, is a favorite meal around our house, even if it only appears occasionally on the dinner table. One of the most delicious ways to make baccalà has got to be in the style of the northern Italian city of Vicenza, slowly simmered in milk flavored with a savory soffritto of garlic, onions and anchovies.

Before going any further, I should mention that the 'baccalà' in this dish is actually what in other parts of Italy would be called stoccafisso, or stockfish, codfish that is not salted but sun and air-dried until it is almost rock hard. Stockfish needs to be soaked in several changes of water over 3 or even 4 days before you can cook it. Some recipes even tell you to beat the cod with a mallet to soften it before soaking. Salt cod, by contrast, is usually still more or less pliable to the touch and requires a much shorter soak, usually 24 hours or less. Stoccafisso is the usual codfish used in the cooking of the Veneto, where this dish originates, while in other parts of the Italy baccalà predominates. But if you can't find stoccafisso—it can be hard to find—this recipe works perfectly well with baccalà, with a few adjustments.

Begin, as mentioned, by soaking the baccalà in water. Depending on how long it has been cured, baccalà can take as much 24 hours to soak, or as little as 8 hours for some lightly salted, relatively fresh varieties. In any case, for this dish, which is seasoned with anchovies, you will want to make sure that the fish is well soaked and almost all of its saltiness removed. Change the water several times during the soaking period. If in doubt, taste a bit of the baccalà; if it is still very salty, keep soaking.


Meanwhile, make a soffritto by sweating an ample amount of thinly sliced (or finely chopped) onion—about half as much as the fish by weight—in olive oil until quite soft and translucent. Season with some salt and pepper, and add a few anchovy fillets and a handful of chopped parsley. As soon as the anchovies have 'melted' into the soffritto, turn off the heat.


Once the baccalà is ready, dry the fillets thoroughly, cut them into relatively even square pieces and dredge them in flour. Spread a spoonful or two of the soffritto on the bottom of a casserole dish, preferably of terracotta, then lay the pieces of baccalà over the soffritto, snugly but in a single layer.


Spread the rest of the soffritto on top of the baccalà. (If you have more fish than will fit in a single layer, then add just a bit of the soffritto on top of the bottom layer, place another layer of fish on top of that, and then spread the rest of the soffritto on top of the second layer. If you have more fish than will fit in two layers, then your casserole is too small!)


Pour over enough milk to just barely cover the fish pieces. Then sprinkle the top with abundant grated parmesan cheese. (This is one of the relatively rare cases in Italian cooking where fish and aged cheese are combined—an exception that proves the rule.) Then drizzle the whole with a generous filo d'olio.

Now you have two choices: either you can simmer the dish on top of the stove—over very gentle heat—or you can place the dish in a moderate to slow oven (no more than 180°C/350°F, but better at 150°C/300°F). The dish should just barely bubble as it cooks. In either case, the baccalà should simmer for about 3-4 hours, shaking the pan once in a while to avoid the bottom burning or the fish sticking, but not stirring, until the the liquid is almost entirely consumed and the fish is very tender. Your patience will be richly rewarded, as the flavor of the dish is absolutely ambrosial!


Serve with soft polenta, preferably the polenta bianca that is typical of the Veneto, but in a pinch your average yellow polenta (as pictured above) will do fine.

NOTES: As noted above, the main concern when using salt cod rather than the original stockfish is to avoid over-salting, so be sure that the codfish is well soaked in several changes of water. You may or may not need to season the dish at all.

There are many subtle variations on the above recipe. Some recipes call for butterflying and 'stuffing' the salt cod fillets rather than simply layering them top and bottom. Some recipes say you should roll the fillets in the soffritto before flouring them. Some recipes call for mixing the soffritto into the milk rather than stuffing or layering the fish with it. Some recipes call for browning the floured pieces of cod before adding them to the casserole. Some recipes call for including a bit of garlic in the soffritto. And some recipes call for adding white wine to the soffritto and then allowing it to evaporate. Ada Boni, in her classic Talismano della Felicità, suggests adding a bit of wine to the dish as it cooks if it starts to dry out during the long cooking process. Almost all recipes call for a long, slow simmering of 3-4 hours, but one source I found specifies only 1-1/2 hours at a relatively high temperature. And, as noted above, you have the choice of simmering on the stove or in the oven. Personally, I prefer the oven method, which avoids scorching the bottom of the casserole and allows a pleasant crust to form on top. Just be careful to regulate the heat so that the crust does not brown too much.

Baccalà alla vicentina is such a famous dish that it actually has its own 'official' website, which sets out the official recipe of the Venerabile Confraternita del bacalà alla vicentina—which is the one set out in this post. The English language version is, unfortunately, poorly translated but mostly intelligible.

For some other ways to make baccala', check out my earlier post on baccala' e ceci.

Vicenza, by the way, is one town in Italy that I have not had the chance to visit, but one I most certainly want to, if only to see some of the 23 palazzi there designed by Andrea Palladio (1508-1580), a native of the city who was perhaps the most influential architect of all time. (If you've visited Monticello in the US or enjoyed the buildings of Christopher Wren or Inigo Jones (not to mention countless neo-Classical stately homes) in the UK, you've seen examples of Palladio's enormous influence. There are so many structures by the famous architect there that UNESCO has designated Vicenza as the "City of Palladio" on its list of World Heritage Sites. Among other noteworthy natives of the city are Sonia Gandhi, Indian politician and wife of Rajiv Gandhi, Prime Minister of India, and Roberto Biaggio, famed football (soccer) player.

The Loggetta Palladiana, an example of Palladian architecture in Vicenza

(By the way, this post reminds me of a story an old friend once told me. As a young girl, she lived with her Italian nonna. It happened that she was luxuriating in the bathtub a bit too long, as she was wont to do, and her nonna knocked on the door and shouted, "Hey, get outta the tub, you baccalà!")

Sunday, January 24, 2010

How to Make Polenta

Polenta is one of the most emblematic dishes of the northern Italian cuisines from the Veneto to Lombardia to Piemonte. It is also one of the oldest foods eaten in Italy, dating back at least to 990 BCE. In its original form, polenta—known to the ancient Romans as pulmentum—was a porridge made from spelt. In later ages other grains such as barley and millet as well as pulses and even chestnuts were used to make various kinds of gruels eaten generally by the poor. It is said to have originally been an Etruscan dish, which the Romans adopted and spread throughout the Empire, although today polenta is not particularly important in the cooking of Tuscany or (with one exception) Lazio. In the 1600s, after maize, a New World grain, was introduced into Italy by the Venetians, polenta took on the form we know today.

Polenta, as befits la cucina povera, is quite simple to make but requires patience and care. Polenta was traditionally made by the fire, cooked in a copper pot known as a paiolo, hung close to the fireplace and stirred  with a wooden stick known as a tarai (or tarel in some areas). Polenta today is usually made on top of a stove, and besides the traditional method, some modern methods have been developed.

Traditional method for making polenta: In a paiolo or other large pot, preferably made of copper, bring some lightly salted water to the simmer. I find that a ratio of 1 liter (1 quart) of water for 250g (1/2 lb.) of polenta flour works well. Have some more water on hand, simmering in a saucepan or kettle at the back of the stove:


When the water in paiolo has come to the simmer, add the polenta in a constant but gradual stream—in Italian they say 'a pioggia' or like rain—stirring the pot all the while with a whisk or wooden spoon in one direction until all the polenta has been incorporated into the water:


NB: This technique should avoid the awful fate of badly made polenta: the formation of unpleasant lumps or grumi. (I find the use of a whisk, while unconventional, is particularly helpful.) But don't be surprised if you wind up with a few lumps on your first few attempts to make polenta; it is part of the learning process.

The polenta will soon thicken. Turn down the heat to low immediately; be careful, as polenta has a tendency to spatter if it 'boils'. If this happens, take the paiolo off heat for a moment and add some water. That will stop the sputtering, and you can return to the heat and continue to stir:


If you have been using a whisk, you will eventually need toswitch to a wooden spoon as the polenta thickens. Continue stirring and, when the polenta gets too thick to stir without great effort, add some of the hot water you have kept in reserve and continue to stir:


Although some recipes call for you to stir constantly throughout the cooking period to avoid scorching the bottom, I find that if the heat is low enough and you keep the polenta rather loose by adding water from time to time, you only need to stir every so often—say every 5 minutes or so. The polenta should simmer like this for at least 45 minutes, and it is even better after an hour. Some recipes even call for cooking the polenta for 90 minutes—something I've never had the patience to do.

The polenta is done when it is perfectly creamy and has attained the consistency you desire. The polenta should pull away from the pot when you run your spoon across the bottom of the pot:


Depending on your tastes and the use you will be making of the polenta, it can be either all'onda, or rather soft like a risotto, or quite stiff. (More on this later.) If you want a stiff polenta, stop adding water for the last 15-20 minutes or so, and allow the polenta to thicken; you will need to stir more during this final period.

 
A nice thick polenta 

Pressure cooker method: The traditional method, even without constant stirring, is quite a job. If you want to cut down both on time and effort, you can make polenta in a pressure cooker. To avoid scorching the bottom, use more water than you normally would (say 25% more) and as soon as the polenta begins to thicken a bit, close the lid and bring the pot up to pressure. Turn down the heat to the barest flame, just enough to maintain the pressure, and cook for 20 minutes. Release the pressure, either gradually by just letting it come down by itself off heat, or 'forcing' the pressure down by opening the valve and/or running the pot under cold water in the sink. Remove the lid. Bring the pot back to the stove and over gentle heat begin stirring your polenta. Depending on the consistency you want, add some more water to loosen the polenta or, if it is already rather looser than you want your final product to be, just keep stirring as the polenta thickens.

Slow cooker/rice cooker method: Although I don't own a slow cooker and only occasionally use a rice cooker, I find this method attractive. You mix your polenta flour with cold water (like the pressure cooker, use about 25% more than you would normally) and a pinch of salt in the cooker, close the lid and proceed to cook according to the instructions for your machine (usually 6 hours on low, 3 hours on high). Some recipes call for you to grease the inside of the cooker with a bit of butter or oil to prevent scorching.

Oven method: This is one I've never tried, but it is said that you can make polenta by mixing cold water and polenta flour in a casserole and placing it in moderate oven (180°C, 350°F) to bake for about 45 minutes, stirring it at least once towards the end of the cooking period. 

Electric polenta pot: My favorite method back in Italy was to use an electric paiolo or polenta pot. After the initial addition of polenta flour, as soon as the polenta began to thicken, you attached a paddle with an electric motor to the top of the pot and plugged it in. The paddle would rotate slowly, stirring the polenta, for as long as you wished to cook it. It is a wonderful invention but I had to give it away before leaving Italy, because of the difference in current. Despite having looked high and low, I have not managed to find anything comparable in the US.

Instant polenta: Even in Italy, partially pre-cooked 'instant' polenta,  sometimes called polenta lampo or 'lightning polenta', which can be eaten after only 5-10 minutes of simmering, is quite popular. Of course, it goes without saying that both taste and texture suffer when compared to 'real' polenta. But the result is acceptable in some dishes where the polenta is paired with an especially hearty condimento, like the Roman classic, polenta con spuntature e salsicce.

NOTES: Polenta is traditionally served heaped onto a large wooden board, in the middle of which a shallow well is formed to hold the sauce or other condimento to go with it. Served this way, polenta is paired with a broad variety of dishes from meat to vegetables to fish. Traditionally, polenta was cut with a heavy string, served with wooden spoons and eaten on wooden plates, as contact with metal was said to ruin its flavor. (This was the original reason for cooking polenta in copper pot, since unlike other metals copper was said not to have this deleterious effect.) These days, a serving platter will do, and the advent of stainless steel has rendered these precautions unnecessary, although like many, I still use copper and wood implements. It just feels right…

There are other ways to serve polenta. While still warm, thickly cooked polenta (either leftover or made for the purpose) can be spread in a shallow layer on a plate or cookie sheet or other flat surface and left to cool; the polenta hardens as it cools and is then cut into squares or other shapes. These can be fried or grilled and used as a kind of contorno, or as the bed of a crostino. The polenta squares can also be arranged in a casserole with béchamel, cheese and sauce like lasagne to make a 'polenta pasticciata'.


There are various types of polenta flour you should use according to the region and dish you are making, as well as your personal taste. The most common type of polenta flour is called bramata, a medium-coarse, yellow cornmeal. It is used for rustic polenta dishes and is well suited for chilling and grilling or baking. It is the kind most often found both inside and (especially) outside Italy. You can use it as a kind of 'all purpose' polenta flour. For a finer texture, which results in a softer, more refined polenta, use the kind of polenta known as fioretto, which is very finely ground. In parts of northern Italy, particularly in the Veneto, a finely ground white cornmeal called polenta bianca is quite commonly used to accompany local dishes like baccalà alla vicentina. A rather unusual, but delicious polenta is made with a mixture of buckwheat and cornmeal, called polenta taragna, both very coarsely ground. It is very typical of the Valtellina—the Alpine area of Lombardia which is home to the buckwheat pasta known as pizzoccheri—and also eaten a further to the south, in the areas around Brescia and Bergamo. Rather than a sauce, copious amounts of cheese and butter are usually added just before serving this kind of polenta.

Although polenta is typically thought of (and is) a northern dish, polenta is eaten all over Italy. And although Rome is not really polenta country, in the winter the aforementioned hearty dish of polenta with sausages and spareribs is much appreciated there. Angelina also made polenta, rather soft, served with a simple sugo di pomodoro or with ragu. In my family the story goes that she learned to make polenta to please my grandfather, who had fought in the First World War against the Austrians and, while up north, developed a taste for the stuff. (Following an long tradition, as puls was the usual ration for Roman soldiers in ancient times.) The story may be apocryphal, however, as polenta is also popular in the area she came from around Benevento and Avellino, perhaps a holdover from the times when polenta was enjoyed all over the Roman world.


Sunday, January 3, 2010

Carpaccio di salmone affumicato


Here's an elegant yet very quick and easy starter that suits just about any menu: a 'carpaccio' of smoked salmon, dressed simply with oil and lemon.

All you need to do is arrange thin slices of smoked salmon on a plate (this is a dish that is best prepared individually for each diner) and spoon over them a citronette that you will have prepared beforehand by processing together a good pour of olive oil (about 1 dl/half a cup), the juice of half a lemon, a few sprigs of parsley, salt and just a smidgen of garlic (say, half a clove) until the lemon and oil have emulsified and the parsley and garlic have been finely minced. Allow to macerate for just 5 minutes or so, and serve with some crusty bread.

NOTES: As many readers will know, the original carpaccio, as invented by Giuseppe Cipriani in 1950 for his renowned Venice bar, was made with very thinly sliced beef fillets, dressed with a creamy mayonnaise. According to some sauces, the sauce was flavored with a bit of curry and chopped chives. Other sources say that the mayonnaise was tempered with lemon juice, Worchestershire sauce and a bit of milk. Either way, the contrasting red and white of the dish reminded Giuseppe of the paintings of Vittore Carpaccio, the 15th Century Venetian painter whose works were known for their prominent use of these colors.

These days, the term applies to a multitude of dishes featuring thinly sliced or pounded meat or fish, including most commonly not just beef, but veal, venison, tuna, swordfish or salmon, usually dressed with oil and lemon seasoned with salt, pepper and aromatic herbs. The charm of using smoked salmon, of course, is that you can buy it pre-sliced, which eliminates an awful lot of work. And the resulting contrast of orange and green, while perhaps not true to Carpaccio's style, is lovely to behold all the same.


Carpaccio, Pilgrims Meet the Pope (1491-93), Accademia, Venice.

Monday, December 14, 2009

An Italian Hannukah: Riso coll'uvetta


It may come as a surprise to some, but Italy has a Jewish tradition going back not just centuries, but millennia. A Jewish community existed in Rome dating from during the Roman Republic, even before the Empire, in the first centuries BCE. That presence grew during the late Middle Ages, when Italy presented a relatively tolerant environment (with emphasis on the 'relatively') as compared with other European countries. A great number of Jews settled in Italy after the mass exiles from Spanish in the wake of the Reconquista in the late 15th Century. The complicated ups and down of Jewish life in Italy over the years are ably outlined in this article, but, to make a long story short, by the 20th Century the principal Jewish communities in Italy were to be found in Rome, Venice and Tuscany. Then came the Holocaust, which resulted in the extermination of about 15% of Italy's Jewish population and the end of many Jewish communities like the one that had been found in the village of Pitigliano, known as "the Little Jerusalem". About 45,000 Jews live in Italy today.

The Jews of Italy developed their own, very distinct but yet very Italian cuisine. The best book I know on the subject is The Classic Cuisine of the Italian Jews by Edda Servi Machlin. Today I would like to present two lovely recipes from that book, for dishes traditionally served at Hannukah: riso coll'uvetta, rice with raisins, an unusual but delicious risotto dish from Venice which I will describe in this post, and pollo fritto per Chanukà, fried chicken for Hannukah which will be featured in the next one.

Riso coll'uvetta—called risi coll'ua in Venetian dialect—is an ancient recipe from the Jewish community in Venice. To make it, you begin with a soffritto of garlic and parsley sautéed in abundant olive oil. As soon as the garlic begins to brown, add your rice and toast that until it turns an opaque white, then add a handful per serving of raisins which you will have softened in warm water for a few minutes, mixing well and then adding broth, a ladleful at a time, in the usual manner for making risotto, until the rice is tender but still al dente. There is no mantecatura for this dish, but I mixed in a bit more chopped parsley for color at the end, and seasoned with salt and pepper as needed, to taste. That's all there is too it. Machlin says the dish can be served warm or at room temperature.

NOTES: The combination of sweet and savory in this risotto is quite unusual in modern Italian cookery—a sign, perhaps, of the recipe's ancient origin—but I really liked it. The addition of raisins in Italian cooking, however, is not all that uncommon, particularly in Venetian and Sicilian cuisines, usually being a sign of Moorish or Middle Eastern influence.

There are a few variations to the dish. Some recipes will have you add a bit of white wine as for a typical risotto, some recipes call for water rather than broth, some call for the addition of some apple juice at the end (something it seems to me that would unbalance the flavors too far in favor of the sweet side). Not all recipes call for softening the raisins (although I recommend it heartily) and some recipes call for adding the raisins at the very end of the cooking time. If you want to make this a dairy dish, then you can omit the broth and use butter instead of oil. In the dairy version, you can also add parmesan at the end as with a regular risotto.

Some readers may know that our word 'ghetto' comes from Venice—the gh and double t give the word away as Italian—and more specifically it refers to that part of the city where Jews were obliged to live during the Middle Ages all the way up to the end of the Venetian Republic. It was Napoleon who, in 1797, decreed the end of Jewish segregation. Nevertheless, the Venetian ghetto is still the center of Jewish life in Venice, home to about 1000 Jews and several synagogues, a yeshiva and other centers of Jewish life including a kosher restaurant where, however, I was disappointed to find, this dish is not on the menu...


Saturday, October 24, 2009

Risotto al radicchio

Risotto, as we all know, is an almost infinitely variable dish. You can pair rice with almost any meat, fish, vegetable or even fruit. One of the very finest ways to make risotto is with radicchio, whose mildly bitter flavor makes it a wonderful foil for the bland, almost sweet flavor of rice. It may not be the prettiest risotto, but it is one of the most delicious and satisfying.

You begin with a soffritto of pancetta, onion and/or shallots (I prefer the shallots with radicchio). Be generous with the onion or shallots—their sweetness will balance the bitterness of the radicchio. When the aromatics are well softened and reduced, add very thinly sliced radicchio (a "chiffonade" as it is called in culinary lingo), mix well and allow the radicchio to wilt and absorb the flavor of the soffritto. When the radicchio is well wilted—it will have darkened in color considerably too—add the rice and proceed in the usual manner to finish the risotto—except that you may want to use red wine, rather than the usual white, to moisten the rice after it has been toasted. Beef broth is preferable to chicken broth. And I like to add a nut of sweet butter as well as a generous amount of grated parmesan cheese during the mantecatura. Many recipes call for a five minute 'rest' for the risotto before serving.

NOTES: There are any number of possible variations to this dish. If you want a vegetarian dish, then omit the pancetta from the soffritto and use vegetable broth (or lightly salted water) instead of broth. If, on the other hand, you want an even more substantial dish that could be a one-course meal, you can add pieces of sausage it to the soffritto or, even better, brown them separately in olive oil and fold them into the finished dish. Radicchio marries well with cheese, which is why I like to add extra grated parmesan in the final stages, but you can also take it up a notch and add other, creamy cheeses like taleggio or—a common pairing—gorgonzola. Although not very orthodox, I also sometimes add a bit of cream, either in addition to or instead of cheese, which has the effect of softening the bitterness of the radicchio, as well as providing a smooth, creamy texture.


Saturday, October 17, 2009

Pasticcio di pappardelle al radicchio rosso di Treviso

Pappardelle, those extra-wide egg noodles typical of Tuscany, are perhaps my favorite pasta. There's something about wide noodles—I love Chinese ho fun noodles, too—that are especially enticing. Perhaps the most well-known pappardelle dishes are 'sulla lepre' (with braised hare) and al cinghiale (wild boar)—but pappardelle are quite versatile and, I find, go especially well with radicchio rosso. And the slightly bitter taste of radicchio marries very well with creamy sauces, the sweetness of which tend to balance out flavors. Put this all together and you have this elegant but simple dish.

You begin with a simple soffritto of onion in butter and olive oil, into which you add about 200g (8 oz. or 1-1/2 cups) of chopped radicchio (preferably radicchio rosso di Treviso—see below), seasoning with salt and pepper and turning to let the radicchio absorb the flavor of the onion over moderate heat. When the radicchio is well wilted (and it will turn color to a kind of burnt sienna) then adding a splash of red wine and allow it to evaporate, then add water or broth, enough to wet all the ingredients well without covering them. Cover and allow to braise about 15 minutes or longer, until the radicchio is tender and the liquid well reduced. (Some recipes call for a simmering time as long as 45 minutes.)

While the radiccchio is braising, make about 500ml (2 cups) of a rather thin béchamel sauce (recipe coming). Add 250ml (1 cup) of heavy cream, a good 100g (1 cup) of grated parmesan cheese and, when done, the radicchio and its braising liquid. Mix well.

Cook your pappardelle (about 125g or 4 oz.) in abundant salted water and, when they are still a quite underdone, add them to the béchamel, cheese and radicchio mixture. The mixture should be quite soupy—remembering that the sauce will simmer and reduce and get absorbed by the pasta during the next step. Pour the mixture into a oven-proof casserole or gratin dish, top with more grated parmesan cheese, and bake in a very hot oven (450F, 230C) until it is lightly browned on top. Allow to cool off for 5 minutes or so before serving. Makes enough for 4 persons as a primo or 2 very hungry persons as a piatto unico.

NOTES: Radicchio is a variety of chicory, with white-veined burgundy-colored leaves. It comes is two main varieties: radicchio di Chioggia, which comes in round, cabbage-like heads, and radicchio di Treviso, which comes in long, tapered heads. The radicchio di Treviso has a more tender texture and, to my taste, a finer flavor. The latter are harder to find (at least in the US) and more expensive, but well worth seeking out. But if you can't find them, the radicchio di Chioggia will do fine for this dish—however, since their leaves are less tender, it will take longer for them to cook to the right point of doneness. This is not a dish where you want your vegetable to be crunchy.

Pappardelle are widely imported and fairly easy to find commercially, even in supermarkets. But if you can't find them near you—or if you want to—they are relatively easy to make at home. Just make egg pasta dough in the usual way, roll it out rather thinly and cut them into 2-3cm (3/4-1 in.) wide strips. Pasta machines and attachments do not usually come with cutting blades wide enough, so you'll need to roll up the sheets of pasta and cut them with a knife, but it's quite easy to do.

Béchamel sauce, despite its French origins, is commonly used in central and northern Italian cooking, especially for baked pasta dishes. For example, baked lasagne in Rome and points north, more often than not, contain béchamel. (Southern lasagne usually come with a ricotta, egg and cheese mixture instead.) It is called besciamella (or, sometimes, balsamella) in Italian, although you will see recipes that simply use the French term. Some Italian authorities (like Giuliano Bugialli) maintain that béchamel was invented by Italians, derived from the Florentine salsa colla and, like some many things, reputed to have been brought to France by Caterina de' Medici.

Radicchio marries well with pork. You can add bits of pancetta or mild sausage to the soffritto at the beginning if you would like an even more substantial dish. They also go nicely with mushrooms, especially wild ones, which I would recommend you sauté separately and add to the mixture before baking.

The term pasticcio, by the way, comes from the same root as the French (and English) pastiche, meaning a mixture of different pieces or ingredients. In Italian cooking, it often refers to a baked pasta dish like this one, in which the pasta is mixed with béchamel , cheese and some sort of condimento and then gratinéed in a hot oven. But it also refers to a savory pie that can be made with vegetable or meats. Colloquially, the word can mean a 'mess', as in 'Che pasticcio!' (What a mess!) or 'Bel pasticcio!' (A fine mess!). And if you find yourself 'nei pasticci', that means you're 'in a fix'. Perhaps even more common than as a pasticcio, pappardelle and radicchio are also very nice without the final gratinée. Instead of béchamel, simply add ample heavy cream to the braised radicchio and, when your pasta is cooked, add it to the skillet with the radicchio and cream, mixing well with grated parmesan cheese, and serve.

Pappardelle  on Foodista

Thursday, July 9, 2009

The ABCs of Making Risotto

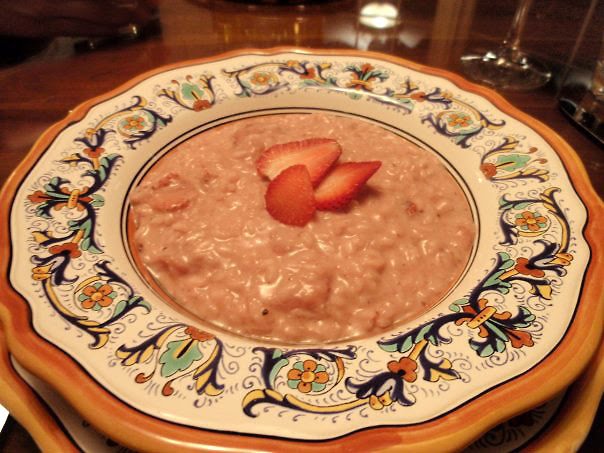
Strawberry Risotto

It's actually not the kind of thing that Angelina made, she being from a small town in southern Italy and risotto being a traditionally northern Italian dish, but still, risotto is one of my favorite things to make, and one of the most versatile of dishes. You can use almost anything--meat, fish, shellfish, vegetables and even fruit--to flavor a risotto. In the past few weeks, I've made four kinds of risotto: a risotto with bacon and belgian endive, one with ham and asparagus, one with red pepper and, just last night, a strawberry risotto.

There is a basic recipe that is common to all risotti: You begin by gently sauteeing chopped or finely sliced onion in butter and/or or oil. (As I've mentioned before, you can add a pinch of salt and a drop of water to soften the onions as they cook to make sure they don't burn.) Then add the rice--a bit more than a handful, or 70-100g
(1/3-1/2 cup) per person, depending on how hungry you are--and let it 'toast' in the soffrito for a few minutes-- just until the grains turn a chalky white color. Then add a splash of wine--almost always white, but red is possible in a few instances and, for a very special risotto, you can use champagne. Then add broth, ladle by ladle, allowing each ladleful of broth to evaporate before adding the next ladleful, stirring often. (There are some cooks who say it's only necessary to stir when adding the broth.) Repeat until the rice is 'al dente', which should take around 20 minutes. You then take the risotto off heat and, for most risotti, add a generous amount of grated parmesan cheese and, if you like, a bit of butter, mixing vigorously to create a creamy consistency. (This last step is called mantecare--the idea being that by agitating the rice kernels and releasing their starch, you give the risotto a rich, creamy texture.) Serve immediately or, for a slightly firmer risotto, you can cover and let it sit for a minute or two. If conversely the risotto is too stiff for your taste, stir in a bit of hot water, broth or cream to loosen it up.


Risotto with red pepper

If you follow the above recipe, you wind up with the most basic of all risotti, risotto in bianco or 'white risotto'. Most risotti, however, are flavored with some other ingredient. If you add a bit of chopped bone marrow to the butter at the beginning, and saffron dissolved in broth to the rice while it is cooking, you have the classic risotto alla milanese, ambrosial on its own as a primo piatto and the invariable accompaniment to ossobuco--one of the few instances where rice is used as a sort of side dish in Italian cooking.

But most often, the flavoring element is added (cut into small dice or thinly sliced) to the soffrito and allowed to insaporire for a few minutes before adding the rice. This is how I made the risotto with bacon and belgian endive: I added the bacon to the butter to render its fat, then added the onions and endives cut in julienne to saute for a few minutes, then the rice, before proceeding with the basic recipe. For the risotto with ham and asparagus, I added both ingredients, cut into small dice, to the already sauteed onions, and continued from there. Most risotti work this way, and, as I mentioned, there is almost no limit to the variety of risotti you can make this way. It's a great way to use up spare vegetables and other stuff. Even leftovers can be used as the flavoring element for a risotto.

But when the flavoring element is particularly delicate in flavor or texture, it can be added either while the rice is cooking (peas or some seafood, for example) or even at the very end, just before you begin to mantecare--and this is usually how you make strawberry risotto. In this case, the flavoring element is sometimes cooked separately before being added to the rice. For example you saute thinly sliced strawberries in butter, added cream, and then added the resulting 'sauce' to the risotto at the very last minute.


Risotto with bacon and belgian endive

 
You have a great deal of flexibility when decided how much condimento to add your rice. Anywhere between a 1:1 to a 1:2 ratio by weight of condimento to rice will work, depending on how 'emphatic' you want to flavor the risotto and the nature of the condimento. Generally speaking, I would use less meat, for example, than I would vegetable, or the risotto will become too heavy. You can use more of foods that tend to 'melt' while cooking, in particular leafy vegetables. Very strongly flavored foods like pancetta or saffron, of course, do not follow this rule--add just enough to lend flavor.


NOTES: There also some variations at the mantecare stage. For a number of risotti, especially those using slightly bitter winter vegetables like radicchio, belgian endive and 'elegant' vegetables like asparagus, I like to add cream (still on heat) and let it reduce before proceeding with the cheese (off heat), in which I case I omit the butter. A friend of mine from Milan told me that she liked to add--believe it or not--Philadelphia cream cheese in addition to the parmesan cheese to finish the dish. For seafood risotti, you usually do not use butter or cheese at the end (it is a fairly strict rule for Italians not to mix seafood and aged cheese--the sight of non-Italians sprinkling grated cheese on their spaghetti and clam sauce can still make me gag!), but some cooks add olive oil instead to finish the dish. But, personally, I don't object to cream, cheese and/or butter in a shrimp risotto--in fact, I rather like it that way.

The main trick to making risotto is the proper regulation of the heat. Cook it too fast, and the outside will be soft while the inside of the rice grains will still be chalky. Cook it too slow, and you will wind up with a stodgy mush... yuck! The other essential for a successful risotto is to use the right kind of rice. Here, there is simply no substitute for imported Italian short grained rice: most commonly, arborio, but also carnaroli and vialone nano. Both of the latter two are more expensive (and can be harder to find), so I usually stuck to arborio, but was recently converted to vialone nano which has wonderful absorptive qualities and produces a creamy, but never stodgy, risotto.

If you're living in the US, I don't recommend using American-grown arborio rice. I've tried it, and it just does not give satisfactory results. If you use long grain rice, it may taste good, but it will not be risotto, which is characterized by the creamy texture that you can only get with the shorter grained variety.

And now I'll let you in a little secret: I'm usually too lazy to make risotto the traditional way, adding broth ladle by ladle and stirring all the time, for 20 minutes. In fact, you can make risotto in about 5-10 minutes using a pressure cooker--yes, that's right, a pressure cooker. You follow the basic recipe until it is time to add the broth. Instead of adding just a bit, add enough to cover the risotto by about 1 cm or so, bring to a full boil, stir well, then cover and bring up to pressure. Lower the heat and allow it to cook under pressure for about 5 minutes, then release the pressure. The broth should have been entirely absorbed, and the rice almost done. Continue with the dish, adding a bit more broth if the rice is still too al dente. If it's just right, then proceed to finish off the dish (mantecare). And another dirty little secret: although risotto will always taste better with homemade broth, if you are using a flavoring element, you can get away with using commercial bouillon. (Shhh....!)

Origins and Regional Variations. Risotto originated as a northern Italian peasant food. Italy is a major European rice producer, and most production is in the Po valley--which runs west to east from the Piemonte, through Lombardy (where Milan is) to the Veneto into the Adriatic Sea--with its center on the plains of Lombardy. (There is a great film of the neorealismo movement, by the way, called Riso Amaro, about the hard life of rice farmers.) It is in this band across the top of Italy that risotto got its start and where it is still most common today. Milan is perhaps the 'capital' of the risotto, where they make it creamy but fairly firm, while in Venice and the rest of the Veneto, they make risotti usually with seafood and almost runny--all'onda as they say, or 'like a wave', as it should flow into the plate as you serve it.

While risotto is associated with the north, one of the classic (and most elaborate) dishes of Neapolitan cuisine is sartu' di riso, a baked risotto timbale filled with little meatballs, chicken livers, sausage, peas and tomato sauce. And while Rome is not really risotto country, two wonderful risotti often appear on Roman menus: risotto alla crema di scampi, made with a puree of sauteed shrimp, and risotto nero, made with squid ink. (The latter is actually a Venetian dish, I believe.) Try both next time you're in Italy, you won't regret it!


Post scriptum:  Here's an excellent video lesson on the basics of making risotto. It's the best treatment of the subject I've seen on the web.